Introduction
Use this guide to revive your iPhone 8’s battery life and performance with a new battery. If your battery is swollen, take appropriate precautions.
This guide instructs you to completely detach the display assembly. This is intended to prevent accidental damage to the display cables. If you feel comfortable removing the battery without putting undue strain on the display cables, you can skip the steps for detaching the display.
While it’s possible to remove the adhesive strips securing the battery as soon as you open the phone, the written guide strongly recommends first removing the Taptic Engine. Pull-stretch adhesives are designed to be pulled at a shallow angle. Doing so reduces the risk of breaking the lower adhesive strips accidentally, either by snagging them on the Taptic Engine, or by pulling the strips at too sharp of an angle.
For optimal performance, after completing this guide, calibrate your newly installed battery: Charge it to 100% and keep charging it for at least two more hours. Then use your iPhone until it shuts off due to low battery. Finally, charge it uninterrupted to 100%.
What you need
Video Overview
-
-
Remove the two 3.5 mm pentalobe screws on the bottom edge of the iPhone.
-
-
-
Measure 3 mm from the tip and mark the opening pick with a permanent marker.
-
-
Tool used on this step:Clampy - Anti-Clamp$24.95
-
Pull the blue handle backwards to unlock the Anti-Clamp's arms.
-
Slide the arms over either the left or right edge of your iPhone.
-
Position the suction cups near the bottom edge of the iPhone just above the home button—one on the front, and one on the back.
-
Squeeze the cups together to apply suction to the desired area.
-
-
-
Heat an iOpener and thread it through the arms of the Anti-Clamp.
-
Fold the iOpener so it lays on the bottom edge of the iPhone.
-
Wait one minute to give the adhesive a chance to release and present an opening gap.
-
Insert an opening pick into the gap.
-
Skip the next three steps.
-
-
-
Heating the lower edge of the iPhone will help soften the adhesive securing the display, making it easier to open.
-
Use a hairdryer or prepare an iOpener and apply it to the lower edge of the phone for about 90 seconds in order to soften up the adhesive underneath.
-
-
-
Apply a suction cup to the lower half of the front panel, just above the home button.
-
-
-
Tool used on this step:Magnetic Project Mat$19.95
-
Remove four Phillips screws securing the lower display cable bracket to the logic board, of the following lengths:
-
Two 1.3 mm screws
-
Two 2.8 mm screws
-
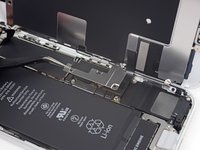
Remove the bracket.
-
-
-
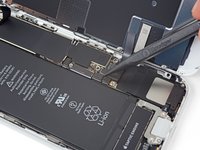
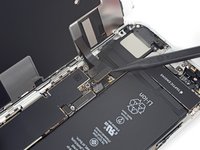
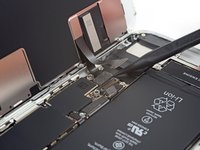
Use the point of a spudger to pry the lower display connector out of its socket.
-
-
-
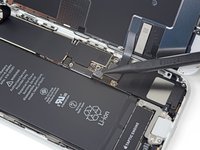
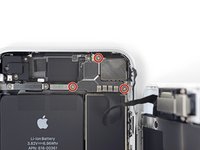
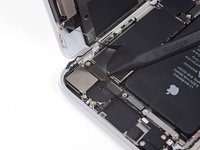
Remove the three screws securing the bracket next to the Taptic Engine:
-
One 1.3 mm Y000 screw
-
One 2.7 mm Phillips screw
-
One 2.9 mm Phillips screw
-
-
Tool used on this step:Standoff Screwdriver for iPhones$5.49
-
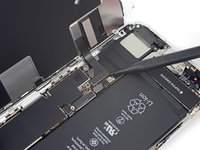
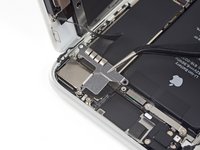
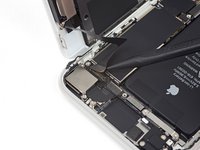
Remove the two screws securing the Taptic Engine:
-
One 2.1 mm Phillips screw
-
One 2.1 mm standoff screw
-
-
-
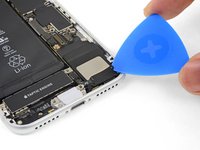
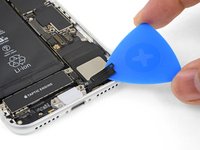
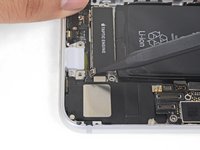
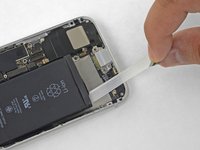
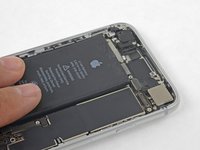
Each piece of adhesive has a black pull-tab at the end, which is lightly adhered to the front surface of the battery.
-
-
-
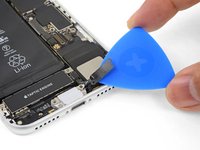
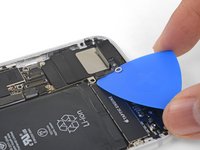
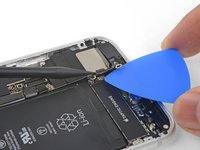
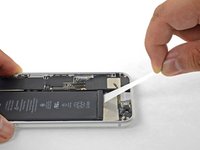
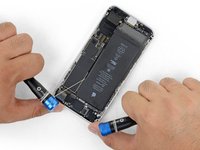
Slowly pull one battery adhesive tab away from the battery, towards the bottom of the iPhone.
-
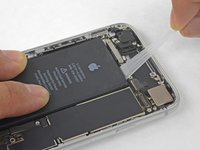
Pull steadily, maintaining constant tension on the strip until it slips out from between the battery and the rear case. For best results, pull the strip at as low an angle as possible, without snagging it on any of the iPhone's other components.
-
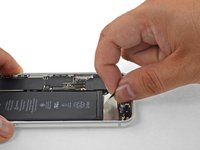
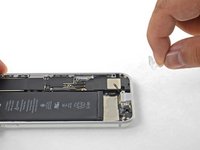
If the battery adhesive tabs break during the removal process, use your fingers or blunt tweezers to retrieve the remaining length of adhesive, and continue pulling.
-
-
-
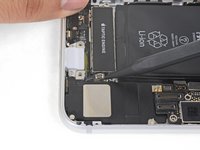
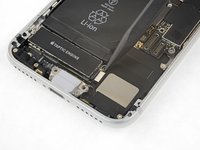
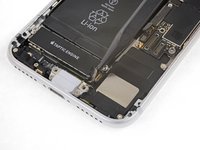
Remove the battery from the iPhone.
-
Adhere the battery, disconnect it, and continue reassembling your device.
-


To reassemble your device, follow these instructions in reverse order. Don't forget to reapply the display adhesive before reinstalling the display.
Take your e-waste to an R2 or e-Stewards certified recycler.
Repair didn’t go as planned? Check out our iPhone 8 Answers community for troubleshooting help.
Cancel: I did not complete this guide.
381 other people completed this guide.


68 Guide Comments
I still did it in 30 minutes….but I am glad I stop repairing phones around the Iphone 6s ! Now it takes serious effors just to replace the battery !
One note on this repair: When reinstalling the standoff that connects to the Taptic Engine, I found that the pointy tip of the spudger fits really well into the little hole at the top of the standoff, and helps with getting it into place and screwing it down if you don’t have a screwdriver bit for the standoff. Hope this is helpful!
Are steps 18 to 27 really required if you’re just replacing the battery?
Hi Daniel!
The pull-stretch adhesive holding the battery has a tendency to tear when they are pulled at a steep angle. When they tear, removing the battery becomes much more difficult. We strongly recommend removing the Taptic Engine in order to give the adhesive the best chance of coming out in one piece.
I tried doing it the ‘easy’ way without those steps. I wound up breaking the top adhesive tabs and it made it a lot harder to remove the battery and took a lot of extra time. If I had to do it again, I would do all the steps. Otherwise, things went very well. Very good instructions.