15% Off Selected iFixit Tools — Limited Time
Free Shipping on Domestic Orders $75+
The Basics
- Check your system for any available updates. Ensuring your system is updated ensures that your console receives essential bug fixes and system improvements to prevent your system from overheating.
- Ensure Ventilation isn't Obstructed: Ensure the Xbox One has proper ventilation. Make sure no objects obstruct the vents on the console. Place the console in an open space to allow for adequate airflow. Ensure your system has a minimum of 4-6 inches of clearance.
- Clean Ventilation: Dust buildup can impede airflow and contribute to overheating. Gently clean the vents and fans using compressed air. Be careful not to damage any internal components.
- Keep your Xbox away from any heat sources. For your Xbox to cool, it must be in a space where the ambient air temperature won't change drastically. The ideal room temperature for your Xbox should be around +5ºC (+41ºF) to +35ºC (+95ºF).
Causes
If you have multiple applications or games running simultaneously, then this could cause your Xbox to use more resources, resulting in your system running hotter than usual.
- Close any applications or games in Snap Mode. Closing any applications or games in Snap Mode reduces strain on the system and should reduce the amount of heat generated by the system.
- You can also power off your system entirely to shut down any potentially problematic applications causing the issue.
- Check your power consumption settings. Sometimes, the issue could be caused by how your energy settings are configured on your console. Try switching to energy-saving power mode and see if your Xbox continues overheating.
Low-quality or third-party accessories may not deliver the proper power or cooling required for optimal performance. For example, some third-party Xbox cooling fans can sometimes make the Xbox overheat because they divert the airflow to the wrong location.
- Remove any connected accessories. This includes things like external fans, hard drives, and charging accessories. Check your Xbox and see if the issue persists.
- Test your accessories to see if the issue has been resolved. If your console is no longer overheating, try plugging in your accessories one at a time to see if the issue happens with one particular accessory. If this is the case, consider looking at iFixit's extensive section on Xbox Accessories.
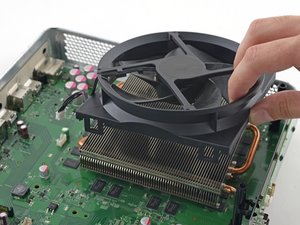
While your vents may be clean and free of dust, you could have an issue with dust and debris having built up in your Xbox's internal components. In addition to the steps detailed below, consider checking out the 'Xbox One Fan Replacement' iFixit guide to learn how to get to the cooling fan.
- Please turn off the console and unplug it from the power source.
- Use compressed air or a soft brush to gently clean the vents and fan.
- Be sure that the fan is clean and is spinning freely.

- 40 minutes - 1 hourModerate
If you frequently use their console, the issue may be caused by an overused system. Cooling periods should be taken to allow the console to cool down before further use.
- If you've been gaming for an extended period, consider taking breaks to allow the console to cool down.
- Please turn off the console during breaks to let it cool more efficiently. Ideally, you would want to wait an hour for your console to cool down.
If you are still finding that your console is experiencing issues, consider opening your Xbox One to see if there is any potential damage internally.
- Check the console's fan for any damage or warping. Ensure your Xbox's cooling fan is spinning correctly in its housing, is connected, and receives power from the center chassis. If needed, replace the malfunctioning fan with a new one.
- Look at your Xbox's Heatsink for dust build-up. Make sure that the Heatsink's fins are clean and free of debris.
- Replace the thermal compound underneath the Heatsink. Most thermal compounds become less effective over time, mainly when used in a system with heavy use. Consider changing out your thermal compound if you have had your system for an extended period.
- Perform a thorough visual inspection of the console's boards for any signs of burns or damaged components. If you observe any visible damage, such as burns or components that appear to be physically damaged, the affected board likely needs to be replaced. Unfortunately, you will need to replace both the Motherboard and the Disk Drive, as the two are paired components.
- 40 minutes - 1 hourModerate

- 30 minutes - 1 hourModerate

$29.99
5
1 reviews

$24.95
4.9
70 reviews

Related Problems


10 common problems
View allDescribe your problem in your own words