Free Shipping on Domestic Orders $75+
Troubleshooting Essentials

$14.99
4.9
80 reviews
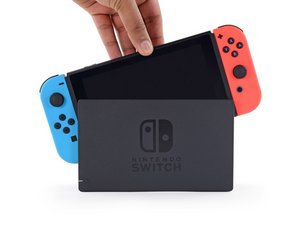
Introduction
You've had a hard day, and plop down on your couch to unwind with your favorite Nintendo title. You reach for your controller, but instead of getting the expected illumination of your screen, you get nothing. Just black. You mash all the buttons to no avail, ready to admit defeat. Don't let your Switch get the best of you. Keep reading, get yourself fixed up, and back to slaying bosses.
The Basics
Before undertaking any of the more time-consuming solutions below, here are a few fundamentals to get you started.
- Use the Power button on the console itself rather than an attached controller. This bypasses a potential connectivity issue with the Joy-Cons.
- Try a different charger or dock, if available. An authentic Nintendo charger is best. The Switch is notoriously fussy about the types of chargers it works with.
- Additionally, verify the outlet you're using is providing power and that the charger is outputting power. Try charging another USB-C device to make sure everything is working.

- Unplug your charger from the wall and your Switch. Wait 30 seconds before reconnecting to cycle all the power out of the adapter.
- Perform a hard power reset. Press and hold the power button on the console for 20 seconds. Then press again to initiate a power-up sequence.
- Connect to the dock to check for video to an external display. If you get video output, you are more likely to need a new screen.
Causes
The Nintendo Switch is especially prone to battery issues as a result of its duality as a console and a handheld. Extended use in docked mode, or playing and charging at the same time can shorten your battery's longevity.
- A faulty battery may manifest as a non-responsive unit, or one which only gives the battery charging logo on screen, but never powers on.
- Check for any signs of battery swelling. Separation of the enclosure, localized discoloration of the screen, or unexplained bowing of the housing are indications the battery may be swollen.
- Replacing the battery is a good first step if you've ruled out power supply issues and a hard power reset didn't work.

- 45 minutes - 2 hoursModerate

- 1 - 2 hoursModerate

- 45 minutes - 1 hourModerate

$39.99
4.7
529 reviews

$29.99
4.7
39 reviews
All modern consoles also have the ability to power on from the controllers, instead of just a switch on the console itself. This means it’s easy to confuse controller communication issues with power-related ones.
- If you are successful in turning the Switch on using the console's Power button, but not from the Joy-Con or Pro Controller, this is likely a controller issue.
- Connect your controller to power or dock it to your Switch. Make sure it is charging, and that appropriate LEDs are showing. See if it is communicating with the Switch.
- If the power issue continues after ensuring the controllers are powering successfully and other functions are working properly, this may be an issue with the controller’s home button. See the Joy-Con and Switch Pro Controller pages for instructions on replacing controller components.
- If you are having general connectivity issues, hop over to the Answers forum for more individualized troubleshooting from our community!
Since the Switch is not wireless charge capable, all power and charge functions go through the USB C port on the bottom of the unit. Wear on this port is common and the inability to charge properly would certainly affect power-on capabilities.
- Check to see if the USB C port is clean. Does a charger sit flush against the bottom edge? If it sits at an angle or has a loose fit, the port itself may be clogged. Use a flashlight to inspect.
- Removing debris from a USB C port can be a bit tricky due to its narrow gaps. Use an air duster and a toothpick shaved to fit to avoid damaging the port. Other non-conductive tools can be used in place of a toothpick, but avoid inserting anything metal into the port.
- Open the Switch and inspect for internal damage to the port, make sure it is attached soundly to the board, and free from burn or corrosion.
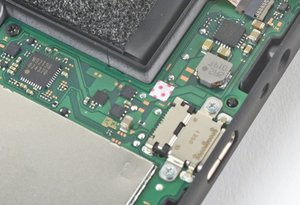
- There is also a liquid damage indicator close to the port on the motherboard. This sticker turns solid red when it touches liquids.
- If you suspect your Switch may have water damage, you can use this motherboard replacement guide to get you inside to take a look. If the damage indicator shows up red, at least you're already halfway to completing the repair.
- Checking charge functionality with a USB multimeter can give some useful data. A Switch will normally charge at 15 Volts and about 1.2 Amps. Depending on your power source, you may be able to get away with a standard USB multimeter. Otherwise, you'll need to source a USB-C type meter. Incorrect voltage, low charging current, or no power through this meter can indicate a port issue.
- Sadly, if you determine your port is the issue, it is not part of a modular replacement component. The port is soldered onto the board itself. If you do not have experience in microsoldering, ask around and see if any local repair shops offer this service. Otherwise, you will need to replace the entire board with a new one.

- 1 - 2 hoursModerate

$5.99
4.9
339 reviews

$14.95
4.8
336 reviews

$9.99
4.8
67 reviews

Find compatible replacement parts for your Nintendo Switch Family. All parts and fix kits are backed by the iFixit Quality Guarantee.
It stands to reason if your power button is not working properly, that the device may not power on when you press it. Otherwise, how will your Switch know you're ready to slay in some Super Smash Brothers?
- This is especially likely if turning on from a controller is successful.
- Check the button's "action" or ability to be depressed. If it doesn't feel like it's moving when you press it, the mechanism may need to be cleaned. Debris can get into gaps in the housing, gumming things up.
- It is a bit of a laborious process to get at these actual buttons, but some attention with some isopropyl alcohol and a cotton swab may get you back in play.
- Use a toothpick if you need to get into any crevices.
- While you're cleaning the debris out, make sure there are no tears, hard creases, or other damage to the button which may be interrupting electrical signals. Replace the button cable if necessary.

- 30 minutes - 2 hoursModerate

$8.99
5
8 reviews
The motherboard is the hub for the vast majority of console functionality. Any number of the tiny board components may have failed or become damaged. It's safe to assume a motherboard fault is your cause if nothing else on this page has worked.
- Check for obvious signs of a board issue - burned or cracked components, liquid residue, corrosion, or bend. If there are signs of liquid the iPhone Liquid Damage Guide might help (this method applies to most circuit boards, not just iPhones).
- You can use this motherboard replacement guide to help get inside the device.
- Replacing the board with a new one is often the most practical solution for a DIYer in this position. If you see signs of liquid damage, this may be your best course of action.
- Contrary to popular belief, the board itself can be repaired. It requires specialized tools and microsoldering know-how. This is not something most people can do themselves, but many independent repair shops can do it for you! Give your local electronics repair shop a call and chat about how they can help.

- 1 hourModerate
- 1 - 2 hoursModerate
Find compatible replacement parts for your Nintendo Switch Family. All parts and fix kits are backed by the iFixit Quality Guarantee.
About the Author
I played my first video game on PC at the age of six. I was begging my dad to teach me DOS commands to run Jill of the Jungle inside of a week. Not only did games make me fluent enough in DOS as a child, they stuck with me my whole life. Although I failed to fix my GameBoy color that died spontaneously. I have never let another console get the better of me. I was the one who opened the Playstation 2 when the disc tray got stuck. I put an SSD in my Xbox One just because Minecraft took too long to load. I have replaced more charge ports on handheld game consoles than I have fingers and toes to count (friends don’t let their friends' kids charge their Switch with an iPhone charger… more than once).
You're seeing solutions for Nintendo Switch. Select your model to find parts for your device.
Related Problems


8 common problems
View allDescribe your problem in your own words