Introduction
Use this guide to repair your iPhone after accidental exposure to water or other liquids. Liquid damage tends to worsen with time, so it's best to get started as soon as possible. That said, liquid damage is among the more challenging DIY repairs to undertake, so if you feel unsure or need access to important data on your phone, you may want to consult with a professional before breaking out your tools.
Throughout this guide, refer to the iPhone repair guides specific to your model for detailed disassembly instructions.
This guide was developed for iPhones, but the procedure for any other smartphone should be very similar.
In addition to isopropyl alcohol, you will need a container big enough to submerge your iPhone's logic board.
Isopropyl alcohol is highly flammable. Perform this procedure in a well-ventilated area. Do not smoke or work near an open flame during this procedure.
This guide covers the basics of liquid damage repair. For a discussion of more advanced repairs, check out this video. If you'd like to see another guide that disassembles a corroded phone, check out this guide.
What you need
-
-
-
Remove your iPhone from the liquid as soon as safely possible. Minimize the length of time the iPhone and liquid are in contact to minimize corrosion.
-
If your phone is still on when removed from the liquid, attempt to turn it off. If it's off, do not attempt to turn it on.
 Ask FixBot
-
-
-
Hold the phone upright and gently tilt it from side to side to drain as much liquid through the bottom as possible.
-
Use a cloth to dry any liquid on the outside of the phone.
-
-
-
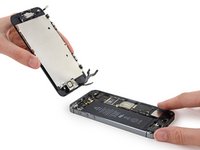
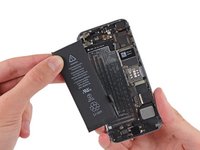
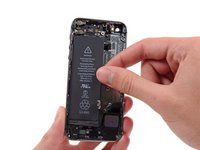
Remove the display and battery, using the repair guide appropriate to your model of iPhone.
-
-
-
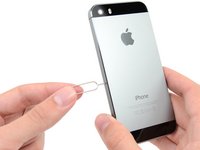
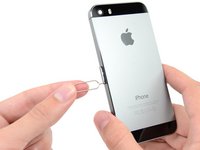
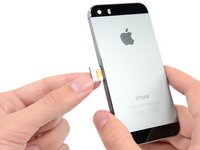
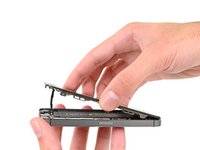
Remove the SIM card tray:
-
Insert a SIM card eject tool or a paperclip into the small hole in the SIM card tray.
-
Push to eject the tray, then remove it from the phone.
-
-
-
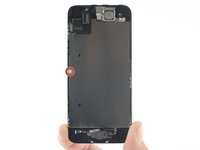
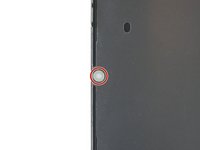
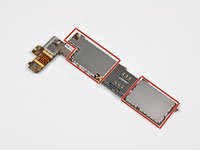
Check if any of the LCIs have turned red for evidence of local liquid intrusion.
-
-
-
-
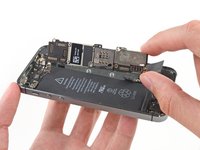
Inspect the logic board and any connectors for signs of corrosion, especially in areas where the LCIs are red.
-
Check any external ports (charging port, headphone jack, SIM card slot, etc.) for corrosion as well. These may have to be cleaned out with alcohol and a brush, or replaced if cleaning is not practical.
-
If all LCIs are white, and there is no moisture or corrosion, leave the phone disassembled in a warm, dry place for a day or two to make sure any potentially trapped liquid evaporates, then reassemble the phone.
-
If any LCIs are red, if there is corrosion or other liquid residue, if the phone fell into dirty/acidic/sticky liquid, or if you just want to be safe, continue for more thorough cleaning.
-
-
Tool used on this step:Tweezers$4.99
-
-
Fill your container with high concentration isopropyl alcohol (90% or greater) and submerge the logic board and any other components that show signs of corrosion, debris, or other liquid damage.
-
Allow everything to soak for 5-10 minutes, or long enough to loosen hardened residue. Swish the parts around a little as well, to displace any trapped liquid.
-
-
Tool used on this step:Detailing Brush$2.99
-
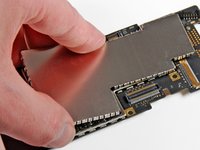
Use a soft brush (like a toothbrush or detailing brush) to gently scrub away any corrosion and liquid residue on the logic board and other components.
-
Keep the logic board and any other alcohol-covered components over a cloth. There's a chance the alcohol can damage or mark your work surface.
-
If needed, repeat steps 8 and 9 until all corrosion and residue is gone.
-
-
-
Moisten a cloth with isopropyl alcohol and wipe off the screen.
-
Unfortunately, there isn't much you can do to repair liquid damage inside the display itself. If damage to the display is significant, use the repair guide appropriate to your phone to replace the display.
-
If there is any residue or corrosion on the case assembly, use the damp cloth to wipe that off as well.
-
-
-
If you were unable to remove all the EMI shields, use compressed air or a blow-dryer on its cold setting to blow underneath the shields and dry out any trapped alcohol.
-
When all components look clean and dry, reapply any EMI shields that you removed and begin to reassemble the phone with a new battery, and a new display if necessary.
-
Do not completely assemble the phone yet. Make sure internal components are screwed down and everything is plugged in, including the battery and display cables, but do not apply adhesive, screw down cover plates, replace external screws, or seat the display.
-
-
-
Turn on your phone and watch for any smoke, strange noises, or burning smells. Check the battery and look for any swelling.
-
Test all the buttons and features (such as the microphone, speakers, wireless connectivity, camera, etc.).
-
Note any component or feature that doesn’t seem to be working. If anything isn’t working, disassemble the phone and check for obvious problems, such as a broken logic board component or corrosion on the cable contacts—or even an error in reassembly.
-
-
-
If there are any clearly damaged components, see our other iPhone guides for instructions on replacing specific components.
-
If the problem seems to stem from a single board component or chip, a skilled microsoldering technician may be able to repair the damage.
-
If you can't find the source of the problem, it's possible that components under the EMI shields have been damaged. Contact a repair professional to de-solder the shields and give the board an ultrasonic cleaning bath.
-
If everything is working, congratulations! Go ahead and reassemble your phone.
-
-


Browse or post a question to our Answers Forum if you have any questions!
Cancel: I did not complete this guide.
100 other people completed this guide.

13 Guide Comments
If there are any more detailed results about “Do not submerge the display or camera modules, even if they are damaged. Submerging them in alcohol will likely damage them further. “ that would be interesting. What type of damage occurs on those components? Are those problems caused by the water or the isopropyl alcohol?
This might be useful for other type of repairs, e.g. LCD video projectors. It is a common problem that the prism block (with the LCD panels) will be stained with dust and nicotine (tar?). I know no official way to clean such a prism unit and replacement is far too expensive…
For this reason came up with the idea to use isopropyl and an Ultrasonic Jewelry Cleaner. Never realized this idea, as I did not found any hints if this really promises to be a solution.
My iPhone 7+ got wet a little I took the phone and carried it on dry land at that time you could've seen the water inside of the screen I was using the phone whiles being wet so I turned the phone off & turned it back on and apparently the water spread oh and by the way I've change my screen before so a few minutes after the screen just went black the phone was still on because I heard the notifications sound I ran it upside and my mom puts it in from of the ac lol the phone turned of completely and I've tried turning it on the next day we went to Walmart and the guy told me to put it in rice I put the phone inside of the rice and I let it sit there for 48hours I took it out and the phone still haven't came on a few days after I Carried it to a shop named you break i fix the guy opened my device and told me there is no damage only thing needs to be done is that I needs to take apart the phone and wipe down the parts with alcohol I haven't done that as yet but before I does it will that turn my phone on ?
This is one (1) sentence with 221 words. You do not really expect anyone to read and try to understand this?
Did you really counted the words??? Who would count the words man?