Introduction
They say that good things come in threes. Seems like Apple has really taken that adage to heart with an unusual release of three new phones this season.
We already showed you what's inside the iPhone 8—but what about the 8 Plus? Is wireless charging wrapped in pretty pink glass enough to distinguish the iPhone 8 Plus in the lineup? Or are two large glass panels just tempting fate? We're here at Circuitwise headquarters in Sydney, Australia, to find out. Join us as we tear down the iPhone 8 Plus.
We've got three more good things for you— Facebook, Twitter, and Instagram to keep you up-to-date on all things repair!
What you need
Video Overview
-
-
The 8 Plus adds some bonus screen, and some bonus features. Let's take a look:
-
Apple A11 Bionic processor with embedded M11 motion coprocessor
-
64 or 256 GB onboard storage capacity
-
5.5-inch multitouch IPS Retina HD display with 1920 × 1080 pixels (401 ppi)
-
Dual 12 MP wide-angle and telephoto cameras with ƒ/1.8 and ƒ/2.8 apertures (respectively), optical zoom, and 10x digital zoom
-
7 MP FaceTime HD camera with ƒ/2.2 aperture and 1080p HD recording capability
-
Supports fast-charge and Qi wireless charging
-
802.11a/b/g/n/ac Wi‑Fi + MIMO Bluetooth 5.0 + NFC
-
-
-
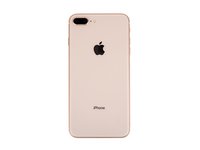
From the front, we have... an iPhone. Except for the new color, the 8 Plus looks about the same as a 6 Plus from 2014.
-
Flip it over and one new feature really shines. That glossy glass back serves two purposes: wireless charging, and doubled crackability—the likes of which iPhones haven't seen since the 4s.
-
Of course, Samsung's flagship phones adopted the glass sandwich design starting with the S6, and it comes with similar trade-offs.
-
In a great victory for Apple Chief Design Officers everywhere, the model number has been erased from the back panel. Fumbling for the box, we see that our 8 Plus is A1864 (an iPhone 8 plus one).
-
-
-
We can't wait to get a peek inside ... and we don't have to, thanks to Creative Electron and their
magicX-ray technology. -
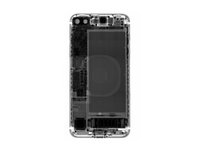
After taking the 8 Plus for a spin in the X-ray machine, we see a dizzying spiral—the charging coil—on the back of the phone. More on that later...
-
Just like in the iPhone 8, there's no sign of an Apple logo, which was prominent in prior models like the iPhone 7 Plus.
-
It's not all apples and oranges compared with the previous generation—we reckon that is the same Taptic Engine of yore.
-
-
Tool used on this step:iOpener$24.99
-
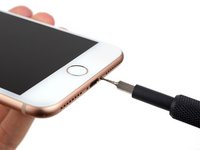
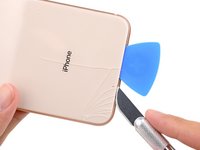
Pentalobe-puller in hand, we find our familiar nemesis—and it's wearing some kind of gasket, for ingress-proofing, we presume.
-
This new iPhone is a little nervous for its big debut, so we called in our iOpener to apply some heat and help it relax ... its adhesive.
-
A little coaxing and we get this iPhone to open up. Now, if it will just spill its guts ...
-
-
Tool used on this step:Spudger$2.99
-
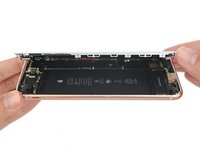
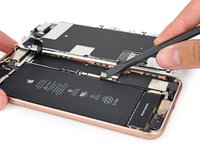
The battery connector is no match against our trusty spudger. Just like we saw in the iPhone 8, Apple ditched the tricky tri-points we're accustomed to seeing on this bracket and replaced them with Phillips #000 screws.
-
Also mirroring the iPhone 8, we find four battery tabs, where in prior years there were but two.
-
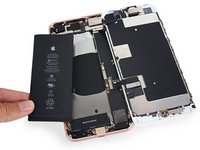
Taking a closer look at the battery, we find a 3.82 V, 2691 mAh cell providing 10.28 Wh of power.
-
The 8 Plus packs less of a punch than its predecessor—the iPhone 7 Plus boasted a 3.82 V, 2900 mAh cell coming in at 11.1 Wh.
-
It's also a lightweight stacked up against the Galaxy Note8, which sports 12.71 Wh (3300 mAh at 3.85 V) of power.
-
Lest you worry about the hard hit to the battery spec, Apple promises the battery life will remain a contender with last year's model.
-
-
-
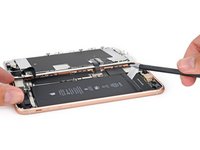
Just a few turns from our Phillips and tri-point drivers and the display is free ... to hit the bench. For the full scoop on the display, check out our iPhone 8 Teardown.
-
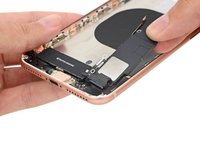
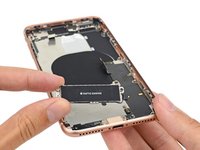
We successfully yanked 3 out of 4 adhesive tabs when removing the battery—leaving one stubbornly in place. Looks like Apple's decision to switch to four tabs from two was to avoid a sticky situation on that fancy new wireless charging coil.
-
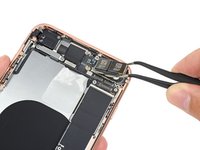
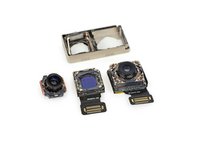
Speeding right along, we pull out that factory-calibrated-for-AR dual camera unit.
-
These 12 MP cameras are solidly fixed together, enabling software used for portrait mode to combine images from both lenses.
-
-
-
-
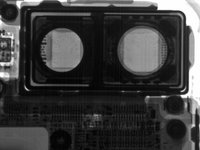
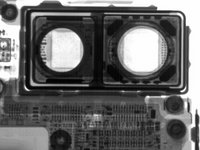
We take our camera staring contest to the next level—with X-rays!
-
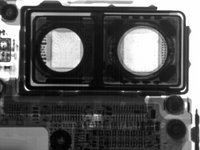
By adjusting the exposure on our scope, a few different details come into view.
-
The first image shows ribbon cable traces under the camera image sensors.
-
The last image shows magnets used for OIS on only one of the dual cameras.
-
-
Tool used on this step:Standoff Screwdriver for iPhones$5.49
-
We're serving up the silicon next! Logic board, we are coming for you.
-
There is some nervous anticipation as we approach a logic board on a new midframe assembly ...
-
... But we are stoked to find that the logic board is secured using the same standoff screws and Phillips screws seen in other iPhones.
-
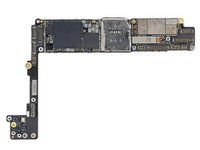
We quickly remove and
decapde-sticker the logic board for the IC-ing on the cake.
-
-
-
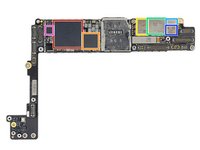
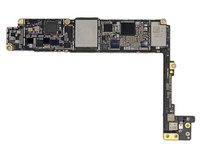
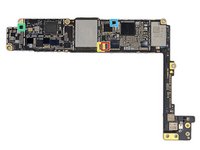
Let's take a look at what the iPhone 8 Plus has under the hood:
-
Apple 339S00439 A11 Bionic SoC layered over Samsung 3 GB LPDDR4 RAM
-
Qualcomm MDM9655 Snapdragon X16 LTE modem
-
Skyworks SkyOne SKY78140
-
Avago 8072JD112
-
P215 730N71T - likely an envelope tracking IC
-
Skyworks SKY77366-17 quad-band GSM power amplifier module
-
NXP Semiconductor 80V18 (PN80V) secure NFC module
-
-
-
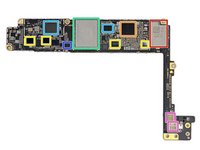
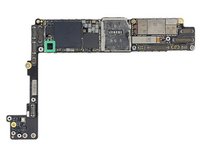
And on the flip side, we find:
-
Murata 339S00399 WiFi/Bluetooth module
-
Apple 338S00309 power management
-
Cirrus Logic 338S00248 audio codec and 338S00286 audio amplifier
-
SanDisk SDMPEGF12 064G 64 GB NAND flash storage
-
Qualcomm WTR5975 Gigabit LTE RF transceiver and PMD9655 PMIC
-
NXP CBTL1612A1—Likely an iteration of the 1610 tristar IC
-
Skyworks 3760 3759 1727 RF switch and SKY762-21 207839 1731 RF switch
-
-
-
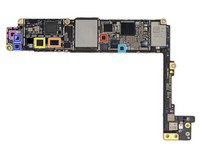
IC Identification, pt. 2:
-
Cypress Semiconductor CYPD2104C USB type-C port controller
-
Broadcom BCM59355 wireless charging controller
-
Texas Instruments SN2501 li-ion battery charger
-
Apple/Dialog Semiconductor 338S00306 power management
-
Texas Instruments SN61280E battery boost converter
-
Texas Instruments LM3539 LED driver
-
Texas Instruments TPS65730 ? display power management (likely)
-
-
-
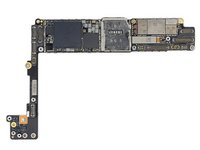
IC Identification, pt. 3:
-
Bosch Sensortec accelerometer/gyroscope
-
Bosch Sensortec BMPxxx ? pressure sensor
-
Nexperia (formerly NXP Semiconductor) 74LVC1G3157-Q100 2-ch. analog multiplexer/demultiplexer
-
Texas Instruments DRV8833 H-bridge motor driver (likely)
-
SiTime SiTxxxx MEMS oscillator
-
-
-
With the logic board out, we can remove some of the peripheral components. We go into sensory overload as we pop out a speaker, tap our Taptic Engine, and blow through the barometric vent.
-
Do you remember when you could swap your speaker without first removing the logic board? iFixit remembers.
-
How about when you could remove the Taptic Engine without first removing the speaker? Yeah, we remember that too.
-
What's this little bit of plastic? Oh right, we answered that last year when we were first acquainted with this style of barometric vent.
-
-
-
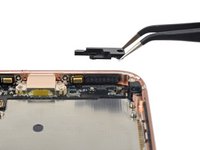
We remove the Lightning port cable and take a quick moment to examine this notable update.
-
Our suspicions here are the same as they were in the iPhone 8: the new design could be meant to dissipate heat quickly for fast charging, but at the very least it seems color-coded to match the body of the phone and Apple's proprietary mystery glass.
-
Emphasis was placed not only on the color of the glass, achieved through a seven-layer color process, but on the material itself, reinforced with an “internal, laser welded, steel and copper structure." What this actually is and what it means for performance, rigidity, and Apple's future aims at metallic glass remains to be seen. For now, we know that Apple likes Pantone colors.
-
-
-
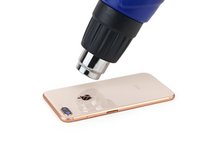
After painstakingly removing the rear panel from the iPhone 8 intact, we decide to go hard on the heat, just in case that's the secret sauce.
-
Spoiler alert: it isn't. It looks like Apple's adhesive of choice is pretty impervious to heat. If anything, it softens the metal frame a bit, but it doesn't seem to do much to the glue.
-
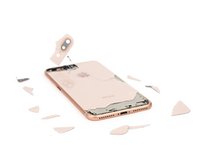
This time, we totally broke the panel on purpose, to try out a more realistic situation of removing a broken panel. The verdict: don't drop this phone. Removing a broken panel is much more difficult than getting it out in one piece.
-
-
-
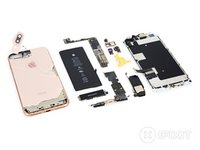
Another tough teardown under our belts, we gaze upon the fruits of our labor, and give thanks...
-
Thanks once again to Circuitwise for letting us camp at your place.
-
And thanks to Creative Electron for the inside scoop with their wicked cool X-ray machine.
-
- The display and battery are straightforward to access—with the proper knowledge and tools.
- Wireless charging means less wear on the all-purpose Lightning port, a common point of failure.
- Water and dust seals complicate repair, but make the need for difficult liquid damage repairs less likely.
- The battery connector still uses common Phillips/JIS fasteners—but you’ll still need up to four different drivers for many repairs.
- Despite alleged durability, the back glass is breakable and next to impossible to replace when cracked.
- The iPhone’s lower components, once readily removed, now lie trapped under a fussy combination of brackets and delicately folded flex cables.


Final Thoughts
Repairability Score


(10 is easiest to repair)

50 Guide Comments
Broke the back glass on purpose? Yeah, that’s the ticket. I meant to do that! LOL
Am I to believe that Apple is actually using the superior LPDDR4x RAM in the Plus model over the less efficient LPDDR4 RAM found in the standard 4.7in model? Or was that a typo?
It should be LPDDR4x.
JJ Wu -
u guys samashed that connector on step 9 didnt u?
Yep! This wouldn’t happen during the course of a normal repair, but to show the chips you first have to remove the soldered-down EMI caps. You can painstakingly desolder them intact, but for a teardown-on-the-go like this we usually just trim off using faster means.