
How to replace your iPhone 5 battery

What you need

Video Overview

  1. How to replace your iPhone 5 battery, Taping the display glass: step 1, image 1 of 3 How to replace your iPhone 5 battery, Taping the display glass: step 1, image 2 of 3 How to replace your iPhone 5 battery, Taping the display glass: step 1, image 3 of 3
    • If your display glass is cracked, keep further breakage contained and prevent bodily harm during your repair by taping the glass.

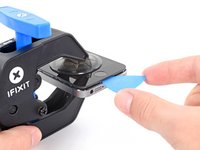
    • Lay overlapping strips of clear packing tape over the iPhone's display until the whole face is covered.

    • Wear safety glasses to protect your eyes from any glass shaken free during the repair.

  2. How to replace your iPhone 5 battery, Remove the Pentalobe screws: step 2, image 1 of 1
    • Before you proceed, discharge your iPhone battery below 25%. A charged lithium-ion battery can catch fire and/or explode if accidentally punctured.

    • Power off your iPhone before beginning disassembly.

    • Remove the two 3.6 mm Pentalobe screws next to the Lightning connector.

  3. How to replace your iPhone 5 battery, How to prevent display separation: step 3, image 1 of 3 How to replace your iPhone 5 battery, How to prevent display separation: step 3, image 2 of 3 How to replace your iPhone 5 battery, How to prevent display separation: step 3, image 3 of 3
    • In the following steps you will be pulling the display up out of the phone body. The display is composed of a glass screen and a plastic bezel with metal clips.

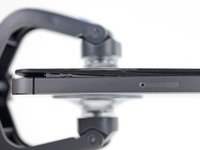
    • Regardless of the tool you use, you need to be sure you pull up the entire display.

    • If the glass begins to separate from the plastic, as shown in the first image, slide a plastic opening tool between the plastic frame and the metal phone body to pry the metal clips out of the case.

    • If you are reassembling a phone with a separated display bezel, you may want to place a thin strip of adhesive between the plastic bezel and the glass to keep the phone closed.

  4. How to replace your iPhone 5 battery, Anti-Clamp instructions: step 4, image 1 of 3 How to replace your iPhone 5 battery, Anti-Clamp instructions: step 4, image 2 of 3 How to replace your iPhone 5 battery, Anti-Clamp instructions: step 4, image 3 of 3
    Tool used on this step:
    Anti-Clamp
    $24.95
    Buy
    • The next two steps demonstrate the Anti-Clamp, a tool we designed to make the opening procedure easier. If you aren't using the Anti-Clamp, skip down two steps for an alternate method.

    • For complete instructions on how to use the Anti-Clamp, check out this guide.

    • Pull the blue handle backwards to unlock the Anti-Clamp's arms.

    • Slide the arms over either the left or right edge of your iPhone.

    • Position the suction cups near the bottom edge of the iPhone just above the home button—one on the front, and one on the back.

    • Squeeze the cups together to apply suction to the desired area.

    • If you find that the surface of your iPhone is too slippery for the Anti-Clamp to hold onto, you can use tape to create a grippier surface.

  5. How to replace your iPhone 5 battery: step 5, image 1 of 3 How to replace your iPhone 5 battery: step 5, image 2 of 3 How to replace your iPhone 5 battery: step 5, image 3 of 3
    • Pull the blue handle forwards to lock the arms.

    • Turn the handle clockwise 360 degrees or until the cups start to stretch.

    • Make sure the suction cups remain aligned with each other. If they begin to slip out of alignment, loosen the suction cups slightly and realign the arms.

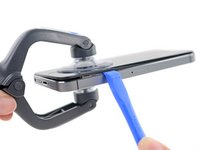
    • Insert an opening pick under the screen when the Anti-Clamp creates a large enough gap.

    • If the Anti-Clamp doesn't create a sufficient gap, apply more heat to the area and rotate the handle a quarter turn.

    • Don't crank more than a quarter turn at a time, and wait one minute between turns. Let the Anti-Clamp and time do the work for you.

    • Skip the next two steps.

  6. How to replace your iPhone 5 battery, Manual Opening Procedure: step 6, image 1 of 1
    • Press a suction cup onto the screen, just above the home button.

    • Be sure the cup is completely on the screen to get a tight seal.

    • If you're opening an iPhone with cracked glass, neatly lay a couple strips of packing tape across the front and squeeze out as many bubbles as you can. This will give the suction cup a surface to grab, and minimize the spread of broken glass.

  7. How to replace your iPhone 5 battery, Start lifting the front panel assembly: step 7, image 1 of 1
    • Make sure the suction cup is firmly attached to the front panel assembly.

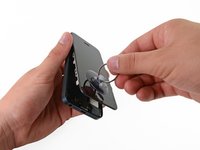
    • While holding the iPhone down with one hand, pull up on the suction cup to slightly separate the front panel assembly from the rear case.

    • Take your time and apply firm, constant force. The screen is a much tighter fit than most devices.

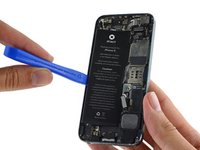
    • With a plastic opening tool, begin to gently pry the rear case down, away from the screen, while you pull up with the suction cup.

    • There are several clips attaching the front panel assembly to the rear case, so you may need to use a combination of the suction cup and plastic opening tool to free the front panel assembly.

  8. How to replace your iPhone 5 battery, Detaching the front panel side clips: step 8, image 1 of 1
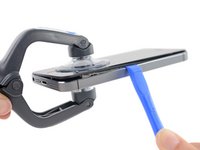
    • Continue to pry up around the sides of the front panel assembly, detaching the clips along the left and right side.

  9. How to replace your iPhone 5 battery, Opening up the phone: step 9, image 1 of 3 How to replace your iPhone 5 battery, Opening up the phone: step 9, image 2 of 3 How to replace your iPhone 5 battery, Opening up the phone: step 9, image 3 of 3
    • Do not try to completely remove the front panel assembly from the rear case, as there are several ribbon cables still attached at the top of the iPhone.

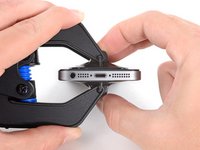
    • Once the clips have been released on the bottom and sides of the front panel assembly, pull the bottom of the assembly away from the rear case.

    • Open the display to about a 90º angle, and lean it against something to keep it propped up while you're working on the phone.

    • Add a rubber band to keep the display securely in place while you work. This prevents undue strain on the display cables.

  10. How to replace your iPhone 5 battery, Removing the battery connector bracket screws: step 10, image 1 of 1
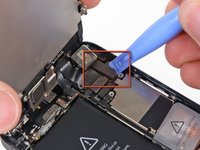
    • Remove the following two screws securing the metal battery connector bracket to the logic board:

    • One 1.8 mm Phillips screw

    • One 1.6 mm Phillips screw

  11. How to replace your iPhone 5 battery, Removing the battery connector bracket: step 11, image 1 of 1
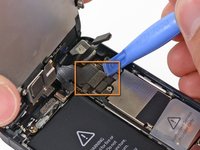
    • Remove the metal battery connector bracket from the iPhone.

  12. How to replace your iPhone 5 battery, Disconnecting the battery connector: step 12, image 1 of 1
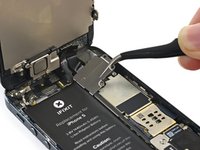
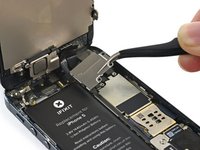
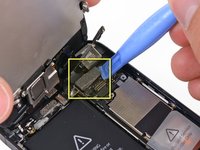
    • Use a plastic opening tool to gently pry the battery connector up from its socket on the logic board.

    • Be careful not to dislodge the small surface-mounted components surrounding the socket.

    • Be very careful to only pry up on the battery connector itself and not the socket on the logic board. If you pry up on the logic board socket or the board itself, you may destroy the socket or damage nearby components on the board.

  13. How to replace your iPhone 5 battery, Removing the front panel assembly cable bracket screws: step 13, image 1 of 1
    • Remove the following screws securing the front panel assembly cable bracket to the logic board:

    • Two 1.2 mm Phillips screws

    • One 1.6 mm Phillips screw

    • This screw tends to not be attracted to a magnetized screwdriver. Take care not to lose it when removing, and make sure it gets back into the right place—a magnetized screw may interfere with the compass.

  14. How to replace your iPhone 5 battery, Removing the front panel assembly cable bracket: step 14, image 1 of 2 How to replace your iPhone 5 battery, Removing the front panel assembly cable bracket: step 14, image 2 of 2
    • Lift the display cable bracket toward the battery to unhook it, and remove it from the iPhone.

    • During reassembly, clip the left-hand hooks under the logic board and lower the bracket towards the outside of the phone.

  15. How to replace your iPhone 5 battery, Disconnecting the front panel assembly cables: step 15, image 1 of 3 How to replace your iPhone 5 battery, Disconnecting the front panel assembly cables: step 15, image 2 of 3 How to replace your iPhone 5 battery, Disconnecting the front panel assembly cables: step 15, image 3 of 3
    • Make sure the battery is disconnected before you disconnect or reconnect the cables in this step.

    • Use a plastic opening tool or a fingernail to disconnect the three front panel assembly cables:

    • Front-facing camera and sensor cable

    • LCD cable

    • Digitizer cable

    • When reassembling your phone, the LCD cable may pop off the connector. This can cause white lines, or nothing at all to appear when powering your phone back on. If that happens, simply reconnect the cable and power cycle your phone. The best way to power cycle your phone is to disconnect and reconnect the battery.

  16. How to replace your iPhone 5 battery, Separating front panel assembly and rear case: step 16, image 1 of 1
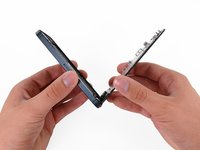
    • Remove the front panel assembly from the rear case.

  17. How to replace your iPhone 5 battery, Lifting the battery: step 17, image 1 of 1
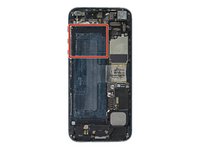
    • Use the exposed clear plastic pull tab to peel the battery off the adhesive securing it to the iPhone.

    • If you are having trouble peeling the battery up or if the tab breaks, apply a few drops of high concentration (over 90%) isopropyl alcohol under the edge of the battery.

    • Wait about one minute for the alcohol solution to weaken the adhesive. Use an opening tool to gently lift the battery by its edge.

    • Don't try to forcefully lever the battery out. If needed, apply a few more drops of alcohol to further weaken the adhesive. Never deform or puncture the battery with your pry tool.

    • If there's any alcohol solution remaining in the phone, carefully wipe it off or allow it to air dry before installing your new battery.

    • If you still have trouble peeling the battery up, use an iOpener or hair dryer to heat the rear case of the iPhone and soften the adhesive.

    • Overheating the iPhone may ignite the battery.

  18. How to replace your iPhone 5 battery, Prying up the battery: step 18, image 1 of 2 How to replace your iPhone 5 battery, Prying up the battery: step 18, image 2 of 2
    • Use the plastic opening tool to gently pry the battery up, only at the outside edge of the phone. Prying anywhere else, especially near the logic board, may result in damage to the logic board.

    • If the battery doesn't pry easily out of the case, apply a few more drops of isopropyl alcohol.

    • Pry gently and evenly to avoid deforming the battery. A bent battery can be a fire hazard.

    • Do not pry at the top portion of the battery, you risk severing the volume control cables.
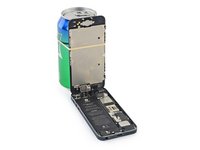
  19. How to replace your iPhone 5 battery, Removing the battery: step 19, image 1 of 1
    • Remove the battery.

    • If your replacement battery came in a plastic sleeve, remove it before installation by pulling it away from the the ribbon cable.

    • Before you adhere the replacement battery, temporarily reconnect the battery connector to the motherboard socket. This ensures that the battery is properly aligned in its recess.

    • Adhere the battery, disconnect it, and continue reassembling your device.

    • During reassembly, make sure the battery is seated firmly against the rear case. This will prevent any damage to other components when reinstalling the front panel assembly.

    • Perform a hard reset after reassembly. This can prevent several issues and simplify troubleshooting.

Conclusion

Compare your new replacement part to the original part—you may need to transfer remaining components or remove adhesive backings from the new part before installing.

To reassemble your device, follow the above steps in reverse order.

Take your e-waste to an R2 or e-Stewards certified recycler.

Repair didn’t go as planned? Check out our Answers community for troubleshooting help.

3775 other people completed this guide.

Attached Documents

Andrew Optimus Goldheart

Member since: 10/17/09

502,106 Reputation

407 Guides authored

Team

iFixit Member of iFixit

Staff

135 Members

16,475 Guides authored

363 Comments

When I finished installing the battery, I put everything back together the way it should be but I have two small problems.

Problem 1: The top of the screen doesn't sit the way it did before I opened it. It sticks out more at the top than the bottom. I'm not talking much, maybe fractions of a MM extra?

Problem 2: The screen isn't as responsive as before. When I'm typing, it sort of lags and then it catches up really fast, sort of like when they phone is "busy" and then it catches up with what you're typing. However, it's not only during typing but scrolling and when tapping the screen. It is generally overall less responsive.

Any ideas?

jnflego - Reply

If others have this problem like I did too when first changing the batter. Here's the answer not in the steps in the guide:

When reassembling the case after replacing the battery and closing the case you have to do the following. The top of the screen (where the cables to the LCD screen are connected) has to be slid in first, before settling in the rest of the case, so that there is no "bumb" on the top of the case. If you don't slide in the case correctly, you will get screen artefacts (after effects, ghosting) when pressing the screen in normal use. You'll notice this immediately and should notice it by the frame not being even on the top.

Fix: Just reopen the screen top, slide the screen frame top first in place, then close the rest of the case and test. Should be ok.

jaakkohyry -

he cambiado la bateria tal y como lo describen pero cuando pongo la nueva bateria no enciende pongo a cargarlo y me sale la manzanita en la pantalla y se apaga asi pasa vario tiempo encendiendose y apgandose solo paraece la manzanita no se que pueda ser

Mario - Reply

Super easy! I am not used to repair things on the regular but this was a breeze. The video was the perfect companion. Hardest part was removing the screen, then reapplying the cover for the three connections towards the top of the phone. The piece didnt seem to sit right, but jiggling it around a little helped and worked like a charm!

therise03 - Reply

While trying to gingerly open a gap with the suction cup, my entire display assembly released all at once and flew up. I think I must have damaged a trace on the flex connector going to the backlight, since I now have hot spots along the top of the display and it seems half of the what-seem-to-be 8 LEDs are dead. Brightness at full is noticeably lower than a friend's iPhone 5.

alexwhittemore - Reply

Add Comment

View Statistics:

Past 24 Hours: 33

Past 7 Days: 257

Past 30 Days: 1,215

All Time: 2,580,228