15% Off Selected iFixit Tools — Limited Time
Free Shipping on Domestic Orders $75+

Introduction
The SC or 5C code is a common error code that occurs on Samsung washing machines. It is triggered by the washing machine having problems with draining. There are 3 main causes and solutions plus a few others.
You might find this a little frustrating sometimes because the only way to test the system is to pump out the water, so if it doesn't pump, you have to manually drain the machine (again) and try the next thing. Sometimes it's worth checking several of the internal causes before reassembling the machine. That way you don't get unwanted practice disassembling your machine. Let's start!
First Steps
Before you get too involved, do some initial checks. Answers to a few questions can help you target the problem.
- Is the washing machine located in an unheated area that gets very cold, or outdoors like on an unheated porch?
- You may have an ice clog in your drain hose.
- Try checking the hose near the bottom where it enters the washing machine. If it is stiff, try heating it with a hair dryer. Some Samsung machines have a check valve in the hose which can trap water and that water can freeze.
- You can also try pouring hot water slowly down the hose and letting it stand for a while.
- You may have an ice clog in your drain hose.
- Does your machine take a long time to drain? You may even be using a workaround where you set it to spin more than once to get it to drain fully.
- Likely there is an obstruction, so you should just start at Clogged Filter.
- Do you hear grinding noises when the machine is trying to pump out? Do you notice that the machine has become much more noisy when draining?
- Your pump is likely failing. You might want to just go to Clogged Filter, then skip to Clogged or Failed Pump.
- Is there no sound at all when your machine is draining, for that matter it probably doesn't drain at all?
- Your pump is probably the issue; go to Clogged or Failed Pump then you can circle back if need be.
- If none of these apply go to the next step.
Causes
Many of these machines are equipped with a filter that can become clogged and prevent draining. This is both very common and very easy to fix. If your machine doesn't have a filter, skip this section.
- Run a Drain Spin Cycle (maybe more than once) if possible to try and remove as much water from the machine as you can.
- Have absorbent materials ready, like old towels, a bucket, and a mop.
- You may even choose to use some disposable pet training pads. It is often pretty dirty under a washing machine, or even just on the floor of many laundry areas.
- There is often a small drain hose alongside the filter on front-load machines, and you can drain even more water out before opening the filter if you have a shallow pan to drain into. Here's a guide to clean the filter as an example.
- Open the filter housing (the filter unscrews from it), remove the filter, and wash it off. You may find the clog trapped here.
- Look inside the filter housing for any bits or foreign material. Make sure it's cleaned out. Not infrequently, you will discover a coin or plastic cap. which may fall in when the filter is removed.
- Look especially at the openings into the housing as there may be objects that are protruding from them and you will want to remove them.
- If the filter and housing were already clean when you opened it, replace it and skip to the next step.
- Reinstall the filter and run a rinse-spin cycle to check if the machine fills and drains properly. If the machine drains, you are done. If not, go to the next step.

- 5 - 10 minutesEasy
The next most common problem is issues with the drain hose. Some things to check:
- Is the drain hose set too deep in the outlet standpipe? If it is, pull it out more. It should be about 4" or 10cm into the pipe.
Drain Hose Kinked or Crushed
Sometimes a washer can go out of balance and dance around and possibly pinch the hose, especially in a small laundry room.
Other times the machine will have been inadvertently moved or pushed and the hose caught.
- Check the entire length of the drain hose for kinks and make sure nothing is crushing the hose either.
Drain Hose Clogged
You can use a wooden dowel to probe the drain hose for a clog. This is sometimes hard to determine because several models (usually top loaders) have a check valve built into the hose inside the machine. A wooden dowel may not give a sure result. because it will hit the flapper in the check valve.
- Sometimes you can lay the hose down flat near floor level and try to get water to drain through it. Remove anything that is used to shape or bend the hose (like putting a "u" bend so it will go into the drain pipe).
- The hose has to be straightened out before you probe with the dowel.
- You can also try clearing the hose with a wet-dry vacuum, but be careful— you might suck something further into the hoses inside the machine.
- Turn on the vacuum, make sure the door or lid of the machine is open, and fit the nozzle over the end of the drain hose. See if it pulls any water through. Sometimes this can be used with a machine that isn't pumping out to empty it.
- Check for leaks after you do this when you next run the machine.
If the hose seems ok, move on to the next step.
- If you removed a clog, run a test on the machine by doing a rinse and spin cycle and see if the machine pumps out properly. if it does, you're done!
If it doesn't pump out, go to the next step after you drain the machine.
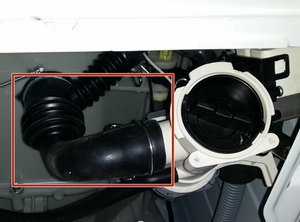
Occasionally objects will make their way into the pump feed hose from the tub. They can be trapped before the filter, and often one item will trap another and fully obstruct the hose.
Here's a picture of a pump hose. It is inside the red rectangle. It is still connected to a pump with a filter assembly built into the pump housing which has been removed from its mountings on the machine frame.
- Access the interior of the machine.
- Remove the hose that runs from the bottom of the outer wash tub (or drum) to the pump.
- Sometimes there's more than one pump, and the pump you are after has a connection to the drain hose (that you just checked).
- Be prepared with a towel or other absorbent material as there is often trapped water, especially if the pump has struggled to empty the machine.
- Usually, this hose will be fairly large, 3-4cm(1 1/4" +/-) at the small end which is usually where the objects will lodge. Detach both ends of the hose and check for the clog.
- Clear any obstructions (they will often come out in the reverse flow direction more easily), wash the hose if possible, and reinstall it.
- If there were no obstructions, go to the next cause
- If you found obstructions, you probably found your problem. You can reassemble the machine and test it.
- Occasionally the pump impeller may have been damaged, or the pump may also be partially clogged from low flow. If you want to be sure, you can inspect the pump before you reassemble the whole machine. Just go to the next step if that's the case.
- If the machine works, you're done, if not, go to the next step.
On some machines, especially many top loaders that do not have a filter, the pump itself can become clogged with debris. Often this is cumulative, a small item like a paperclip or twist tie gets into the pump and then traps other items. Small items, like children's socks, are also a common culprit.
There are a large number of Samsung machines, but they all share a common feature, a drain pump driven separately from the main motor. Many models also have a circulation pump which may share the pump housing with the drain pump. The drain pump will be the one that is connected to the drain hose that is on the outside of the washer.
This pump has two main components, the pump unit, and the pump housing. To check for a clogged pump it is easiest to simply remove the whole pump assembly and disassemble it.
- If you don't already have the machine opened up from the previous steps, open the cabinet and locate the drain pump. As mentioned, this will be a unit that connects to the drain hose, and also to the washer tub or drum.
- You will need to remove the whole assembly.
- Disconnect all the hoses that go into the pump assembly. Note where they go (rarely more than 3 hoses). Take a photo for reference before you start.
- Disconnect the electrical connection. If there's a circulating pump, disconnect it too. Be sure to note which connector goes where.
- Unscrew the pump from its mounting to the frame of the machine. Below are a number of videos to give you an idea of the appearance of some of the pumps and how they come out if you need more guidance.
- Once you have the pump assembly out, remove the drain pump unit from the pump housing. Usually, there are only three screws or maybe four. Note the position of the pump before you remove it, occasionally a pump will fit in more than one position. Here's a guide to an example of pump disassembly. It is a link to a somewhat long, but very informative video.
- Once you have it open, clean out the pump housing and also inspect the impeller for damage.
- You can also use a multimeter to check the resistance of the pump windings. they should be between 12 and 18Ω.
- Make sure the impeller is still connected to the motor shaft.
- It should turn with a stiff, step-by-step, kind of jerky or pulsing "rubbery" movement. If it just spins loosely, that is actually a bad sign. Replace the pump (not the pump housing) if it just spins because it is broken.
- You may also find that the pump has end play (the shaft moves along its axis). This is often indicated by noise when the pump was operating, and damage to the impeller and pump housing where they rub. It may still turn in the right way, but if it has end play, replace it.
- Usually, if the housing is not cracked, the rubbing from the impeller is not a problem–you can just replace the pump.
Here is a picture of an impeller. The impeller is circled in red. Sometimes there are 4 blades sometimes 3.

- When you have finished cleaning the pump housing and checking the impeller, and have replaced any defective parts, reassemble your machine and test it. If it works, you're done! If not, we have some last-ditch items.

- No estimateModerate
Water Level Sensor/Switch
If this has failed, the machine will think it has drained when it hasn't. If the machine has also been reluctant to fill with water, that sensor and system could be a distinct possibility. Here's a link to more information
Control Board
This is the last resort. If the machine is still giving these errors and you have done all the above steps, it is a good possibility that your main control board is defective. You should replace it.
You're seeing solutions for Samsung Washing Machine. Select your model to find parts for your device.
Related Problems


10 common problems
View allDescribe your problem in your own words