Introduction
Rainy weather got you down? Stuck inside sitting on the couch eating popcorn? What better to do whilst eating popcorn than…watch TV. While on Fire. Amazon Fire TV.™
Yesterday, Amazon announced a tiny black box that supposedly does everything better than all of the other tiny black boxes. Join us as we investigate the insides of this April treat to see if it's got what it takes to burn through the competition.
Then tell all your friends what you found out! Follow us on Instagram, like us on Facebook, or read the results of our April Fools' joke on Twitter.
What you need
-
-
Forget about using kindling—Amazon is pouring gas on the media box fire. Get ready to set your TV ablaze with these smokin' tech specs:
-
Quad-core, 1.7 GHz Qualcomm Krait 300 processor
-
Qualcomm Adreno 320 dedicated GPU
-
2 GB LPDDR2 RAM at 533 MHz
-
8 GB internal storage
-
MIMO Wi-Fi supporting 802.11a/b/g/n
-
Bluetooth 4.0
-
More than just a TV box, the Fire TV has power to spare for games, and for a little extra dough you can get this snazzy gamepad controller.
-
-
-
We've had enough of the etchings; it's time to get inside.
-
Go, go, plastic opening tool!
-
We dispatch the plastic clips to gain access to the Fire TV's internals. This hotshot may be tightly sealed, but it's no match for our icy blue opening tools.
-
On the flip-side we've got some runes:
-
Model CL1130
-
6.25 Volt DC Input
-
Federal Communications Commission Approval
Has someone think about that hole in the board. Why the heel isn't it a square board if you have a box to fill? What were they thinking about?
Easy, less board equals less cost. Put only the amount of board in the unit that you need. Always been this way for most electronics.
wie kosten die Amazon fire TV
-
-
-
Precision driving is not only a skill—it's a sport. We drive through a series of screws on the motherboard with precision far surpassing that of Imperial Stormtroopers.
-
With just a few turns, this board-in-a-box is on the loose.
-
Hey! Who left their bubblegum in our magic TV box? Gross.
-
-
-
Muppet news flash: Fire seems to put off a lot of heat. To keep this toasty box from catching fire, Amazon included a heatsink that fills most of the top case.
-
In addition to aforementioned hefty thermal gum wads. Ah, the sweet taste of cooling.
-
Keeping cool under the HDMI port, we find a little antenna, chilling all alone, not tied back into the system. With a tiny chip in the center, this looks like an RFID sticker, probably for inventory or tracking during manufacturing.
I bet the RFID is for sales, not manufacturing. Amazon will read the ID when it's boxed for shipping and tie it to the owner. That way once you receive the unit and connect it to the net, it will phone home and ask who it's owner is. Then download the appropriate account settings.
Yup. Same thing they do with the RFID tag in the Kindle.
-
-
-
-
Our first attempt at removing the heat sink involves an iOpener and an overwhelming lack of luck.
-
So begins the epic struggle...
-
Fortunately, we're experienced with both fire and ice as we use the old ice-cube-tray-twist to dislodge this heatsink.
-
The judicious combination of warmth and wiggling vanquishes this mighty foe.
-
-
-
The Fire TV is packing a pile of pyrotechnic chips:
-
Samsung K3PE0E00QM-CGC2 2 GB LPDDR2 RAM—the same we found in the Moto-X. The quad-core, 1.7 GHz Qualcomm Krait 300 processor is layered beneath the RAM.
-
Toshiba THGBM5G6A2JBAIR 8 GB eMMC NAND flash
-
Qualcomm PMM8920 power management IC
-
Atheros AR8152-B PCI-E fast ethernet controller
-
Pericom PI6C557-03ALE PCI-E clock
-
Texas Instruments DIT4192 digital audio transmitter
-
And on the back, a Qualcomm Atheros QCA6234XH integrated dual-band 2x2 802.11n + Bluetooth 4.0 chip, the same seen on the Kindle Fire 7" HDX.
How did you get the RF shielding off the CPU? Was it soldered? I understand why you didn't talk about it - I'm just curious.
And another thing - how effective is a heatsink when attached to a shield like that instead of directly to the heat source? Seems like they've really just attached the heatsink to the ground plane.
The heat sink, is secured with copious amounts of extremely sticky glue.
-
-
-
With the Fire doused, we direct our efforts towards the remote.
-
Replaceable batteries? Check. We dread the day when even remotes no longer house removable batteries.
-
Remote, disassemble!
-
Apparently the voice search is not as advanced as we hoped. Alas, we will resort to using a screwdriver and opening tools to pry open the remote/microphone combo.
-
Another component, another RFID tag. Looks like Amazon is rooting for a different kind of dystopian future than we'd all imagined.
The slanted panel at the rear of the case is attached with adhesive, and will come loose with a little... persuasion.
The more difficult bit is that there are two more screws under the front end of the case--how Amazon gets them in there, I don't know--but if you pry hard enough, the threaded brass inserts will pop out of the top section. You can see them in the photo on the iFixit teardown. Unfortunately, I can't seem to get them to pop back in cleanly. No matter how hard I press, there's still a small gap in the case.
As to why I opened the remote, I was holding it in my hand, and both heard and felt a loud "POP!" It felt like an electrolytic capacitor blowing, although the remote seemed to be working fine... and as you can see, there aren't any electrolytic capacitors in it. I popped it open just in case, found no obvious damage, and closed it back up.
I guess it´s not 4 but 6 screws and the two of them are hidden under some cover...
Ripping out the threads is not the designed solution.
I just opened the remote without damaging it more than some scratches. When you are looking at the back (where the batteries go in), at the top (between the battery case and the shiny plastic front semi-circle piece) there is a curved piece of raised plastic. Under that are the two hiding screws. The plastic piece is held on strongly by a strip of adhesive. Once I was sure that was the removable piece, I could get a tiny flat screwdriver head under the edge and pry it up. I'm doubtful that the adhesive will work when I try to put it back together, but I have some double sided-tape. It's main job, besides foiling attempts to open the remote, is to provide a place for the battery cover to click into.
-
-
-
Round two of board-in-a-box primarily features a bit of Texan muscle:
-
Texas Instruments MSP430F5435A 16-bit ultra low power microcontroller
-
Texas Instruments CC2560 dual-mode Bluetooth Classic and Low-Energy (BLE)
-
Winbond W25Q40BW serial flash memory with dual and quad SPI (Serial Peripheral Interface)
-
MD v1.2 microphone, the same one seen in the Kindle Fire HD
-
Audience es305 voice processor
-
That's a wrap! Well, for this act anyway. Enjoy a remote layout by way of intermission.
-
-
-
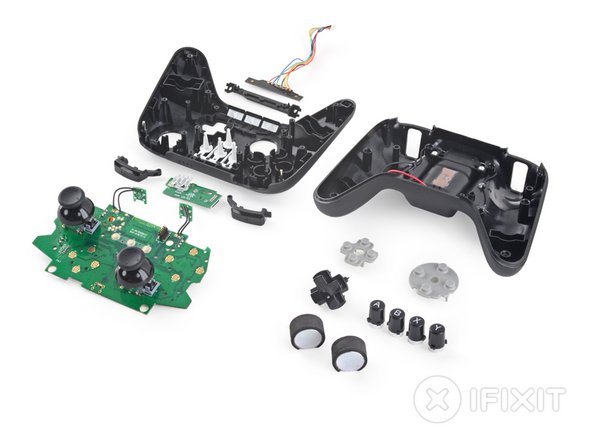
But wait...there's more! Round three of this teardown brings us to the gaming controller.
-
The controller is tamper-proofed with a variant of the tri-wing screw family. They look cool and resemble shurikens, but we don't know anybody who keeps a shuriken driver on their tool belt.
-
Outwitting the strange screws, we pop this controller open. At least there's no adhesive keeping it shut.
-
And to complete the trifecta, there lies the controller's RFID tag.
-
-
-
We tweeze out little trigger button boards like splinters.
-
There's no time for a status report as we quickly free the status light and its
little green friendboard.
-
-
-
Next we pull the trigger...off the controller's motherboard.
-
We've touched the
Flying Spaghetti Monstermotherboard, and we're ready for some tasty treats: -
CSR CSR8670 audio and Bluetooth system-on-chip
-
NXP LPC812 Cortex-M0+ 32-bit microcontroller
-
Winbond 25Q16DW serial flash memory with dual and quad SPI
-
Texas Instruments HC595 8-bit shift registers
-
NXP HC4052 dual 4-channel analog multiplexer/demultiplexer
-
Boy howdy, it's your lucky day, reader! A second (gamier) layout, just for you.
Transpositions in the NXP part ID "NPX LCP812 Cortex-M0+ 32-bit microcontroller", expect "NXP LPC812"
The buttons are just digital. You can tell from the PCB lands.
Those are just weights, and not motors. Maybe they were a late scratch for cost, or they will add a new more expensive version with the same enclosure. The weight probably makes it feel "better". I know I prefer heavier controllers than those without motors or batteries inside.
-
-
-
Amazon Fire TV Repairability Score: 6 out of 10 (10 is easiest to repair)
-
Simple construction—upper case, lower case, heat sink, motherboard. Once it's apart, there's not much to keep track of.
-
The power supply is separate; should it ever need replacement, there'll be no disassembly required.
-
Standard Phillips screws populate the internals, making this box a worry-free affair once you're inside...
-
...provided you never need to remove the heat sink, which is secured with copious amounts of extremely sticky glue.
-
The outer case is a very tight fit. Plastic clips are used rather than glue, but they're so stubborn you'd be forgiven for thinking otherwise.
-
A single board hosts all the vitals—clean and simple, but when it comes to repair, it's all or nothing.
Your conclusion doesn't match your email: "A stylish — yet hard to disassemble — black box full of fairly ordinary components. It was a doozy to take apart, and quite repair-unfriendly given that a single board holds all the vital components." You still give it a 6 yet your email makes it sound more like a 2. There's nothing to repair in the box, all you can do is replace the entire board.
As for the possible RFID sticker, I'd look into that a bit more. I see no reason to include something like this in manufacturing but Amazon could have ulterior motives with this device and even though it isn't attached to anything, it doesn't have to be. It could activate with a wireless signal and send data back over WiFi to Amazon.
I think you need to slip off the tinfoil hat. In all likelihood the RFID contains the serial number of the device. When it ships out from Amazon they scan it and associate that RFID with your Amazon account so as soon as you plug it in to the net you're already set up. RFID chips like this have a very limited range, so the idea that they could somehow activate it wirelessly and collect data from it is absurd.
Why would you ever need to remove the heatsink? Again I don't understand how you rate these on repairability. They aren't meant to be fixed. Would you like for EVERY IC to be socketed, every component to be through hole for easy soldering, a bottom cover held on with screws?
I mean a heatsink is a piece of metal. It isn't going to fail.
@ Nicholas, I cant imagine there are very many cases where you need to replace the heatsink itself (short of damaging it while you have it removed from the case). But being an Android device, I can imagine someone will find a way to overclock this little box to squeeze a bit more performance out of it and make those forthcoming games run a bit smoother.
In that situation, you most certainly would want to replace the heatsink with something that provides more surface area for cooling, or perhaps even active cooling. But you may also find users removing the stock heatsink, lapping the base, and reinstalling with a better thermal transfer material in an effort to improve cooling.
But you are right, without a fan on there by default you probably will never need to "service" the heatsink. It would be difficult to make something this small, and this affordable by having a slot and socket for everything, but making devices more repairable is always a good thing.
@plink53: "As for the possible RFID sticker, I'd look into that a bit more. I see no reason to include something like this in manufacturing but ..."
Here's two reasons. Amazon links each Fire to your account when it ships them, just like a Kindle. The RFID lets them link without having to print bar codes. Also simplifies inventory managements in the repair/return process.
-


5 Comments
What about the power Brick? It sure was a disappointment to have to have one when the Apple TV takes just a clean AC cord.
Also, how much power does this draw in standby. Is this another Power vampire.
As for repairable...it is only good up and to the point where it reduces reliability.
Regarding RFID. I am pretty sure that this is related to the binding device to the Amazon account. When I bought fire tv stick and turned it on, it showed already my amazon account and asked me to confirm. This could be only possible, if they read device ID in warehouse during processing my order and bind it to my account. Easiest way to do this just to read RFID tag during packaging, so they do not need to scan any paper labels on box.
For accessories: they could be used to bind them all together on factory with some special tool by scanning RFIDs fully automatically. Or may be available for QA if all components present in a package during packaging on factory, or even just for future use.
wbr
Mike
I want to know where the reset pins are to initiate a restore. Mine is stuck on amazon fire TV logo one day I turned it on. It was after I loaded a kodi install file. Anyway when unloaded it and came back after an hour or so I get thisboot loop. Remote dont respond and I know it was paired and has new batteries. Also tried android but it ask for.a pin onscreen and that's not happening. I'm a technician and I know there has got to be some reset pins some.where. help if you can. Who's got the schematic??
im pretty sure u just plug in a keyboard and a menu pops up. don't do like me and pop it open, i fried something. super !#^&@@
Did you ever find a schematic?
Where is the picture of the 8gb internal storage chip inside the amazon tv
Johnny Marin - Reply
It's the Toshiba chip highlighted in orange in Step 7.
Jeff Suovanen -