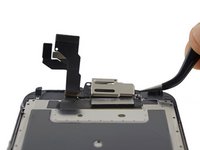
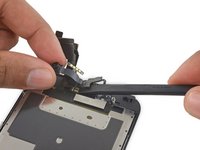
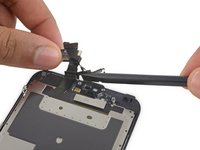
iPhone 6s Front-Facing Camera and Sensor Assembly Replacement

What you need

  1. iPhone 6s Front-Facing Camera and Sensor Assembly Replacement, Pentalobe Screws: step 1, image 1 of 1
    • Before disassembling your iPhone, discharge the battery below 25%. A charged lithium-ion battery can catch fire and/or explode if accidentally punctured.

    • Power off your iPhone before beginning disassembly.

    • Remove the two 3.4 mm P2 Pentalobe screws on the bottom edge of the iPhone, on either side of the Lightning connector.

  2. iPhone 6s Front-Facing Camera and Sensor Assembly Replacement, Anti-Clamp instructions: step 2, image 1 of 3 iPhone 6s Front-Facing Camera and Sensor Assembly Replacement, Anti-Clamp instructions: step 2, image 2 of 3 iPhone 6s Front-Facing Camera and Sensor Assembly Replacement, Anti-Clamp instructions: step 2, image 3 of 3
    Tool used on this step:
    Anti-Clamp
    $24.95
    Buy
    • The next two steps demonstrate the Anti-Clamp, a tool we designed to make the opening procedure easier. If you aren't using the Anti-Clamp, skip down three steps for an alternate method.

    • For complete instructions on how to use the Anti-Clamp, check out this guide.

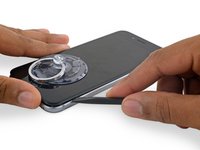
    • Pull the blue handle backwards to unlock the Anti-Clamp's arms.

    • Slide the arms over either the left or right edge of your iPhone.

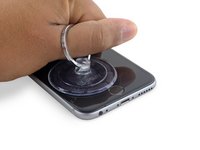
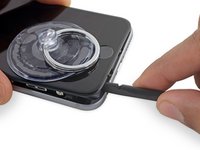
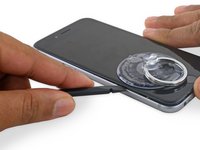
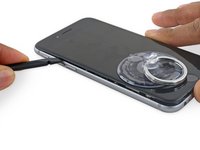
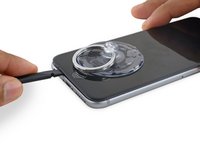
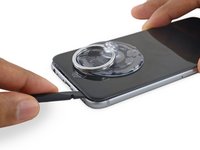
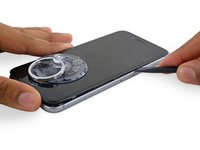
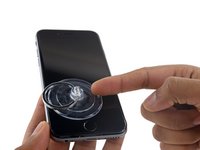
    • Position the suction cups near the bottom edge of the iPhone just above the home button—one on the front, and one on the back.

    • Squeeze the cups together to apply suction to the desired area.

    • If you find that the surface of your iPhone is too slippery for the Anti-Clamp to hold onto, you can use tape to create a grippier surface.

  3. iPhone 6s Front-Facing Camera and Sensor Assembly Replacement: step 3, image 1 of 3 iPhone 6s Front-Facing Camera and Sensor Assembly Replacement: step 3, image 2 of 3 iPhone 6s Front-Facing Camera and Sensor Assembly Replacement: step 3, image 3 of 3
    • Pull the blue handle forwards to lock the arms.

    • Turn the handle clockwise 360 degrees or until the cups start to stretch.

    • Make sure the suction cups remain aligned with each other. If they begin to slip out of alignment, loosen the suction cups slightly and realign the arms.

    • Insert an opening pick under the screen when the Anti-Clamp creates a large enough gap.

    • If the Anti-Clamp doesn't create a sufficient gap, rotate the handle a quarter turn.

    • Don't crank more than a quarter turn at a time, and wait a few seconds between turns. Let the Anti-Clamp and time do the work for you.

    • Skip the next three steps.

  4. iPhone 6s Front-Facing Camera and Sensor Assembly Replacement, Opening Procedure: step 4, image 1 of 1
    Tool used on this step:
    Anti-Clamp
    $24.95
    Buy
    • If you don't have an Anti-Clamp, follow the next three steps to use a suction handle.

    • Apply mild heat to the lower edge of the iPhone using an iOpener or hair dryer for about a minute.

    • Heat softens the adhesive securing the display, making it easier to open.

  5. iPhone 6s Front-Facing Camera and Sensor Assembly Replacement: step 5, image 1 of 1
    • Opening the display on the 6s separates a thin strip of adhesive around the perimeter of the display. If you prefer to replace the adhesive, have a set of new adhesive strips ready before you continue. It's possible to complete the repair without replacing the adhesive, and you probably won't notice any difference in functionality.

    • Apply a suction cup to the lower left corner of the display assembly.

    • Take care not to place the suction cup over the home button.

    • If your display is badly cracked, covering it with a layer of clear packing tape may allow the suction cup to adhere. Alternatively, very strong tape may be used instead of the suction cup. If all else fails, you can superglue the suction cup to the broken screen.

  6. iPhone 6s Front-Facing Camera and Sensor Assembly Replacement: step 6, image 1 of 2 iPhone 6s Front-Facing Camera and Sensor Assembly Replacement: step 6, image 2 of 2
    • Pull up on the suction cup with firm, constant pressure to create a slight gap between the front panel and rear case.

    • Take your time and apply firm, constant force. The display assembly is a much tighter fit than most devices and is held down with adhesive.

    • Pulling too hard may damage the display assembly. Apply just enough pressure to create a small gap between the display assembly and the rear case.

    • If you have any trouble, heat the front of the iPhone using an iOpener, hair dryer, or heat gun until it's slightly too hot to touch. This will help soften the adhesive securing the edges of the display.

  7. iPhone 6s Front-Facing Camera and Sensor Assembly Replacement: step 7, image 1 of 2 iPhone 6s Front-Facing Camera and Sensor Assembly Replacement: step 7, image 2 of 2
    • There is a notch on the underside of the display, just above the headphone jack. This is the safest place to begin prying the phone open.

    • Place the flat edge of a spudger into the gap between the screen and rear case, directly above the headphone jack.

  8. iPhone 6s Front-Facing Camera and Sensor Assembly Replacement: step 8, image 1 of 2 iPhone 6s Front-Facing Camera and Sensor Assembly Replacement: step 8, image 2 of 2
    • Twist the spudger to widen the gap between the front panel assembly and the rest of the phone.

  9. iPhone 6s Front-Facing Camera and Sensor Assembly Replacement: step 9, image 1 of 2 iPhone 6s Front-Facing Camera and Sensor Assembly Replacement: step 9, image 2 of 2
    • Insert the flat end of the spudger on the left side of the phone, between the display assembly and rear case.

    • Slide the spudger up the side of the phone to separate the adhesive and pop the clips free.

  10. iPhone 6s Front-Facing Camera and Sensor Assembly Replacement: step 10, image 1 of 2 iPhone 6s Front-Facing Camera and Sensor Assembly Replacement: step 10, image 2 of 2
    • Remove the spudger and reinsert it on the bottom edge, where you pried the phone open.

    • Slide the spudger to the right, along the bottom edge of the phone.

  11. iPhone 6s Front-Facing Camera and Sensor Assembly Replacement: step 11, image 1 of 2 iPhone 6s Front-Facing Camera and Sensor Assembly Replacement: step 11, image 2 of 2
    • Slide the spudger up the right side to continue separating the adhesive and popping the display clips free from the iPhone.

  12. iPhone 6s Front-Facing Camera and Sensor Assembly Replacement: step 12, image 1 of 2 iPhone 6s Front-Facing Camera and Sensor Assembly Replacement: step 12, image 2 of 2
    • Use the suction cup to open the display, breaking the last of the adhesive.

    • Don't open the display more than 90º, as it is still connected at the top by three cables that may break if stretched.

  13. iPhone 6s Front-Facing Camera and Sensor Assembly Replacement: step 13, image 1 of 2 iPhone 6s Front-Facing Camera and Sensor Assembly Replacement: step 13, image 2 of 2
    • Pull up on the nub on the top side of the suction cup to remove it from the front panel.

  14. iPhone 6s Front-Facing Camera and Sensor Assembly Replacement: step 14, image 1 of 3 iPhone 6s Front-Facing Camera and Sensor Assembly Replacement: step 14, image 2 of 3 iPhone 6s Front-Facing Camera and Sensor Assembly Replacement: step 14, image 3 of 3
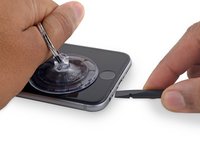
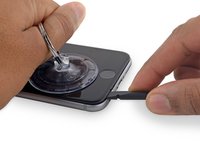
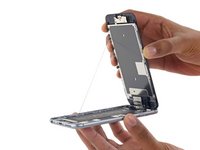
    • Gently grasp the display assembly and lift it up to open the phone, using the clips at the top of the front panel as a hinge.

    • Open the display to about a 90º angle, and lean it against something to keep it propped up while you're working on the phone.

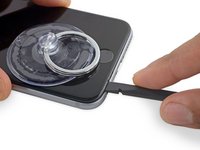
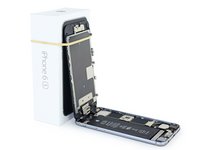
    • Add a rubber band to keep the display securely in place while you work. This prevents undue strain on the display cables.

    • In a pinch, you can use an unopened canned beverage to hold the display.

  15. iPhone 6s Front-Facing Camera and Sensor Assembly Replacement, Battery Connector: step 15, image 1 of 1
    Tool used on this step:
    Magnetic Project Mat
    $19.95
    Buy
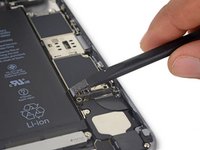
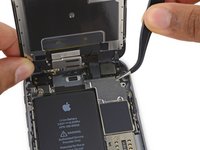
    • Remove two Phillips screws securing the battery connector bracket, of the following lengths:

    • One 2.9 mm screw

    • One 2.2 mm screw

    • Throughout this repair, keep track of each screw and make sure it goes back exactly where it came from to avoid damaging your iPhone.

  16. iPhone 6s Front-Facing Camera and Sensor Assembly Replacement: step 16, image 1 of 2 iPhone 6s Front-Facing Camera and Sensor Assembly Replacement: step 16, image 2 of 2
    • Remove the battery connector bracket from the iPhone.

  17. iPhone 6s Front-Facing Camera and Sensor Assembly Replacement: step 17, image 1 of 3 iPhone 6s Front-Facing Camera and Sensor Assembly Replacement: step 17, image 2 of 3 iPhone 6s Front-Facing Camera and Sensor Assembly Replacement: step 17, image 3 of 3
    • Use the point of a spudger to disconnect the battery connector by prying it straight up from the logic board.

  18. iPhone 6s Front-Facing Camera and Sensor Assembly Replacement: step 18, image 1 of 2 iPhone 6s Front-Facing Camera and Sensor Assembly Replacement: step 18, image 2 of 2
    • Push the battery connector away from the logic board until it stays separated from its socket, so as to avoid any accidental connection to the battery while you work.

  19. iPhone 6s Front-Facing Camera and Sensor Assembly Replacement, Unfasten the display cable bracket: step 19, image 1 of 1
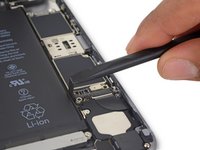
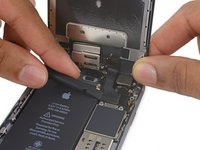
    • Remove the following four Phillips screws securing the display cable bracket:

    • Three 1.2 mm screws

    • One 2.8 mm screw

  20. iPhone 6s Front-Facing Camera and Sensor Assembly Replacement: step 20, image 1 of 2 iPhone 6s Front-Facing Camera and Sensor Assembly Replacement: step 20, image 2 of 2
    • Remove the display cable bracket.

  21. iPhone 6s Front-Facing Camera and Sensor Assembly Replacement: step 21, image 1 of 2 iPhone 6s Front-Facing Camera and Sensor Assembly Replacement: step 21, image 2 of 2
    • Use a spudger or a clean fingernail to disconnect the front camera flex cable by prying it straight up from its socket on the logic board.

  22. iPhone 6s Front-Facing Camera and Sensor Assembly Replacement: step 22, image 1 of 2 iPhone 6s Front-Facing Camera and Sensor Assembly Replacement: step 22, image 2 of 2
    • Disconnect the digitizer cable by prying it straight up from its socket on the logic board.

    • When reconnecting the digitizer cable, do not press the center of the connector. Press one end of the connector, then press the opposite end. Pressing in the center of the connector can bend the component and cause digitizer damage.

  23. iPhone 6s Front-Facing Camera and Sensor Assembly Replacement: step 23, image 1 of 2 iPhone 6s Front-Facing Camera and Sensor Assembly Replacement: step 23, image 2 of 2
    • Make sure the battery is disconnected before you disconnect or reconnect the cable in this step.

    • Disconnect the display cable by prying it straight up from its socket on the logic board.

  24. iPhone 6s Front-Facing Camera and Sensor Assembly Replacement: step 24, image 1 of 1
  25. iPhone 6s Front-Facing Camera and Sensor Assembly Replacement, Earpiece Speaker: step 25, image 1 of 1
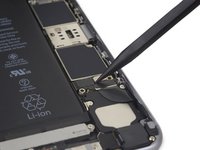
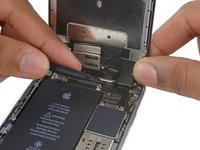
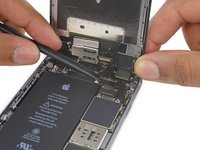
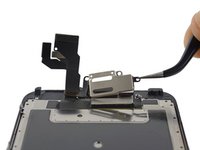
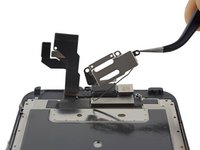
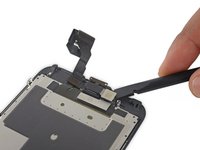
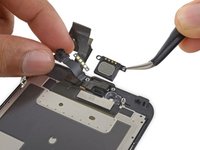
    • Remove the following three Phillips screws securing the earpiece speaker bracket:

    • Two 2.3 mm screws

    • One 1.9 mm screw

  26. iPhone 6s Front-Facing Camera and Sensor Assembly Replacement: step 26, image 1 of 3 iPhone 6s Front-Facing Camera and Sensor Assembly Replacement: step 26, image 2 of 3 iPhone 6s Front-Facing Camera and Sensor Assembly Replacement: step 26, image 3 of 3
    • Lift up and remove the earpiece speaker bracket, peeling up the bracket gasket as you go.

    • Peel up the gasket carefully, as it is thin and can tear easily.

  27. iPhone 6s Front-Facing Camera and Sensor Assembly Replacement: step 27, image 1 of 2 iPhone 6s Front-Facing Camera and Sensor Assembly Replacement: step 27, image 2 of 2
    • Use the flat end of a spudger to nudge the front-facing camera from its housing.

  28. iPhone 6s Front-Facing Camera and Sensor Assembly Replacement: step 28, image 1 of 2 iPhone 6s Front-Facing Camera and Sensor Assembly Replacement: step 28, image 2 of 2
    • Pull back the front-facing camera to access the earpiece speaker.

    • Remove the earpiece speaker.

    • Be careful not to touch the golden contacts as you remove and replace the speaker. Oil from your skin can interfere with the contacts and interrupt the connection. If you accidentally touch them with your skin, wipe them off with a little isopropyl alcohol (rubbing alcohol) before reinstalling them.

  29. iPhone 6s Front-Facing Camera and Sensor Assembly Replacement, Front-Facing Camera and Sensor Assembly: step 29, image 1 of 2 iPhone 6s Front-Facing Camera and Sensor Assembly Replacement, Front-Facing Camera and Sensor Assembly: step 29, image 2 of 2
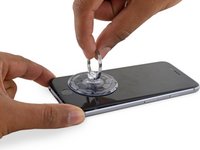
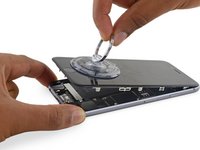
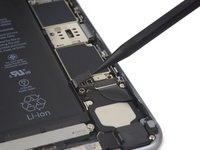
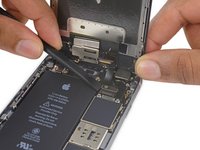
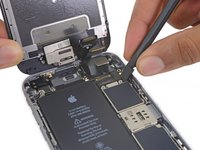
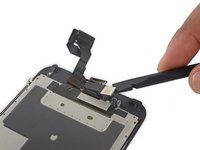
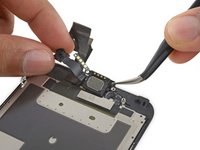
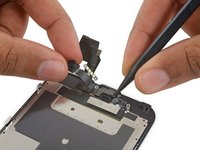
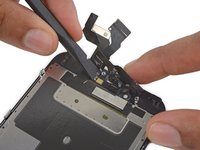
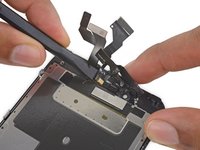
    • Holding the front-facing camera out of the way, use the point of a spudger to push the ambient-light sensor up out of its recess in the front panel.

  30. iPhone 6s Front-Facing Camera and Sensor Assembly Replacement: step 30, image 1 of 2 iPhone 6s Front-Facing Camera and Sensor Assembly Replacement: step 30, image 2 of 2
    • Fold the front-facing camera and sensor cable up to allow access to the microphone.

  31. iPhone 6s Front-Facing Camera and Sensor Assembly Replacement: step 31, image 1 of 2 iPhone 6s Front-Facing Camera and Sensor Assembly Replacement: step 31, image 2 of 2
    • Use the flat end of a spudger to gently break up the adhesive securing the microphone to the front panel.

  32. iPhone 6s Front-Facing Camera and Sensor Assembly Replacement: step 32, image 1 of 1
    • Remove the front-facing camera and sensor cable.

Conclusion

To reassemble your device, follow these instructions in reverse order.

218 other people completed this guide.

Evan Noronha

Member since: 02/05/15

223,163 Reputation

168 Guides authored

17 Comments

I replaced this connector (+camera) and now the camera doesn't focus anymore. Any idea why is that?

Ciprian - Reply

There is a good chance that the camera is bad. Try to rub it with a Q tip and some alcohol if that does not fix it try to clean the glass of the screen from the inside.

Gadget Tech - PDX -

I replaced connecter but still not working the sensor. Any reason?

Ana w

irismhco - Reply

The old speaker works fine?

Or should be replaced with the new flex, because I read in the other tutorial here in ifixit that mentions something about the speaker an oil that these have.

I questioned this because I broke the flex of my iPhone 6s Plus trying to clean after water immersion.

miguel.f07 - Reply

Just used this guide to replace the front camera in my iPhone 6s !!! Thank you guys at iFixit ! Now it works as well as a new one! yaaaaaaay

Ely Saakian - Reply

Add Comment

View Statistics:

Past 24 Hours: 5

Past 7 Days: 79

Past 30 Days: 365

All Time: 142,726