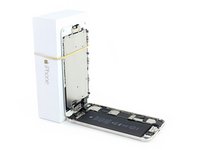
Introduction
Use this guide to replace a scratched or damaged rear case.
This guide requires removing the battery. When reinstalling the battery in your new case, refer to this guide to replace your battery's adhesive strips. The battery is pretty tightly secured in the device, but reinstalling it properly will keep it from rattling.
What you need
-
-
Power off your iPhone before beginning disassembly.
-
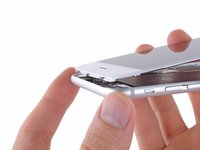
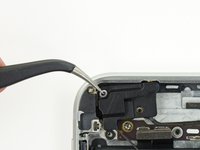
Remove the two 3.6 mm P2 Pentalobe screws next to the Lightning connector.
 Ask FixBot
-
-
Tool used on this step:Clampy - Anti-Clamp$24.95
-
Pull the blue handle backwards to unlock the Anti-Clamp's arms.
-
Slide the arms over either the left or right edge of your iPhone.
-
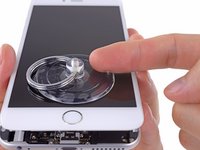
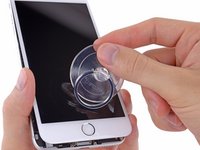
Position the suction cups near the bottom edge of the iPhone just above the home button—one on the front, and one on the back.
-
Squeeze the cups together to apply suction to the desired area.
-
-
-
Pull the blue handle forwards to lock the arms.
-
Turn the handle clockwise 360 degrees or until the cups start to stretch.
-
Insert an opening pick or tool under the screen when the Anti-Clamp creates a large enough gap.
-
Skip the next three steps.
-
-
-
Use a single suction cup to lift the front panel:
-
Press a suction cup onto the screen, just above the home button.
-
-
-
While holding the iPhone down with one hand, pull up on the suction cup to slightly separate the front panel assembly from the rear case.
-
Using a plastic opening tool, begin to gently pry the rear case down, away from the display assembly, while continuing to pull up with the suction cup.
-
-
-
Pull the plastic nub to release the vacuum seal on the suction cup.
-
Remove the suction cup from the display assembly.
-
-
-
Pull the home button end of the front panel assembly away from the rear case, using the top of the phone as a hinge.
-
Open the display to about a 90º angle, and lean it against something to keep it propped up while you're working on the phone.
-
Add a rubber band to keep the display securely in place while you work. This prevents undue strain on the display cables.
-
-
-
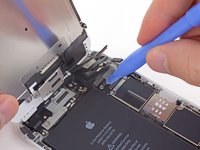
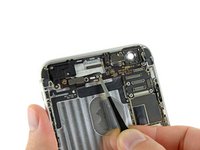
Remove the following Phillips screws from the battery connector bracket:
-
One 2.3 mm screw
-
One 3.1 mm screw
-
-
-
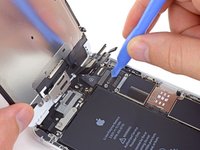
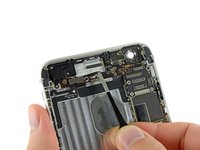
Use a clean fingernail or the edge of an opening tool to gently pry the battery connector up from its socket on the logic board.
-
-
-
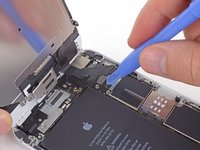
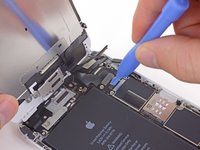
Remove the following Phillips screws securing the front panel assembly cable bracket:
-
Three 1.2 mm screws
-
One 1.5 mm screw
-
One 2.9 mm screw
-
-
-
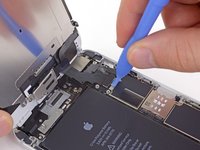
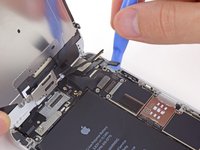
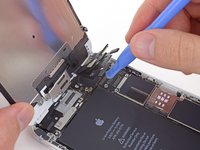
While still supporting the front panel, use a fingernail or the edge of an opening tool to disconnect the front-facing camera and earpiece speaker connector.
-
-
Tool used on this step:Tweezers$4.99
-
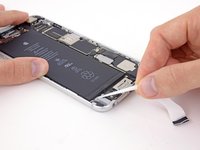
Peel back the first battery adhesive tab from the bottom right edge of the battery.
-
-
-
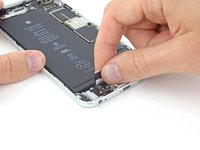
Very slowly, pull and stretch one adhesive strip away from the battery, toward the bottom of the iPhone.
-
Pull at as low of an angle as you can without snagging the adhesive strip on any of the components along the lower edge of the phone.
-
Don't press down on the battery as you pull the strip.
-
-
-
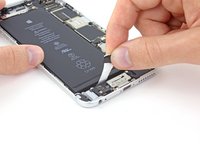
Peel back the second battery adhesive tab from the other side of the battery.
-
Again, pull and slowly stretch the adhesive tab to slide it out from between the battery and the rear case.
-
Continue pulling the adhesive tab until it releases completely from the battery. If it breaks, try to retrieve the remaining length and continue pulling, or proceed as instructed below.
-
-
-
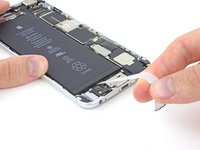
Peel back the final battery adhesive tab from the bottom edge of the battery. Gently pull the battery adhesive tab upward and away from the battery, allowing the adhesive strip to slowly slide out from between the battery and the rear case.
-
Continue pulling until the final strip comes free from the iPhone.
-
Wait about one minute for the alcohol solution to weaken the adhesive. Use the flat end of a spudger to gently lift the battery.
-
-
-
If the battery remains stuck to the rear case, prepare an iOpener or use a hair dryer to heat the rear case directly behind the battery.
-
Then, use a plastic opening tool to gently lift the battery.
-
Thread the floss or string underneath one end of the battery and pull side to side in a sawing motion to separate the adhesive.
-
-
-
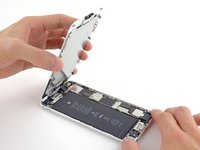
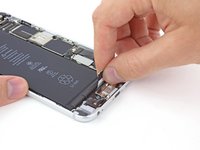
Remove the battery from the iPhone.
-
Adhere the battery, disconnect it, and continue reassembling your device.
-
-
-
Remove the following screws securing the rear-facing camera bracket to the rear case:
-
One 1.7 mm Phillips #00 screw
-
One 2.3 mm Phillips #00 screw
-
-
-
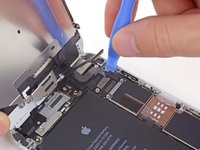
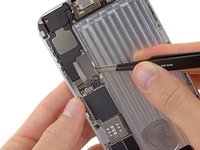
Use the flat end of a spudger to disconnect the rear-facing camera connector from its socket on the logic board.
-
-
-
-
Remove the following screws securing the antenna bracket to the rear case:
-
One 1.5 mm Phillips #00 screw
-
One 2.8 mm Phillips #00 screw
-
-
Tool used on this step:Tweezers$4.99
-
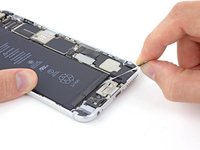
Grasp the antenna bracket with a pair of tweezers and lift it off the iPhone.
-
-
-
Carefully pry the antenna connector up off the logic board with a plastic opening tool.
-
-
-
Grasp the antenna connector with a pair of tweezers and gently lift it from its retaining clip on the logic board.
-
-
-
Disconnect the power button cable and audio control cable connectors from their respective sockets on the logic board.
-
-
-
Remove the following screws securing the top cellular antenna to the rear case:
-
One 2.8 mm Phillips #00 screw
-
Two 1.6 mm Phillips #00 screws
-
-
-
Use a pair of tweezers to grasp and remove the top cellular antenna out of the iPhone.
-
-
-
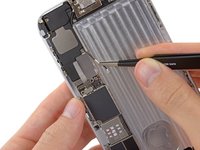
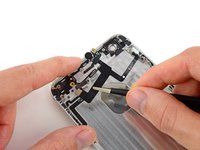
Pry the vibrator connector cable up from its socket on the logic board with the flat end of a spudger.
-
-
-
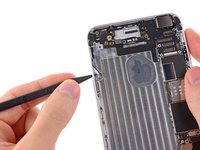
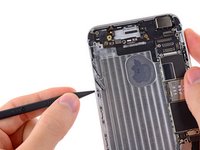
Use the tip of a spudger to disconnect the interconnect antenna cable from its socket on the logic board.
-
-
Tool used on this step:Tweezers$4.99
-
Grasp the interconnect antenna cable with a pair of tweezers and carefully deroute it from its channel on the speaker assembly.
-
-
-
Remove the two 2.5 mm Phillips #00 screws securing the vibrator to the rear case.
-
-
-
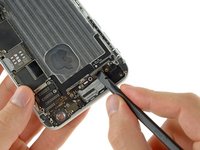
Insert a SIM card eject tool or a paperclip into the small hole in the SIM card tray.
-
Press to eject the tray.
-
-
-
Remove the single 2.8 mm Phillips #00 screw securing the plastic clip to the logic board.
-
-
-
Remove the single 1.3 mm Phillips #00 screw recessed against the top of the rear case.
-
-
Tool used on this step:Tweezers$4.99
-
Use a pair of tweezers to firmly grasp the plastic clip and remove it from the iPhone.
-
-
-
Remove the single 1.6 mm Phillips #00 screw securing the antenna clip to the rear case.
-
-
-
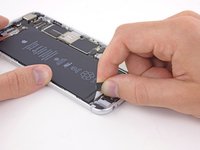
Carefully grasp the antenna clip with a pair of tweezers and remove it from the iPhone.
-
-
Tool used on this step:Standoff Screwdriver for iPhones$5.49
-
Remove the following screws securing the logic board to the rear case:
-
Two 2.4 mm standoff screws
-
One 2.1 mm Phillips #00 screw
-
-
-
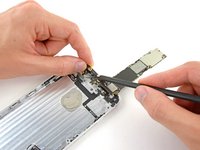
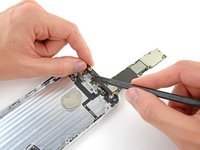
Carefully raise—but do not remove—the logic board, lifting it from the bottom edge nearest the Lightning connector.
-
-
-
Continue carefully lifting the bottom side of the logic board until it is vertical.
-
-
-
Gently lay the logic board upside-down, with the top portion resting against the rear case of the iPhone.
-
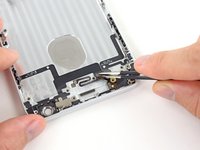
Use the flat end of a spudger to disconnect the antenna connector from its socket on the back of the logic board.
-
-
Tool used on this step:Tweezers$4.99
-
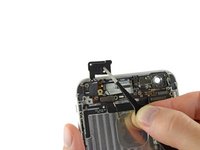
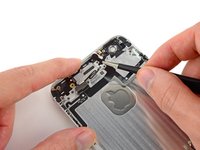
Use a pair of tweezers to peel the single adhesive tab that resides on top of both the power button and audio control/rocker switch cable connectors.
-
-
-
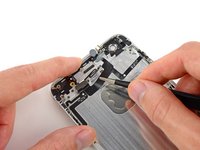
Remove the single 1.3 mm Phillips #00 screw securing the power button cable bracket to the rear case.
-
-
-
Carefully grasp the bracket with a pair of tweezers and remove it from the iPhone.
-
-
-
Remove the following screws securing the power button cable bracket to the inner edge of the rear case:
-
One 2.1 mm Phillips #00 screw
-
One 1.7 mm Phillips #00 screw
-
-
-
Grasp the power button cable bracket with a pair of tweezers and remove it from the iPhone.
-
-
-
Remove the single 2.1 mm Phillips #00 screw securing the power button switch to the rear case.
-
-
-
Pull the power button switch out of its recess on the rear case with a pair of tweezers, and begin carefully peeling the power button cable from the rear case.
-
-
-
Continue gently peeling the power button cable off the rear case and remove it from the iPhone.
-
-
-
Remove the following screws securing the audio controls and rocker switch to the rear case:
-
Two 2.0 mm Phillips #00 screws
-
One 2.5 mm Phillips #00 screw
-
-
Tool used on this step:Tweezers$4.99
-
Grasp the audio control and rocker switch cable with a pair of tweezers.
-
Slowly peel the audio control and rocker switch cable up off the rear case.
-
-
-
Use the tip of a spudger to push the audio control and rocker switch buttons out of their recess on the rear case.
-
-
Tool used on this step:Tweezers$4.99
-
Gently grasp both top and bottom audio control buttons with a pair of tweezers and remove them from the iPhone.
-
-
Tool used on this step:Tweezers$4.99
-
Grasp the antenna connector with a pair of tweezers and carefully begin de-routing it from its channel on the speaker.
-
-
-
Remove the following screws securing the speaker to the rear case:
-
One 2.3 mm Phillips #00 screw
-
One 2.8 mm Phillips #00 screw
-
-
-
Remove the two 3.3 mm Phillips #00 screws securing the metal bracket to the Lightning connector assembly.
-
-
Tool used on this step:Tweezers$4.99
-
Use a pair of tweezers to lift and remove the metal bracket out of the iPhone.
-
-
-
Use the flat edge of a spudger to pry the antenna connector cable up off its socket on the Lightning connector assembly.
-
-
-
Remove the following Phillips #00 screws securing the Lightning connector assembly to the rear case:
-
Two 3.2 mm screws
-
One 3.8 mm screw
-
Two 1.7 mm screws
-
Two 1.5 mm screws
-
Two 1.4 mm screws
-
-
-
Use a pair of tweezers to grasp the plastic clip that is situated to the right of the headphone jack and remove it from the iPhone.
-
-
-
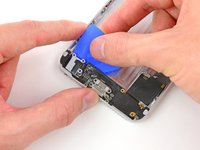
Use an opening pick to slowly separate the Lightning connector and headphone jack cable from the rear case.
-
-
-
Insert the pick underneath the right bottom corner of the Lightning connector and headphone jack cable.
-
-
-
Run the opening pick across the top of Lightning connector and headphone jack cable to loosen the adhesive securing it to the rear case.
-
-
-
Lift and remove the Lightning connector and headphone jack cable assembly out of the iPhone.
-


To reassemble your device, follow these instructions in reverse order.
Cancel: I did not complete this guide.
59 other people completed this guide.


6 Guide Comments
what are the 5 metal "spacers" attached to the housing? they are simplistic metal spacing bars with a tiny rubber block. all held to the left side and right side walls with 2 screws per spacer. The instructions totally skipped this step about removing them. all housings i see being sold do not include them, so wouldnt you want to move them over too?
they probably don't add it because its pretty self explanatory.
step 84, When you have finished tearing it all down, there are a couple of things you missed, the rubber piece that is connected to the case near the speaker and the charging port housing when you remove the board at the bottom.
In addition to the metal "spacers," the screen for the speaker and the charging port housing, don't forget to transfer a few other things that weren't mentioned in the guide to your new rear case: the power button, the little metal switch for the sim tray; there's a tiny black speaker screen near the headphone jack that must be transferred over (might want to clean it off if it has collected dust); in the top left corner there are two more screws to loosen: one is for a tiny metal spacer piece and the other for the antennae connector cable; there is also a little metal square that cushions the antenna connector's socket; a small strip where the earpiece speaker would be that looks like a black rolled piece of tape; and finally, the foam cushion for the rear camera and the little black screen next to it. But yea... pretty self explanatory.
Hi all,
During the instructions, the screws flip from having #00 next to them and then nothing.
Does this mean that these screws are different? If so, how do you differentiate them? I have a replacement set of screws that are unsorted so hoping to sort them with my digital caliper.
All the best
Mike