Free Shipping on Domestic Orders $75+

iPad Pro 13" Rear Camera Replacement

What you need

  1. iPad Pro 13" Rear Camera Replacement, Prepare the iPad for disassembly: step 1, image 1 of 3 iPad Pro 13" Rear Camera Replacement, Prepare the iPad for disassembly: step 1, image 2 of 3 iPad Pro 13" Rear Camera Replacement, Prepare the iPad for disassembly: step 1, image 3 of 3
    • For your safety, fully discharge the battery before disassembling the device. This reduces the risk of fire if the battery is accidentally damaged during the repair.

    • Disconnect all cables and accessories from the iPad.

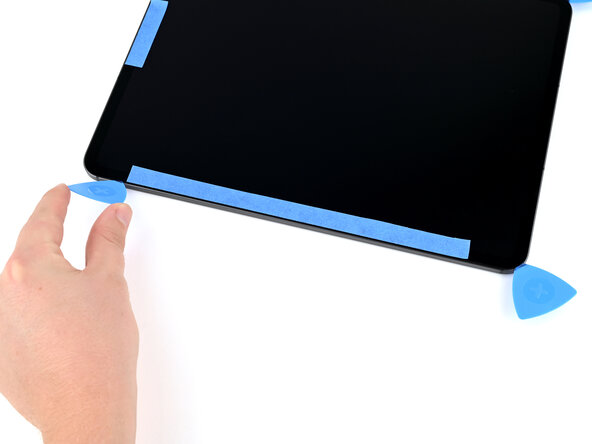
    • Place masking tape over the following areas of the display:

    • The TrueDepth camera near the middle of the top edge

    • The ambient light sensor near the middle of the left edge

    • The bottom edge, where there are delicate ribbon cables under edge of the display

    • Note that directions in this guide are given for the iPad in landscape orientation. The USB-C port is on the right edge of the iPad.

    • If your screen is badly cracked, cover it with a layer of packing tape to help the suction cup stick and prevent shards of glass from coming off.

    Ask FixBot
  2. iPad Pro 13" Rear Camera Replacement, Mark your opening picks: step 2, image 1 of 1
    • While removing the display, don't insert picks more than 3.5 mm.

    • Mark your opening picks at 3.5 mm.

    Ask FixBot
  3. iPad Pro 13" Rear Camera Replacement, Heat the top-right corner: step 3, image 1 of 1
    • Apply a heated iOpener to the top-right corner of the screen for two minutes to soften the adhesive.

    • You can also use a hair dryer or heat gun to soften the adhesive, but be careful not to overheat the iPad as the screen and battery can be damaged by heat.

    • Use this same procedure for all future steps where heat is needed to soften adhesive, unless otherwise noted.

    Ask FixBot
  4. iPad Pro 13" Rear Camera Replacement, Anti-Clamp instructions: step 4, image 1 of 3 iPad Pro 13" Rear Camera Replacement, Anti-Clamp instructions: step 4, image 2 of 3 iPad Pro 13" Rear Camera Replacement, Anti-Clamp instructions: step 4, image 3 of 3
    • The next three steps show how to use the Anti-Clamp. For complete Anti-Clamp instructions, including how to work with a broken screen, check out this guide.

    • If you don't have an Anti-Clamp, read these steps for important tips, then follow the alternate method using a suction handle, which comes after these steps.

    • Unlock the Anti-Clamp by pulling the blue handle backwards, away from the suction cups.

    • Place something under the bottom-left corner of the iPad to hold it level, then place the Anti-Clamp on your work surface and insert the top-right corner of the iPad between the Anti-Clamp's suction cups.

    • Hold the bottom of the Anti-Clamp and press down on the top arm to engage the suction cups.

    • Make sure the top and bottom suction cups are aligned, and remain aligned for this entire procedure.

    Ask FixBot
  5. iPad Pro 13" Rear Camera Replacement: step 5, image 1 of 2 iPad Pro 13" Rear Camera Replacement: step 5, image 2 of 2
    • Pull the blue handle forward, towards the suction cups, to engage the twist mechanism.

    • Turn the blue handle clockwise one full rotation or until the suction cups start to stretch.

    • If a suction cup pops off, reapply it. If needed, apply some suction tape for a grippier surface.

    Ask FixBot
  6. iPad Pro 13" Rear Camera Replacement: step 6, image 1 of 3 iPad Pro 13" Rear Camera Replacement: step 6, image 2 of 3 iPad Pro 13" Rear Camera Replacement: step 6, image 3 of 3
    • Wait at least one minute for the Anti-Clamp to pull the screen up until there's a small gap between the screen and the frame.

    • Rely on heat and time to lift the screen. Don't try to force it open.

    • If the screen isn't lifting after two minutes:

    • Make sure there's tension on the suction cups. Crank the handle just until you feel resistance, but don't crank too much or the suction cups will release.

    • Apply more heat while the Anti-Clamp is engaged. You can thread a heated iOpener through the Anti-Clamp or use a hair dryer or heat gun.

    • If the screen is still not releasing, crank the handle a half-turn and wait another minute while applying more heat periodically, still being careful not to overheat the iPad. Repeat as needed.

    • Once the screen lifts, insert a marked opening pick into the gap, no more than 3.5 mm deep.

    • Slide the opening pick around the corner and leave it inserted.

    Ask FixBot
  7. iPad Pro 13" Rear Camera Replacement, Suction handle instructions: step 7, image 1 of 3 iPad Pro 13" Rear Camera Replacement, Suction handle instructions: step 7, image 2 of 3 iPad Pro 13" Rear Camera Replacement, Suction handle instructions: step 7, image 3 of 3
    • If you don't have an Anti‑Clamp, use a single suction handle instead.

    • If the screen is badly cracked, make a handle out of very strong tape instead of a suction cup. If nothing else works, you can use strong glue to stick the suction cup to the broken screen.

    • Apply the suction handle near the top‑right corner with the open part of the handle facing away from the edge.

    • Hold the iPad down with one hand, away from the suction cup, and pull the suction handle up and towards the center of the iPad.

    • As soon as a small gap appears between the screen and the frame, insert a marked opening pick no more than 3.5 mm into the gap and release tension on the suction cup.

    • If you're having trouble lifting the screen, be patient and apply more heat while pulling on the suction handle.

    • Slide the pick gently around the corner and leave it inserted.

    Ask FixBot
  8. iPad Pro 13" Rear Camera Replacement, Heat the top edge: step 8, image 1 of 1
    • Use an iOpener, hair dryer, or heat gun to soften the adhesive under the top edge of the screen.

    • This iPad cools very quickly. To get the screen off, work in sections of about 3 inches at a time. So, for this step, start with heating the right side of the top edge.

    Ask FixBot
  9. iPad Pro 13" Rear Camera Replacement, Slice the top edge adhesive: step 9, image 1 of 3 iPad Pro 13" Rear Camera Replacement, Slice the top edge adhesive: step 9, image 2 of 3 iPad Pro 13" Rear Camera Replacement, Slice the top edge adhesive: step 9, image 3 of 3
    • Be patient while slicing the screen adhesive. If you suddenly feel more resistance or notice the screen starting to flex, stop and apply more heat. If you're using an iOpener, you can apply heat while you're sliding the pick.

    • Insert an additional marked opening pick beside the first pick, on the top edge of the iPad, no more than 3.5 mm.

    • Slice the adhesive by slowly sliding the opening pick under the screen towards the front camera, stopping before you get to the masking tape.

    Ask FixBot
  10. iPad Pro 13" Rear Camera Replacement: step 10, image 1 of 3 iPad Pro 13" Rear Camera Replacement: step 10, image 2 of 3 iPad Pro 13" Rear Camera Replacement: step 10, image 3 of 3
    • Be careful not to damage the sensitive components, like the front camera and microphone, under the screen. Work slowly. If you feel resistance, stop, slide the pick back partially, apply more heat, and continue.

    • Lift the opening pick so it's at a sharp angle pointing into the iPad.

    • Slice the adhesive by sliding the pick under the taped section of the screen.

    Ask FixBot
  11. iPad Pro 13" Rear Camera Replacement: step 11, image 1 of 2 iPad Pro 13" Rear Camera Replacement: step 11, image 2 of 2
    • Finish slicing the adhesive by sliding the opening pick to the top-left corner.

    • Leave the opening pick inserted.

    Ask FixBot
  12. iPad Pro 13" Rear Camera Replacement, Slice the right edge adhesive: step 12, image 1 of 3 iPad Pro 13" Rear Camera Replacement, Slice the right edge adhesive: step 12, image 2 of 3 iPad Pro 13" Rear Camera Replacement, Slice the right edge adhesive: step 12, image 3 of 3
    • Heat the right edge of the iPad.

    • Insert an opening pick beside the first opening pick you inserted, on the right edge.

    • Working in small sections, slice the adhesive, applying more heat as needed.

    Ask FixBot
  13. iPad Pro 13" Rear Camera Replacement, Slice the bottom-right corner adhesive: step 13, image 1 of 3 iPad Pro 13" Rear Camera Replacement, Slice the bottom-right corner adhesive: step 13, image 2 of 3 iPad Pro 13" Rear Camera Replacement, Slice the bottom-right corner adhesive: step 13, image 3 of 3
    • Heat the bottom-right corner of the iPad.

    • Carefully slide the opening pick from the previous step around the bottom-right corner.

    • Leave the pick inserted.

    Ask FixBot
  14. iPad Pro 13" Rear Camera Replacement, Slice the bottom edge adhesive: step 14, image 1 of 3 iPad Pro 13" Rear Camera Replacement, Slice the bottom edge adhesive: step 14, image 2 of 3 iPad Pro 13" Rear Camera Replacement, Slice the bottom edge adhesive: step 14, image 3 of 3
    • Heat the bottom edge of the iPad, focusing on the right end.

    • Insert an opening pick beside the pick in the corner, on the bottom edge, no more than 3.5 mm deep.

    • Lift the pick so it enters the iPad at a sharp angle.

    • Carefully slide the pick under the screen across the bottom edge of the iPad.

    • Work slowly to avoid damaging the delicate ribbon cables under the screen in this section. If you feel any resistance, stop, slide your pick back partially, apply more heat, and try again.

    Ask FixBot
  15. iPad Pro 13" Rear Camera Replacement, Slice the bottom-left corner adhesive: step 15, image 1 of 3 iPad Pro 13" Rear Camera Replacement, Slice the bottom-left corner adhesive: step 15, image 2 of 3 iPad Pro 13" Rear Camera Replacement, Slice the bottom-left corner adhesive: step 15, image 3 of 3
    • Heat the bottom-left corner of the iPad.

    • Carefully slide the opening pick around the bottom-left corner.

    • Leave the pick inserted.

    Ask FixBot
  16. iPad Pro 13" Rear Camera Replacement, Slice the left edge adhesive: step 16, image 1 of 3 iPad Pro 13" Rear Camera Replacement, Slice the left edge adhesive: step 16, image 2 of 3 iPad Pro 13" Rear Camera Replacement, Slice the left edge adhesive: step 16, image 3 of 3
    • Heat the left edge of the iPad, focusing on the bottom end.

    • Insert an opening pick above the pick already inserted near the bottom-left corner.

    • Carefully slide the pick to the beginning of the masking tape.

    Ask FixBot
  17. iPad Pro 13" Rear Camera Replacement: step 17, image 1 of 3 iPad Pro 13" Rear Camera Replacement: step 17, image 2 of 3 iPad Pro 13" Rear Camera Replacement: step 17, image 3 of 3
    • Lift the pick so it enters the iPad at a sharp angle.

    • Slide the opening pick to the top-left corner.

    • Work slowly to avoid damaging the ambient light sensor near the middle of the screen. If you feel resistance, stop, pull the pick back slightly, apply more heat, and try again.

    • Don't try to remove the iPad screen yet. You should be able to lift the iPad screen about a half–inch out of the frame all the way around the edge.

    • If the screen is still adhered anywhere, use heat and an opening pick to slice the adhesive. Use opening picks to keep the screen lifted while you work.

    Ask FixBot
  18. iPad Pro 13" Rear Camera Replacement, Reposition the screen: step 18, image 1 of 3 iPad Pro 13" Rear Camera Replacement, Reposition the screen: step 18, image 2 of 3 iPad Pro 13" Rear Camera Replacement, Reposition the screen: step 18, image 3 of 3
    • Once the screen is completely free of the adhesive, lift it about a half-inch and rotate it slightly counterclockwise so the screw next to the front camera is visible.

    Ask FixBot
  19. iPad Pro 13" Rear Camera Replacement, Remove the microphone connector cover: step 19, image 1 of 3 iPad Pro 13" Rear Camera Replacement, Remove the microphone connector cover: step 19, image 2 of 3 iPad Pro 13" Rear Camera Replacement, Remove the microphone connector cover: step 19, image 3 of 3
    • Use a JCIS or JIS 00 screwdriver to remove the 1.3 mm‑long screw securing the microphone connector cover.

    • Small iFixit Phillips bits are designed to work with JIS screws, so you can use an iFixit PH 00 driver. You can try Phillips drivers from other manufacturers, but you risk stripping the screw.

    • Use tweezers or your fingers to remove the microphone connector cover. Be careful not to damage the foam on the back.

    Ask FixBot
  20. iPad Pro 13" Rear Camera Replacement, Disconnect the microphone: step 20, image 1 of 2 iPad Pro 13" Rear Camera Replacement, Disconnect the microphone: step 20, image 2 of 2
    Ask FixBot
  21. iPad Pro 13" Rear Camera Replacement, Open the iPad: step 21, image 1 of 2 iPad Pro 13" Rear Camera Replacement, Open the iPad: step 21, image 2 of 2
    • Open the iPad like a book from the top edge.

    • Hold the screen above the iPad body and place a soft cloth on top of the iPad to protect both the screen and the iPad body.

    • Place the screen face-down on the cloth, being careful not to strain the cables still attached to the iPad body.

    Ask FixBot
  22. iPad Pro 13" Rear Camera Replacement, Remove the display connectors cover: step 22, image 1 of 3 iPad Pro 13" Rear Camera Replacement, Remove the display connectors cover: step 22, image 2 of 3 iPad Pro 13" Rear Camera Replacement, Remove the display connectors cover: step 22, image 3 of 3
    • Place cloths over the batteries to protect them while you work.

    • Use a JCIS or JIS 00 screwdriver to remove the screws securing the display connectors cover:

    • Four 2.1 mm‑long screws towards the center of the iPad

    • Two 1.6 mm‑long screws near the edge of the iPad

    • Use tweezers or your fingers to remove the display connectors cover.

    Ask FixBot
  23. iPad Pro 13" Rear Camera Replacement, Disconnect the screen: step 23, image 1 of 3 iPad Pro 13" Rear Camera Replacement, Disconnect the screen: step 23, image 2 of 3 iPad Pro 13" Rear Camera Replacement, Disconnect the screen: step 23, image 3 of 3
    • Use the tip of a spudger to pry up and disconnect the wide display cable press connector.

    • Then, use the tip of a spudger to pry up and disconnect the Multi‑Touch cable press connector.

    Ask FixBot
  24. iPad Pro 13" Rear Camera Replacement: step 24, image 1 of 3 iPad Pro 13" Rear Camera Replacement: step 24, image 2 of 3 iPad Pro 13" Rear Camera Replacement: step 24, image 3 of 3
    • Use the tip of a spudger to pry up and disconnect both of the display power cable press connectors.

    Ask FixBot
  25. iPad Pro 13" Rear Camera Replacement, Remove the screen: step 25, image 1 of 2 iPad Pro 13" Rear Camera Replacement, Remove the screen: step 25, image 2 of 2
    • Remove the screen.

    Ask FixBot
  26. iPad Pro 13" Rear Camera Replacement, Remove the rear camera cover: step 26, image 1 of 2 iPad Pro 13" Rear Camera Replacement, Remove the rear camera cover: step 26, image 2 of 2
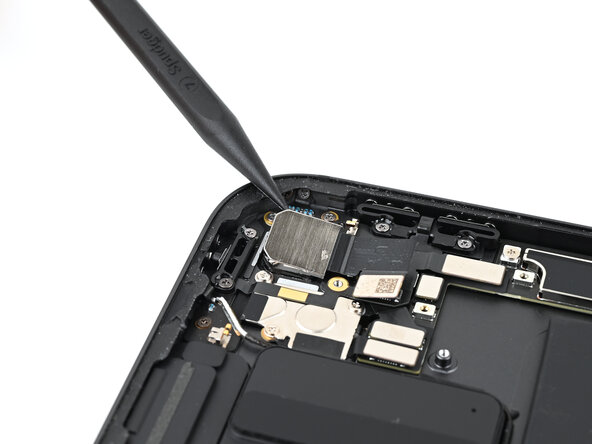
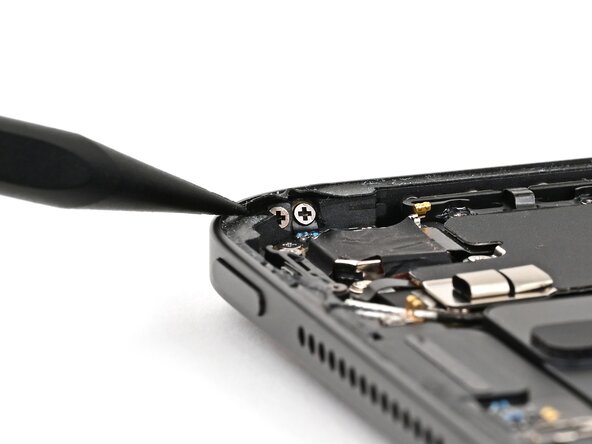
    • Use a JCIS or JIS 00 screwdriver to remove the four screws securing the rear camera cover:

    • Two 1.4 mm‑long screws, one near the center and one in the top-right corner

    • Two 1.6 mm‑long screws, one near the middle of the left edge and one near the bottom-right corner

    Ask FixBot
  27. iPad Pro 13" Rear Camera Replacement: step 27, image 1 of 2 iPad Pro 13" Rear Camera Replacement: step 27, image 2 of 2
    • Use tweezers or your fingers to remove the rear camera cover.

    Ask FixBot
  28. iPad Pro 13" Rear Camera Replacement, Remove the grounding sticker: step 28, image 1 of 3 iPad Pro 13" Rear Camera Replacement, Remove the grounding sticker: step 28, image 2 of 3 iPad Pro 13" Rear Camera Replacement, Remove the grounding sticker: step 28, image 3 of 3
    • Use a pair of angled tweezers to gently peel up the black grounding sticker covering the back of the camera.

    • Check the replacement camera. If it doesn't have a grounding sticker, set the sticker aside carefully so you can put it on the new camera later.

    Ask FixBot
  29. iPad Pro 13" Rear Camera Replacement, Disconnect the camera: step 29, image 1 of 2 iPad Pro 13" Rear Camera Replacement, Disconnect the camera: step 29, image 2 of 2
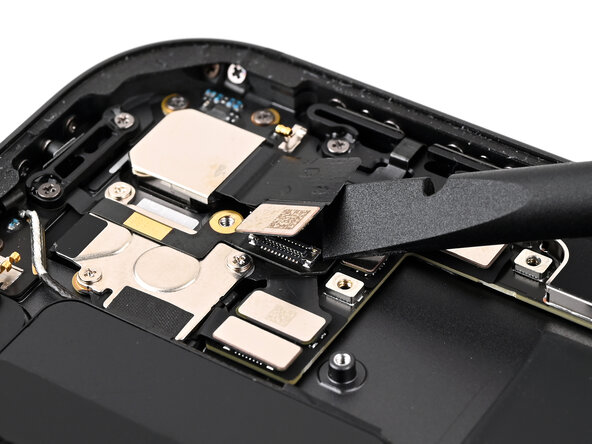
    • Place the flat end of a spudger between the camera ribbon cable and the top button ribbon cable, against the camera press connector.

    • While holding the top button ribbon cable down with the spudger, twist the spudger to disconnect the rear camera press connector.

    Ask FixBot
  30. iPad Pro 13" Rear Camera Replacement, Remove the camera: step 30, image 1 of 1
    • Use a spudger to break the glue dots near the top-left and bottom-right corners of the camera.

    • These glue dots are small and hard to see. If the camera doesn't pry up easily in the next step, look for more glue dots.

    Ask FixBot
  31. iPad Pro 13" Rear Camera Replacement: step 31, image 1 of 3 iPad Pro 13" Rear Camera Replacement: step 31, image 2 of 3 iPad Pro 13" Rear Camera Replacement: step 31, image 3 of 3
    • Use the point of a spudger to pry the camera up from the top-left corner.

    • The camera is adhered to the iPad. Apply slow, firm pressure to give it time to release.

    • Once the camera is free, grab it by the ribbon cable and remove it.

    Ask FixBot
  32. iPad Pro 13" Rear Camera Replacement, Disassembly complete: step 32, image 1 of 1
    • Congratulations on completing disassembly! The remaining steps will show how to reassemble the iPad.

    Ask FixBot
  33. iPad Pro 13" Rear Camera Replacement, Clean the camera housing: step 33, image 1 of 2 iPad Pro 13" Rear Camera Replacement, Clean the camera housing: step 33, image 2 of 2
    • If any camera adhesive stayed on the frame, you'll need to clean it before installing a new camera.

    • Wrap a microfiber or lint-free cloth around a spudger and apply some high-concentration (>90%) isopropyl alcohol to the cloth.

    • Clean the camera housing, being careful not to scratch the lens.

    Ask FixBot
  34. iPad Pro 13" Rear Camera Replacement, Check the adhesive: step 34, image 1 of 2 iPad Pro 13" Rear Camera Replacement, Check the adhesive: step 34, image 2 of 2
    • The new camera should have new adhesive on it or with it.

    • If the adhesive isn't already on the camera, apply the new adhesive to the camera around the lens, making sure to match the notches in the adhesive with the notches in the camera.

    • Remove any liners.

    Ask FixBot
  35. iPad Pro 13" Rear Camera Replacement, Place the camera: step 35, image 1 of 2 iPad Pro 13" Rear Camera Replacement, Place the camera: step 35, image 2 of 2
    • Gently set the camera into the housing, but don't press it down yet.

    Ask FixBot
  36. iPad Pro 13" Rear Camera Replacement, Connect the camera: step 36, image 1 of 2 iPad Pro 13" Rear Camera Replacement, Connect the camera: step 36, image 2 of 2
    • Use the flat end of a spudger or your finger to connect the camera press connector.

    Ask FixBot
  37. iPad Pro 13" Rear Camera Replacement, Press the camera: step 37, image 1 of 2 iPad Pro 13" Rear Camera Replacement, Press the camera: step 37, image 2 of 2
    • Firmly press the camera into place for ten seconds to let the adhesive bond.

    Ask FixBot
  38. iPad Pro 13" Rear Camera Replacement, Clean the camera: step 38, image 1 of 2 iPad Pro 13" Rear Camera Replacement, Clean the camera: step 38, image 2 of 2
    • If your replacement camera includes a grounding sticker, skip the next two steps.

    • Use a microfiber or lint-free cloth and high-concentration (>90%) isopropyl alcohol to clean the back of the camera.

    • Do this even for a new camera to help the sticker stick.

    • Let the camera dry completely.

    Ask FixBot
  39. iPad Pro 13" Rear Camera Replacement, Place the grounding sticker: step 39, image 1 of 3 iPad Pro 13" Rear Camera Replacement, Place the grounding sticker: step 39, image 2 of 3 iPad Pro 13" Rear Camera Replacement, Place the grounding sticker: step 39, image 3 of 3
    • If the new camera has a grounding sticker attached, skip this step, but be sure to remove any liners that might be present.

    • Use tweezers or your fingers to place the grounding sticker over the camera. The tabs should extend past the camera's left and bottom edges.

    • Use a spudger or your fingers to press down the grounding sticker, including its tabs on the sides of the camera.

    Ask FixBot
  40. iPad Pro 13" Rear Camera Replacement, Install the rear camera cover: step 40, image 1 of 2 iPad Pro 13" Rear Camera Replacement, Install the rear camera cover: step 40, image 2 of 2
    • Use tweezers or your fingers to place the rear camera cover over the rear camera.

    Ask FixBot
  41. iPad Pro 13" Rear Camera Replacement: step 41, image 1 of 2 iPad Pro 13" Rear Camera Replacement: step 41, image 2 of 2
    • Use a JCIS or JIS 00 driver to install the four screws securing the rear camera cover:

    • Two 1.4 mm‑long screws, one near the center and one in the top-right corner

    • Two 1.6 mm‑long screws, one near the middle of the left edge and one near the bottom-right corner

    Ask FixBot
  42. iPad Pro 13" Rear Camera Replacement, Clean frame adhesive: step 42, image 1 of 3 iPad Pro 13" Rear Camera Replacement, Clean frame adhesive: step 42, image 2 of 3 iPad Pro 13" Rear Camera Replacement, Clean frame adhesive: step 42, image 3 of 3
    • Don't touch the ambient light sensor near the middle of the left edge or TrueDepth camera near the middle of the top edge while cleaning the frame.

    • Use the tip of a spudger to lift a section of adhesive. Look for an edge or overhang where you can get underneath the adhesive strip.

    Ask FixBot
  43. iPad Pro 13" Rear Camera Replacement: step 43, image 1 of 2 iPad Pro 13" Rear Camera Replacement: step 43, image 2 of 2
    • Use tweezers or your fingers to lift and remove the old screen adhesive. Apply a little heat to make the removal easier.

    Ask FixBot
  44. iPad Pro 13" Rear Camera Replacement: step 44, image 1 of 3 iPad Pro 13" Rear Camera Replacement: step 44, image 2 of 3 iPad Pro 13" Rear Camera Replacement: step 44, image 3 of 3
    Tool used on this step:
    Adhesive Cleanup Kit (Set of 12)
    $7.99
    Buy
    • Apply a bit of isopropyl alcohol to a cotton swab or lint-free cloth and clean the frame until it's free of adhesive residue.

    • Alternatively, use our adhesive cleanup kit.

    Ask FixBot
  45. iPad Pro 13" Rear Camera Replacement, Clean screen adhesive: step 45, image 1 of 3 iPad Pro 13" Rear Camera Replacement, Clean screen adhesive: step 45, image 2 of 3 iPad Pro 13" Rear Camera Replacement, Clean screen adhesive: step 45, image 3 of 3
    • Skip this step if you're installing a new screen.

    • Repeat this process to clean the adhesive off the screen bezel.

    • Don't scrape with a metal tool, or you will scratch the display assembly's black paint.

    • Only apply solvents (like isopropyl alcohol) to the black bezel. Don't let any get under the front sensor assembly or display itself. Solvents will also dissolve the foam gaskets, especially around the front camera cutouts.

    Ask FixBot
  46. iPad Pro 13" Rear Camera Replacement, Align new adhesive: step 46, image 1 of 2 iPad Pro 13" Rear Camera Replacement, Align new adhesive: step 46, image 2 of 2
    • If your replacement screen comes with adhesive pre‑installed, skip the next twelve steps.

    • Be careful not to crease or stretch the adhesive during installation. It can't be used if damaged.

    • Align the adhesive with the frame of the iPad. It's easiest to align it above the USB‑C port.

    Ask FixBot
  47. iPad Pro 13" Rear Camera Replacement, Flip the adhesive over: step 47, image 1 of 2 iPad Pro 13" Rear Camera Replacement, Flip the adhesive over: step 47, image 2 of 2
    • Flip the adhesive over so it's aligned with the back of the screen.

    Ask FixBot
  48. iPad Pro 13" Rear Camera Replacement, Set the adhesive aside: step 48, image 1 of 2 iPad Pro 13" Rear Camera Replacement, Set the adhesive aside: step 48, image 2 of 2
    • Lift the adhesive off the back of the screen and set it to the side. Keep it in the same orientation as the screen.

    Ask FixBot
  49. iPad Pro 13" Rear Camera Replacement: step 49, image 1 of 2 iPad Pro 13" Rear Camera Replacement: step 49, image 2 of 2
    • Don't remove any of the plastic adhesive liners yet—they keep the adhesive in shape.

    • Use scissors to cut the adhesive vertically in half. Be careful not to crease or pull the adhesive itself.

    Ask FixBot
  50. iPad Pro 13" Rear Camera Replacement, Left adhesive: step 50, image 1 of 3 iPad Pro 13" Rear Camera Replacement, Left adhesive: step 50, image 2 of 3 iPad Pro 13" Rear Camera Replacement, Left adhesive: step 50, image 3 of 3
    • The adhesive is encased in four layers of plastic—three on top and one on the bottom.

    • Peel and remove the topmost plastic cling layer from the left adhesive strip.

    Ask FixBot
  51. iPad Pro 13" Rear Camera Replacement: step 51, image 1 of 3 iPad Pro 13" Rear Camera Replacement: step 51, image 2 of 3 iPad Pro 13" Rear Camera Replacement: step 51, image 3 of 3
    • Flip the left adhesive over.

    • Peel the clear liner with the blue line off the back of the left adhesive. The adhesive is now exposed.

    Ask FixBot
  52. iPad Pro 13" Rear Camera Replacement, Install the left adhesive: step 52, image 1 of 3 iPad Pro 13" Rear Camera Replacement, Install the left adhesive: step 52, image 2 of 3 iPad Pro 13" Rear Camera Replacement, Install the left adhesive: step 52, image 3 of 3
    • Work slowly when installing the adhesive—once it sticks, it can't be repositioned.

    • Flip the left adhesive and align it to the left edge of the display assembly.

    • Set the left adhesive in place aligned with the left edge of the screen.

    • Press the top and bottom sections of the left adhesive onto the back of the screen.

    Ask FixBot
  53. iPad Pro 13" Rear Camera Replacement: step 53, image 1 of 3 iPad Pro 13" Rear Camera Replacement: step 53, image 2 of 3 iPad Pro 13" Rear Camera Replacement: step 53, image 3 of 3
    • Remove the clear liner on the left adhesive. Leave the final blue liner in place.

    Ask FixBot
  54. iPad Pro 13" Rear Camera Replacement, Prepare the right adhesive: step 54, image 1 of 3 iPad Pro 13" Rear Camera Replacement, Prepare the right adhesive: step 54, image 2 of 3 iPad Pro 13" Rear Camera Replacement, Prepare the right adhesive: step 54, image 3 of 3
    • Repeat the preparation process with the right adhesive strip.

    • Peel and remove the topmost (clear) cling layer from the strip.

    • Peel and remove the bottom liner layer (clear with a blue line) from the strip.

    Ask FixBot
  55. iPad Pro 13" Rear Camera Replacement: step 55, image 1 of 2 iPad Pro 13" Rear Camera Replacement: step 55, image 2 of 2
    • Flip the right adhesive and peel off the clear liner with a blue line.

    Ask FixBot
  56. iPad Pro 13" Rear Camera Replacement, Install the right adhesive: step 56, image 1 of 3 iPad Pro 13" Rear Camera Replacement, Install the right adhesive: step 56, image 2 of 3 iPad Pro 13" Rear Camera Replacement, Install the right adhesive: step 56, image 3 of 3
    • Flip the right adhesive and set it in place, aligned with the right edge of the screen.

    • Press the top and bottom sections of the right adhesive onto the back of the screen.

    Ask FixBot
  57. iPad Pro 13" Rear Camera Replacement, Remove the clear liner: step 57, image 1 of 2 iPad Pro 13" Rear Camera Replacement, Remove the clear liner: step 57, image 2 of 2
    • Remove the clear liner off the right adhesive. Leave the final blue liner in place.

    Ask FixBot
  58. iPad Pro 13" Rear Camera Replacement, Press the adhesive: step 58, image 1 of 3 iPad Pro 13" Rear Camera Replacement, Press the adhesive: step 58, image 2 of 3 iPad Pro 13" Rear Camera Replacement, Press the adhesive: step 58, image 3 of 3
    • Use the flat end of a spudger to gently press all the adhesive into place around the entire perimeter of the iPad. Be careful not to press on the delicate ribbon cables across the bottom of the screen.

    Ask FixBot
  59. iPad Pro 13" Rear Camera Replacement, Set the screen on the iPad: step 59, image 1 of 2 iPad Pro 13" Rear Camera Replacement, Set the screen on the iPad: step 59, image 2 of 2
    • Place a clean cloth over the left battery cell in the iPad.

    • Set the screen on the iPad, so the screen cable connectors can reach their respective sockets in the iPad.

    Ask FixBot
  60. iPad Pro 13" Rear Camera Replacement, Connect the display power cables: step 60, image 1 of 3 iPad Pro 13" Rear Camera Replacement, Connect the display power cables: step 60, image 2 of 3 iPad Pro 13" Rear Camera Replacement, Connect the display power cables: step 60, image 3 of 3
    • Align one of the display power cable press connectors over its socket on the logic board.

    • Press down with the flat end of a spudger or your fingertip—first on one of the short sides, then the other—until it clicks into place.

    • Don't try to force the connector into place. If you're having trouble, reposition it and try again.

    • Repeat this process to connect the second display power cable press connector.

    Ask FixBot
  61. iPad Pro 13" Rear Camera Replacement, Connect the display cables: step 61, image 1 of 3 iPad Pro 13" Rear Camera Replacement, Connect the display cables: step 61, image 2 of 3 iPad Pro 13" Rear Camera Replacement, Connect the display cables: step 61, image 3 of 3
    • Repeat the same procedure to connect the two remaining display cables.

    Ask FixBot
  62. iPad Pro 13" Rear Camera Replacement, Install the display connectors cover: step 62, image 1 of 2 iPad Pro 13" Rear Camera Replacement, Install the display connectors cover: step 62, image 2 of 2
    • Set the display connectors cover onto the logic board so it's aligned with its screw holes.

    Ask FixBot
  63. iPad Pro 13" Rear Camera Replacement, Install the display connectors cover screws: step 63, image 1 of 1
    • Use a JCIS or JIS 00 screwdriver to install the six screws securing the display connectors cover:

    • Four 2.1 mm‑long screws towards the center of the iPad

    • Two 1.6 mm‑long screws near the edge of the iPad

    Ask FixBot
  64. iPad Pro 13" Rear Camera Replacement, Remove the final adhesive liners: step 64, image 1 of 3 iPad Pro 13" Rear Camera Replacement, Remove the final adhesive liners: step 64, image 2 of 3 iPad Pro 13" Rear Camera Replacement, Remove the final adhesive liners: step 64, image 3 of 3
    • Use tweezers or your fingers to remove the final, blue liners off the iPad screen adhesive.

    Ask FixBot
  65. iPad Pro 13" Rear Camera Replacement: step 65, image 1 of 1
    • Verify all the adhesive liners are removed. The adhesive is now exposed.

    Ask FixBot
  66. iPad Pro 13" Rear Camera Replacement, Remove the cloth: step 66, image 1 of 3 iPad Pro 13" Rear Camera Replacement, Remove the cloth: step 66, image 2 of 3 iPad Pro 13" Rear Camera Replacement, Remove the cloth: step 66, image 3 of 3
    • Without touching the adhesive, slightly lift the iPad screen and remove the cloth between it and the iPad.

    Ask FixBot
  67. iPad Pro 13" Rear Camera Replacement, Set the screen down at an angle: step 67, image 1 of 3 iPad Pro 13" Rear Camera Replacement, Set the screen down at an angle: step 67, image 2 of 3 iPad Pro 13" Rear Camera Replacement, Set the screen down at an angle: step 67, image 3 of 3
    • Don't align the iPad screen with the frame yet—the front sensor assembly still needs to be connected.

    • Flip the iPad screen over and set it down at a slight angle on top of the iPad frame.

    Ask FixBot
  68. iPad Pro 13" Rear Camera Replacement, Connect the front sensor assembly: step 68, image 1 of 2 iPad Pro 13" Rear Camera Replacement, Connect the front sensor assembly: step 68, image 2 of 2
    • Be careful not to strain the microphone cable while connecting it. If it doesn't reach, lower the screen until it does.

    • Hover the top of the screen over the microphone connector's socket on the board.

    • Use the flat end of a spudger or your finger to connect the microphone press connector to its socket on the board (located next to the front camera assembly).

    Ask FixBot
  69. iPad Pro 13" Rear Camera Replacement, Install the microphone connector cover: step 69, image 1 of 3 iPad Pro 13" Rear Camera Replacement, Install the microphone connector cover: step 69, image 2 of 3 iPad Pro 13" Rear Camera Replacement, Install the microphone connector cover: step 69, image 3 of 3
    • Use tweezers to install the microphone connector cover into its slot beneath the front camera assembly bracket.

    • Set the cover down so it's aligned with its screw hole.

    • The cover may try to stick to the magnets next to it. Keep it in place for the next step.

    Ask FixBot
  70. iPad Pro 13" Rear Camera Replacement: step 70, image 1 of 1
    • Use a JCIS or JIS 00 screwdriver to install the 1.3 mm‑long screw securing the microphone connector cover.

    Ask FixBot
  71. iPad Pro 13" Rear Camera Replacement, Install the screen: step 71, image 1 of 3 iPad Pro 13" Rear Camera Replacement, Install the screen: step 71, image 2 of 3 iPad Pro 13" Rear Camera Replacement, Install the screen: step 71, image 3 of 3
    • Carefully align the bottom edge of the screen with the bottom edge of the iPad.

    • Position the screen so it sits into the lip on the edge of the iPad.

    • Before closing up the display, check to make sure that no cables are trapped beneath the screen. If they are, lift the top edge slightly (without straining the microphone cable), reposition the screen, and try again.

    Ask FixBot
  72. iPad Pro 13" Rear Camera Replacement: step 72, image 1 of 2 iPad Pro 13" Rear Camera Replacement: step 72, image 2 of 2
    • Lower the screen into place, ensuring the screen's bottom edge stays flush with the bottom edge of the iPad.

    Ask FixBot
  73. iPad Pro 13" Rear Camera Replacement: step 73, image 1 of 3 iPad Pro 13" Rear Camera Replacement: step 73, image 2 of 3 iPad Pro 13" Rear Camera Replacement: step 73, image 3 of 3
    • Press down across the bottom edge, then across the entire perimeter of the screen so it sits flush.

    Ask FixBot
  74. iPad Pro 13" Rear Camera Replacement, Heat the screen: step 74, image 1 of 2 iPad Pro 13" Rear Camera Replacement, Heat the screen: step 74, image 2 of 2
    • To help the adhesive bond, apply heat to all four edges of the screen using an iOpener, hair dryer, or heat gun until it's hot to the touch.

    Ask FixBot
  75. iPad Pro 13" Rear Camera Replacement, Press the screen adhesive: step 75, image 1 of 2 iPad Pro 13" Rear Camera Replacement, Press the screen adhesive: step 75, image 2 of 2
    • In order for the adhesive to bond correctly, you'll need to apply even pressure around the perimeter of the iPad. You can compensate for the camera bump by laying the iPad face-down and placing coins around its perimeter.

    • Alternatively, you can use screen vise clamps around the perimeter of your device to set the new adhesive.

    • Place the iPad screen-side-down on a soft, flat surface.

    • Apply tape to the back to protect its finish.

    Ask FixBot
  76. iPad Pro 13" Rear Camera Replacement: step 76, image 1 of 3 iPad Pro 13" Rear Camera Replacement: step 76, image 2 of 3 iPad Pro 13" Rear Camera Replacement: step 76, image 3 of 3
    • Place evenly spaced layers of coins or similarly thick objects on the tape along the edges of the back glass.

    • Stack them to a consistent height taller than the camera bump.

    Ask FixBot
  77. iPad Pro 13" Rear Camera Replacement: step 77, image 1 of 1
    • Stack multiple books or other heavy objects on the iPad.

    • The coins may leave an impression on the bottom object, so don't use anything valuable.

    • Leave the objects in place for at least thirty minutes. The lighter the objects, the longer they should be left. Ideally, leave them stacked overnight.

    Ask FixBot
Conclusion

Calibrate the replacement rear camera using Apple's Repair Assistant. Navigate to Settings General About Parts & Service History, tap Restart & Finish Repair, and follow the onscreen prompts.

Take your e-waste to an R2 or e-Stewards certified recycler.

Repair didn’t go as planned? Try some basic troubleshooting, or ask our iPad Pro 13" Answers Community for help.

Nick Schultz

Member since: 03/24/24

54,202 Reputation

305 Guides authored

0 Guide Comments

Add Comment

View Statistics:

Past 24 Hours: 1

Past 7 Days: 7

Past 30 Days: 30

All Time: 161