
Display Assembly (Unfasten)

Prerequisite Only
This guide is only intended to be used as a prerequisite for other guides. It's incomplete by itself.

What you need

  1. Display Assembly (Unfasten), Tape over a cracked screen: step 1, image 1 of 3 Display Assembly (Unfasten), Tape over a cracked screen: step 1, image 2 of 3 Display Assembly (Unfasten), Tape over a cracked screen: step 1, image 3 of 3
    Tool used on this step:
    Safety Glasses
    $3.19
    Buy
    • If your display is badly cracked, covering it with a layer of clear packing tape may allow the suction cup to adhere. Alternatively, very strong tape may be used instead of the suction cup. If all else fails, you can superglue the suction cup to the broken screen.

    • Do your best to follow the rest of the guide as described. However, once the glass is broken, it will likely continue to crack as you work, and you may need to use a metal prying tool to scoop the glass out.

    • Wear eye protection. The glass may break, sending pieces flying.

  2. Display Assembly (Unfasten), Adhesive tip: step 2, image 1 of 2 Display Assembly (Unfasten), Adhesive tip: step 2, image 2 of 2
    • Removing the screen involves using an opening pick and/or halberd spudger to separate the adhesive securing the screen to the frame.

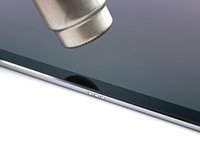
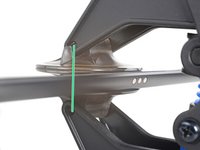
    • As you slice through the adhesive, note the following:

    • The adhesive on the long edges of the iPad is about 4 mm wide. Avoid slicing deeper than that, or you risk damaging the display panel.

    • The adhesive on the short edges of the iPad is about 2 mm wide. Avoid slicing deeper than that.

    • Take especially care when slicing near the home button and charging port to avoid damaging the flex cables.

    • Take extra care when you slice near the front facing camera, to avoid damaging or smearing it.

  3. Display Assembly (Unfasten), Heat the left edge: step 3, image 1 of 2 Display Assembly (Unfasten), Heat the left edge: step 3, image 2 of 2
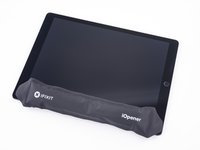
    • Apply a heated iOpener to the left edge of the screen to loosen the adhesive underneath. Apply the iOpener for at least 5 minutes.

    • A hair dryer, heat gun, or hot plate may also be used, but be careful not to overheat the device.

    • The display adhesive of the iPad is strong and the glass breaks easily. You need to reheat and reapply the iOpener in each section several times during the display removal.

  4. Display Assembly (Unfasten), Anti-Clamp instructions: step 4, image 1 of 3 Display Assembly (Unfasten), Anti-Clamp instructions: step 4, image 2 of 3 Display Assembly (Unfasten), Anti-Clamp instructions: step 4, image 3 of 3
    Tool used on this step:
    Anti-Clamp
    $24.95
    Buy
    • The next three steps demonstrate the Anti-Clamp, a tool we designed to make the opening procedure easier. If you aren't using the Anti-Clamp, skip down three steps for an alternate method.

    • For complete instructions on how to use the Anti-Clamp, check out this guide.

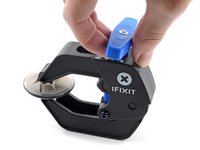
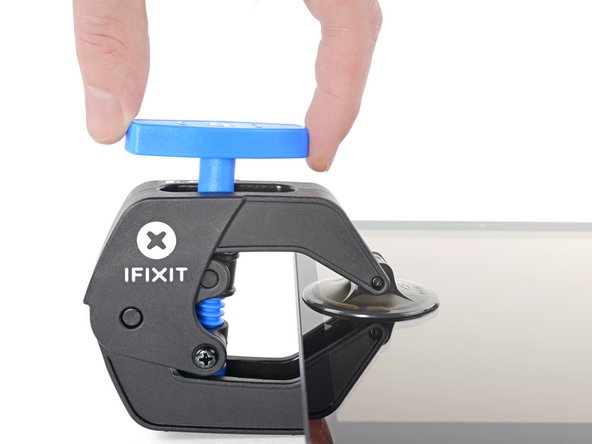
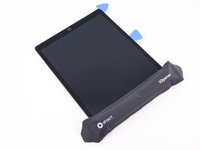
    • Pull the blue handle backwards to unlock the Anti-Clamp's arms.

    • Place an object under your iPad so it rests level between the suction cups.

    • Position the suction cups near the middle of the left edge—one on the top, and one on the bottom.

    • Hold the bottom of the Anti-Clamp steady and firmly press down on the top cup to apply suction.

    • If you find that the surface of your iPad is too slippery for the Anti-Clamp to hold onto, use tape to create a grippier surface.

  5. Display Assembly (Unfasten): step 5, image 1 of 3 Display Assembly (Unfasten): step 5, image 2 of 3 Display Assembly (Unfasten): step 5, image 3 of 3
    • Pull the blue handle forward to lock the arms.

    • Turn the handle clockwise 360 degrees or until the cups start to stretch.

    • Make sure the suction cups remain aligned with each other. If they begin to slip out of alignment, loosen the suction cups slightly and realign the arms.

  6. Display Assembly (Unfasten): step 6, image 1 of 2 Display Assembly (Unfasten): step 6, image 2 of 2
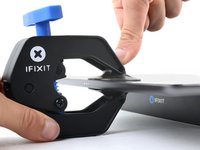
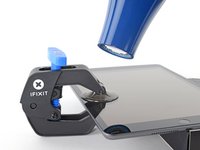
    • Wait one minute to give the adhesive a chance to release and present an opening gap.

    • If your screen isn't getting hot enough, you can use a hair dryer to heat along the left edge of the iPad.

    • For complete instructions on how to use a hair dryer, check out this guide.

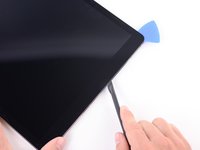
    • Insert an opening pick under the screen when the Anti-Clamp creates a large enough gap.

    • If the Anti-Clamp doesn't create a sufficient gap, apply more heat to the area and rotate the handle clockwise half a turn.

    • Don't crank more than a half a turn at a time, and wait one minute between turns. Let the Anti-Clamp and time do the work for you.

    • Skip the next two steps.

  7. Display Assembly (Unfasten), Apply a suction handle: step 7, image 1 of 1
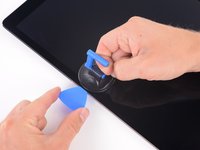
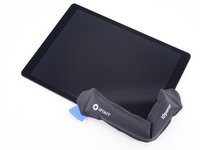
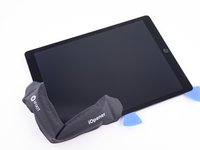
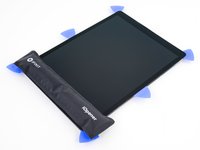
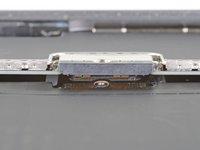
    • Once the screen is warm to touch, apply a suction handle to the left edge of the iPad's screen, above the Smart Connector port and as close to the edge as possible.

  8. Display Assembly (Unfasten), Insert an opening pick: step 8, image 1 of 3 Display Assembly (Unfasten), Insert an opening pick: step 8, image 2 of 3 Display Assembly (Unfasten), Insert an opening pick: step 8, image 3 of 3
    • While holding down the corners of the iPad, repeatedly pull up on the screen, then ease it back down to weaken the adhesive. This will eventually create a small gap in the seam.

    • If the edge cools down during the pulling process, reheat the edge with an iOpener before proceeding.

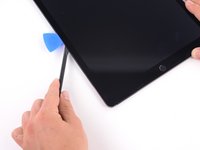
    • Once you've created a small gap, insert the tip of an opening pick into the gap.

    • Don't insert your opening pick deeper than 3–4 mm, or you risk permanently damaging the display panel.

  9. Display Assembly (Unfasten), Slice the adhesive: step 9, image 1 of 3 Display Assembly (Unfasten), Slice the adhesive: step 9, image 2 of 3 Display Assembly (Unfasten), Slice the adhesive: step 9, image 3 of 3
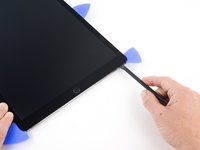
    • Reapply the iOpener to the bottom left corner of the iPad for at least 2 minutes, spanning from the opening pick to the home button.

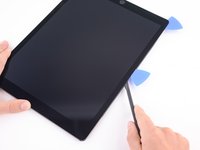
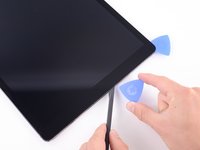
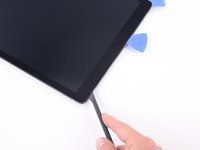
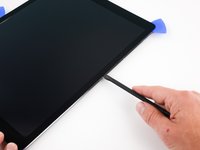
    • After letting the adhesive soften, insert an opening pick or halberd spudger into the gap next to the opening pick.

    • Don't insert your slicing tool deeper than 3–4 mm, or you risk permanently damaging the display panel.

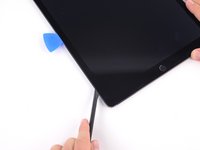
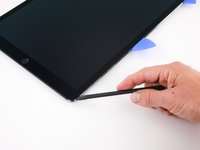
    • Use an opening pick or halberd spudger to slice the adhesive along the bottom left side of the iPad. If the slicing becomes difficult, reheat the edge and try again.

  10. Display Assembly (Unfasten), Insert an opening pick: step 10, image 1 of 1
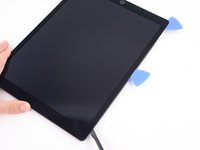
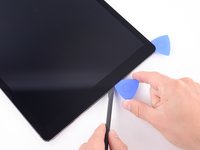
    • Insert an opening pick underneath the bottom left corner of the screen to prevent the adhesive from resealing.

  11. Display Assembly (Unfasten), Slice the adhesive: step 11, image 1 of 3 Display Assembly (Unfasten), Slice the adhesive: step 11, image 2 of 3 Display Assembly (Unfasten), Slice the adhesive: step 11, image 3 of 3
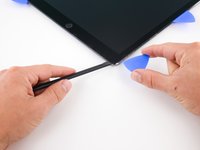
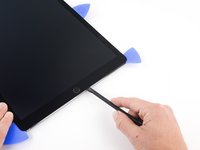
    • Reapply the iOpener to the upper left corner of the iPad for at least 2 minutes, spanning from the opening pick to the front facing camera.

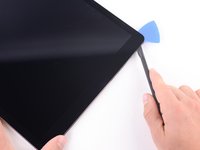
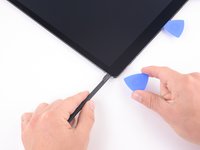
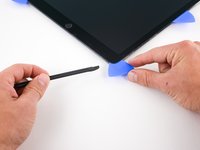
    • Use an opening pick or halberd spudger and slide along the upper left edge of the iPad to slice the adhesive.

    • If the slicing becomes difficult, reheat the edge and try again.

    • Don't insert your slicing tool deeper than 3–4 mm, or you risk permanently damaging the display panel.

  12. Display Assembly (Unfasten), Insert an opening pick: step 12, image 1 of 1
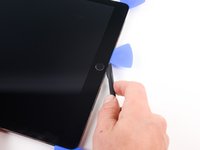
    • Insert an opening pick underneath the top left corner of the screen to prevent the adhesive from resealing.

  13. Display Assembly (Unfasten), Slice the adhesive: step 13, image 1 of 3 Display Assembly (Unfasten), Slice the adhesive: step 13, image 2 of 3 Display Assembly (Unfasten), Slice the adhesive: step 13, image 3 of 3
    • Reheat your iOpener and apply it the top edge of the device for at least 2 minutes.

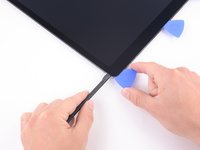
    • Use an opening pick or halberd spudger and slide along the top edge of the iPad to slice the adhesive. Stop before you reach the front-facing camera.

    • Don't insert your slicing tool deeper than 2 mm, or you risk permanently damaging the display panel.

    • If the slicing becomes difficult, reheat the edge and try again.

  14. Display Assembly (Unfasten), Insert an opening pick: step 14, image 1 of 2 Display Assembly (Unfasten), Insert an opening pick: step 14, image 2 of 2
    • Insert an opening pick underneath the screen just before the front-facing camera to prevent the adhesive from resealing.

  15. Display Assembly (Unfasten), Slice the adhesive: step 15, image 1 of 3 Display Assembly (Unfasten), Slice the adhesive: step 15, image 2 of 3 Display Assembly (Unfasten), Slice the adhesive: step 15, image 3 of 3
    • Reheat your iOpener and apply it to the top edge of the device for at least 2 minutes.

    • Insert an opening pick or a halberd spudger just past the front-facing camera.

    • Use your cutting tool to slice the remaining adhesive underneath the top edge of your device.

    • Don't insert your slicing tool deeper than 2 mm, or you risk permanently damaging the display panel.

    • If the slicing becomes hard, reheat the edge and try again.

  16. Display Assembly (Unfasten), Insert an opening pick: step 16, image 1 of 2 Display Assembly (Unfasten), Insert an opening pick: step 16, image 2 of 2
    • Insert an opening pick underneath the upper right corner of the screen to prevent the adhesive from resealing.

  17. Display Assembly (Unfasten), Slice the adhesive: step 17, image 1 of 3 Display Assembly (Unfasten), Slice the adhesive: step 17, image 2 of 3 Display Assembly (Unfasten), Slice the adhesive: step 17, image 3 of 3
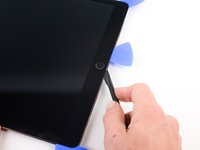
    • Apply a heated iOpener to the right edge of the screen for 5 minutes to loosen the adhesive underneath.

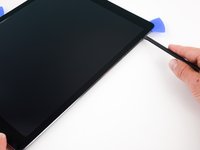
    • Use an opening pick or halberd spudger and slide along the right edge of the iPad to slice the adhesive.

    • Don't insert your slicing tool deeper than 3–4 mm, or you risk permanently damaging the display panel.

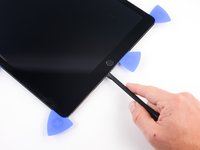
    • Insert an opening pick underneath the center of the right edge to prevent the adhesive from resealing.

  18. Display Assembly (Unfasten), Insert an opening pick: step 18, image 1 of 2 Display Assembly (Unfasten), Insert an opening pick: step 18, image 2 of 2
    • Insert an opening pick underneath the bottom right corner of the iPad to prevent the adhesive from resealing.

  19. Display Assembly (Unfasten), Slice the adhesive: step 19, image 1 of 3 Display Assembly (Unfasten), Slice the adhesive: step 19, image 2 of 3 Display Assembly (Unfasten), Slice the adhesive: step 19, image 3 of 3
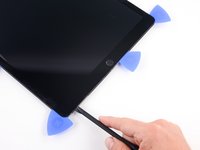
    • Reheat your iOpener and apply it to the bottom edge of the device for at least 2 minutes.

    • Insert an opening pick or a halberd spudger underneath the bottom right corner of the iPad.

    • Slide the opening pick along the bottom edge of the iPad, stopping short about 12 mm before reaching the home button.

    • Don't insert your slicing tool deeper than 2 mm, or you risk permanently damaging the display panel.

  20. Display Assembly (Unfasten), Insert an opening pick: step 20, image 1 of 2 Display Assembly (Unfasten), Insert an opening pick: step 20, image 2 of 2
    • Insert an opening pick underneath the screen just before the home button to prevent the adhesive from resealing.

    • Use the tip of an opening pick or an halberd spudger to slice the adhesive beneath the home button.

    • Don't insert your slicing tool deeper than 2 mm, or you risk permanently damaging the home button.

  21. Display Assembly (Unfasten), Slice the adhesive: step 21, image 1 of 2 Display Assembly (Unfasten), Slice the adhesive: step 21, image 2 of 2
    • Insert an opening pick or a halberd spudger just past the home button.

    • Use your cutting tool to slice the remaining adhesive underneath the bottom edge of your device.

  22. Display Assembly (Unfasten), Loosen and slice any remaining adhesive: step 22, image 1 of 1
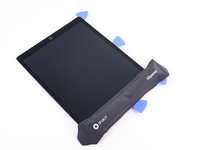
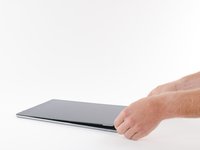
    • At this point, you've sliced through most of the screen adhesive. Use an opening pick to carefully slice any remaining adhesive along the edges until the screen is freed.

    • If some parts are stubborn, heat the area with an iOpener to loosen the adhesive.

  23. Display Assembly (Unfasten), Lift the display: step 23, image 1 of 3 Display Assembly (Unfasten), Lift the display: step 23, image 2 of 3 Display Assembly (Unfasten), Lift the display: step 23, image 3 of 3
    • The iPad shown in the following two steps is the iPad Pro 12.9" 1st Generation. The internals look slightly different but the taping procedure is the same.

    • The display cables in this iPad are very short. Read the next two steps before you proceed.

    • Do not pivot the screen about the lower edge. The display cables don't have enough slack to allow for this and will tear if you do not slide the screen towards the front-facing camera as you lift.

    • The display cables will tear if you raise the screen more than 90º.

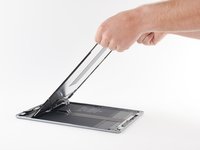
    • Lift up the upper edge of the screen and slide the entire screen towards the front-facing camera to access the iPad's internal components.

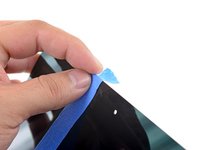
    • Use masking tape to tape the lower edge of the screen to the frame to prevent the screen from slipping.

  24. Display Assembly (Unfasten), Prop up the screen: step 24, image 1 of 3 Display Assembly (Unfasten), Prop up the screen: step 24, image 2 of 3 Display Assembly (Unfasten), Prop up the screen: step 24, image 3 of 3
    • This step shows one way to support the screen using masking tape. You can also turn the iPad sideways. Make sure not to strain the display cables with whatever method you choose.

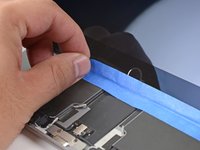
    • Attach a long strip of masking tape to the top edge of the screen. Fold the tape over the edge and make sure that the tape is attached securely.

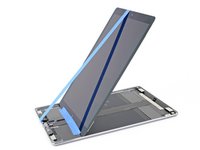
    • Attach the other end of the strip to the bottom edge of the iPad frame to hold the screen at an angle. Make sure the tape attaches securely to the frame.

  25. Display Assembly (Unfasten), Unfasten the logic board EMI shield screws: step 25, image 1 of 2 Display Assembly (Unfasten), Unfasten the logic board EMI shield screws: step 25, image 2 of 2
    • It's important to disconnect the battery before you proceed further. Detaching or connecting the display cables with the battery plugged in can cause a short that will destroy touchscreen functionality.

    • Use a Phillips screwdriver to remove the six screws securing the logic board EMI shield:

    • Two 2.4 mm-long screws

    • Four 1.2 mm-long screws

  26. Display Assembly (Unfasten), Remove the logic board EMI shield: step 26, image 1 of 3 Display Assembly (Unfasten), Remove the logic board EMI shield: step 26, image 2 of 3 Display Assembly (Unfasten), Remove the logic board EMI shield: step 26, image 3 of 3
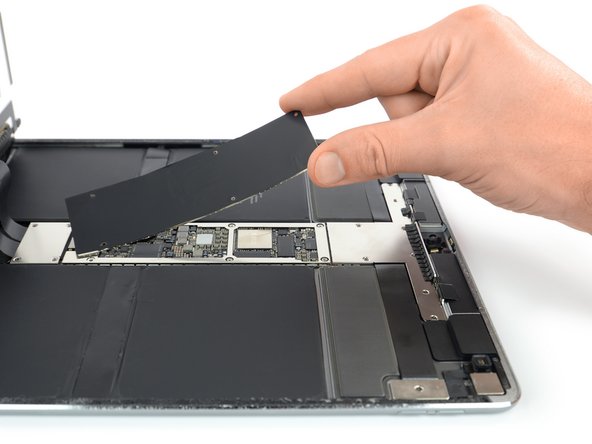
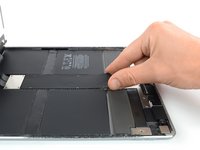
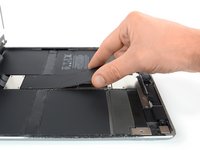
    • Lift the logic board EMI shield from the edge nearest the top of the iPad.

    • Peel up the EMI shield from the logic board.

    • This takes a bit of force due to the many tiny clips securing the shield, and the shield may deform slightly. That's okay—try to keep the deformation to a minimum, and it will lay flat when you reinstall it and screw it down.

    • Remove the logic board EMI shield.

  27. Display Assembly (Unfasten), Unfasten the battery connector screw: step 27, image 1 of 2 Display Assembly (Unfasten), Unfasten the battery connector screw: step 27, image 2 of 2
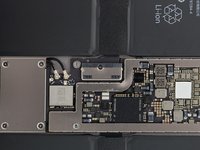
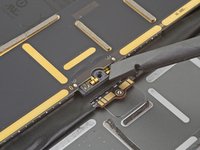
    • Use a Phillips screwdriver to remove the 1.6 mm-long screw securing the battery connector.

  28. Display Assembly (Unfasten), Battery connector information: step 28, image 1 of 3 Display Assembly (Unfasten), Battery connector information: step 28, image 2 of 3 Display Assembly (Unfasten), Battery connector information: step 28, image 3 of 3
    • These photos show what the battery connector looks like underneath the logic board. Use these photos as a reference while you safely disconnect the battery.

    • Notice that the battery connector has springs on the logic board that press down against the battery contact pads. You'll need to slide something thin and flexible between the contact points to disconnect the battery.

  29. Display Assembly (Unfasten), Create a battery blocker: step 29, image 1 of 3 Display Assembly (Unfasten), Create a battery blocker: step 29, image 2 of 3 Display Assembly (Unfasten), Create a battery blocker: step 29, image 3 of 3
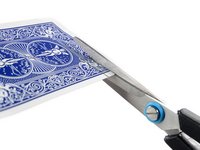
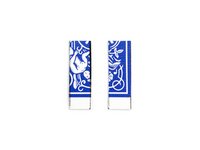
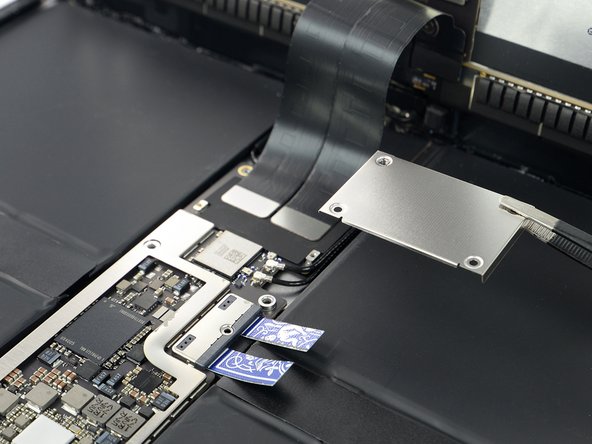
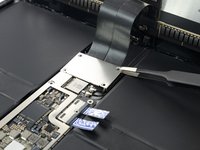
    • Use a piar of scissors to cut two 6 mm x 20 mm strips of a playing card to use as a battery blocker.

  30. Display Assembly (Unfasten), Insert the card strips: step 30, image 1 of 3 Display Assembly (Unfasten), Insert the card strips: step 30, image 2 of 3 Display Assembly (Unfasten), Insert the card strips: step 30, image 3 of 3
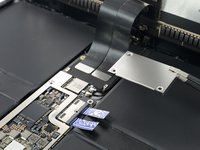
    • Gently insert the card strips on each side of the battery connector as far as they will go.

    • You can also use an iFixit battery blocker. Be very careful and don't push the battery blocker underneath the connector with excessive force.

  31. Display Assembly (Unfasten), Unfasten the display connector bracket screws: step 31, image 1 of 2 Display Assembly (Unfasten), Unfasten the display connector bracket screws: step 31, image 2 of 2
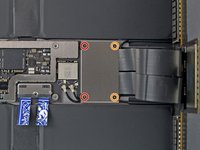
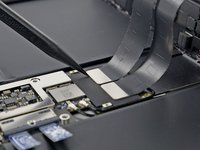
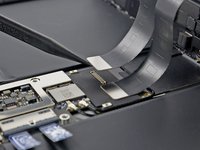
    • Use a Phillips screwdriver to remove the four screws securing the display connector bracket:

    • Two 1.2 mm-long screws

    • Two 2.4 mm-long screws

  32. Display Assembly (Unfasten), Remove the display connector bracket: step 32, image 1 of 2 Display Assembly (Unfasten), Remove the display connector bracket: step 32, image 2 of 2
    • Remove the display connector bracket.

  33. Display Assembly (Unfasten), Disconnect the display cables: step 33, image 1 of 3 Display Assembly (Unfasten), Disconnect the display cables: step 33, image 2 of 3 Display Assembly (Unfasten), Disconnect the display cables: step 33, image 3 of 3
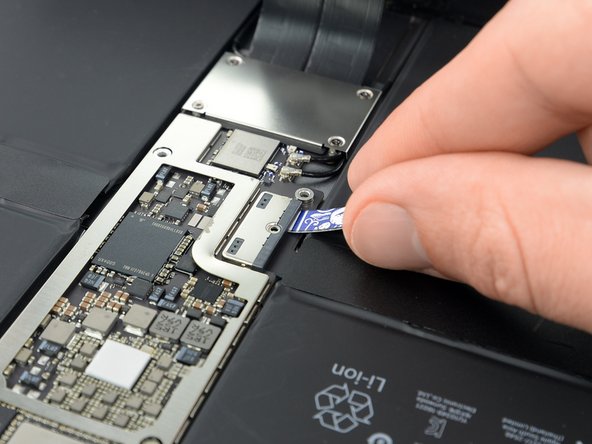
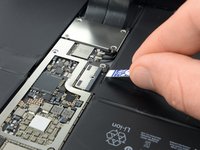
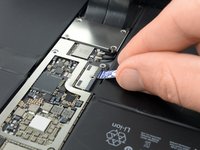
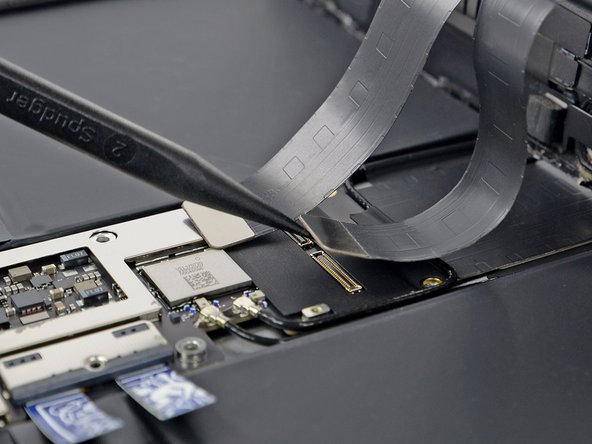
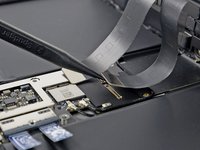
    • Use the pointed end of a spudger to pry up and disconnect the display and digitizer cables from their logic board sockets.

    • To re-attach press connectors like this one, carefully align and press down on one side until it clicks into place, then repeat on the other side. Do not press down on the middle. If the connector is misaligned, the pins can bend, causing permanent damage.

    • These cables are very delicate, and the connectors can damage easily if they're misaligned. When you reattach the cables to the logic board, try to have as much slack on the cables and gently press the connectors onto their sockets.

  34. Display Assembly (Unfasten), Remove the screen assembly: step 34, image 1 of 1
    • Remove the screen assembly.

Conclusion

If possible, turn on your device and test your repair before installing new adhesive and resealing.

Compare your new replacement part to the original part—you may need to transfer remaining components or remove adhesive backings from the new part before installing.

To reassemble your device, follow these instructions in reverse order.

During reassembly, apply new adhesive where it's necessary after cleaning the relevant areas with isopropyl alcohol (>90%).

The best way to secure the new screen is to apply a sheet of custom-cut double-sided tape to the back of the screen.

Take your e-waste to an R2 or e-Stewards certified recycler.

Repair didn’t go as planned? Try some basic troubleshooting, or ask our Answers community for help.

Dominik Schnabelrauch

Member since: 11/23/16

203,419 Reputation

682 Guides authored

Team

iFixit Member of iFixit

Staff

135 Members

16,820 Guides authored

0 Comments

Add Comment

View Statistics:

Past 24 Hours: 0

Past 7 Days: 0

Past 30 Days: 0

All Time: 11