
Introduction
Have you ever booted your MacBook and found it unresponsive? If you have encountered a black or white screen while restarting or booting up your MacBook, or you’re simply getting nothing on screen at all, don't panic, it’s possible you’ll even be able to solve your issue without the need for a costly repair.
If your Mac doesn’t seem like it’s powering on, you may want to head over to the troubleshooting page for that instead.
First Steps
It’s easy to forget some troubleshooting basics amidst frustration. Before undertaking any of the more time consuming solutions below, these are a few fundamentals to get you started.
- Perform a hard reset. Press and hold your power button for fifteen seconds, then release. Wait a few seconds, then try to power on again. This can resolve any minor hang ups in the startup process or resolve a stuck update.
- Connect, or reconnect your charger. Try a different port if you have multiple. This may kick the device out of sleep, or power it on if other methods are not working.
- Turn up your brightness settings. If your Mac has a Touch Bar, the brightness can be adjusted by moving the slider marked with the Sun logo. If you only have the row of Function Keys, display brightness can be adjusted up or down with F2 or F1, respectively.
- Disconnect any peripherals. Docks or multi-port hubs are notoriously problematic, especially if they have many items connected.
- Reset the PRAM or NVRAM. These are terms for a small amount of memory which contains system settings for the Mac, including brightness and display resolution.
- Reset the System Management Controller (or SMC). This can clear any bunk startup settings, or resolve issues where your Mac is stuck in sleep.
Triage
Troubleshooting is a process that often resembles medical diagnosis. Certain information can help hone in on a specific problem. Try these tests to point yourself in the right direction.
- Move your cursor around, especially towards the corners, or edges of the display. Try to get menus to appear. If you're getting any sort of pointer, your display hardware is working properly. Have a look at software fixes.
- Is your screen lighting up? Try powering on in a dark room for easier observation.
- Pro Tip: Macs with a white Apple logo on the lid use the display backlight to illuminate. If the Apple lights up, your backlight is working.
- If you don’t have any signs of backlight, check for an image on screen by shining a flashlight at your display. No backlight and no display means you can safely rule out software.
- Pro Tip: This is easiest to spot during boot up. The high contrast between the on screen Apple logo and the background significantly increases visibility.
- Bonus Pro Tip: If your Mac has the aforementioned white Apple logo on the lid, shine a light through it to emulate your backlight. Can you see an image now?
- Close and open your display. Check for changes in display behavior at different angles or when you move the lid. Differences in image or backlight with display angle generally indicates a faulty cable.
- Pro Tip: If you have a 2016 MacBook Pro or newer, or a Retina style MacBook Air, try closing your display, then open it slowly. Stop if your display is behaving normally. Continue to open the display and see if backlight levels, or image disappears as you open further. This behavior is indicative of faulty flex cables.
- No image or backlight? Connect your Mac to an external display. You may need a dock, or an adapter to accomplish this. If you get normal image on the external monitor, graphics processing is working properly.
- Getting trackpad click, but nothing else? See if the Caps Lock LED lights when you press the key. If no, you may have a firmware issue.
Causes
Keeping track of the information on your MacBook is hard work. Data is constantly being written, overwritten, accessed or deleted. Often following an update or power loss, data records may change in ways that are unintentional. This is commonly called data corruption. Even without corruption, software may contain flaws that result in unexpected behavior–including your blank display.
- Power down your Mac and try to launch into Safe Mode. A reboot after entering Safe Mode may be sufficient. Some OS repairs are done as part of this process.
- See if you get an image in Recovery Mode. Once there, repair the file system. Using Internet Recovery is best since this does not rely on access to the disk you’re repairing.
- If errors were repaired, restart your Mac and see if the issue is resolved.
- Reinstall, or upgrade your operating system using Recovery Mode. You can also use a bootable USB installer if you have access to another Mac.
- If all else fails, make sure you have a backup or come to terms with losing whatever you have stored currently. Erase your drive and reinstall the OS on the newly erased drive..
Note: If you do not have a backup, or are not willing to erase the drive, you still have options.

- 5 minutesVery easy

- 15 minutesEasy

- 30 minutes - 1 hourVery easy

- 30 minutes - 2 hoursEasy

- No estimateModerate
If your Mac is from 2018 or newer, it’s possible your MacBook encountered an error or lost power when it was updating the firmware. This might make it appear as though it’s not on, when it just doesn’t have the directions to boot up properly. Direct Firmware Upgrade or DFU mode can help to diagnose or solve this issue.
- Press and hold the power button for a solid twenty seconds. Release the button, wait a few seconds, and attempt to power it on again. This will force a normal boot attempt if your device was inadvertently put into DFU mode.
- To reinstall a known good copy of the firmware, you will need a second Mac that can run Apple Configurator 2 and a USB C cable.
- Follow the Apple Support page to get your Mac into DFU mode. You may need to disconnect and reconnect the cable between the two Macs to get Configurator to recognize the device.
- Note: The procedure for Macs with Apple Silicon processors varies slightly.
- Attempt a revive first. This will install a new copy of the device firmware. You should get an Apple logo on the device screen at some point during this process. If you do not, your issue is likely the display itself.
- If the Revive is unsuccessful, ensure you have a good backup and try a Restore.
- Note: This will reinitialize the internal storage. Your data will be erased, you may also need to reinstall the operating system depending on the device model.
- If you encounter an error during this process, try a different USB cable, internet connection, or both. If you are still unsuccessful, head over to the Answers Forum where you can get some more individual assistance. Make note of any error codes you get. They can help diagnose the underlying issue.

- 30 minutes - 1 hourVery easy
As laptops have continued to get thinner, the likelihood of damage to your display has increased dramatically. Visible damage can be harder to spot than you expect depending on its severity and location. Even without damage, the display may not work properly due to internal faults, damaged or not.
- Look closely at your display for signs of break. Changing your viewing angle may help catch small hairline cracks. .
- Check the bezel below the display as well. Damage to this area could sever or puncture the fragile cables beneath it.
- Check internal cables for signs of tears or other damage. Pay special attention to the cables leading from the TCON board to the display. They tend to collect debris and could have punctures or tears causing a variety of display related issues.
- If you find damage, or software fixes have not made a difference, replacing the display is the most likely solution. Use the appropriate Guide for your model. iFixit may even carry the screen!

Find compatible replacement parts for your Mac Laptop. All parts and fix kits are backed by the iFixit Quality Guarantee.
Starting with the 2016 Mac Book Pro family, Apple redesigned the way the display connects to the logic board. The Timing Control (or TCON) board is mounted inside the main housing of the device rather than hiding it under the display bezel. Cabling from the logic board connects to the TCON board, which then transmits signals to the display. In 2018, the MacBook Air redesign incorporated this layout. Well documented issues with this new design layout were observed in the repair community triggering a controversy known as “Flexgate.”
- These cables are a common fault due to repeat tension from opening and closing the screen. They are also prone to trapping debris that falls in the gap in the hinge area resulting in small cable punctures. This may also be referred to as “Dust Gate.”
- Inspect the cables for tears or dimples. Even minor damage could cause problems. Tears are common where they may rub against the edge of the TCON board.
- Even though the cables are the faulty part, the most common fix is replacing the entire display assembly.
- The cables themselves are extremely difficult to replace. One end is soldered to the TCON board. The other end leads under the back of the display panel, which is not intended to be removed independently.
- Some folks repair the cables with microsoldering, but this is not a repair for the faint of heart, or the inexperienced. They also tend to face the same failure since soldered on jumper wires don’t flex the same way as the cables they seek to repair.
Future iterations of the MacBook Pro contained cables that are slightly longer. These cables are less susceptible to this fault, but do not eliminate it.

Apple offers a Repair Program to resolve this for the 13” 2016 MacBook Pro models, but no others. There are reports of Apple extending this to other 2016 and 2017 models at their discretion, but you will likely have to press them for that sort of service.

Find compatible replacement parts for your Mac Laptop. All parts and fix kits are backed by the iFixit Quality Guarantee.
The cable which connects the logic board to the display is an uncommon fault, but as Adam Savage once said, “Failure is always an option.”
eDP Cable
- The Embedded DisplayPort or eDP cable used in MacBook Pros made in 2016 forward and Retina MacBook Airs is short, rigid and unlikely to go bad by itself, but reseating the cable connection is still a good idea.
- Liquid damage in this area can spell bad news. Check closely for signs of corrosion or liquid exposure here if your issue occurred following a spill.
- The layout of this connector positions the power line for your display’s backlight next to a line which carries data between the display and the CPU.
- The backlight line can run in excess of 40 Volts. The CPU data line is 1.8 Volts. If liquid gets into the connector when the display is on and bridges the backlight line into the adjacent data line…. I’m sure you can see why that might be a problem. Generally this is a death sentence for that part of the CPU which can no longer send data signals to the display. Logic board replacement would be necessary in this case
- Both the connections on the TCON board and the connector on the rear of the logic board could be affected. Inspect closely, and thoroughly if you are concerned this might be your issue.
LVDS Cable
Pre-2016 MacBook Pros and Pre-2018 MacBook Airs make use of a different display cable type. Low-Voltage Differential Signaling, or LVDS, is a communications standard often used for analog transmission of video signals.
- Reseat the cable connector on the logic board to start. Inspect the connector for pin damage or stuck debris.
- Verify the cable hasn’t gotten pinched in the hinges of the display or sustained any other damage. An off kilter display or improperly routed cable can cause progressive wear, or sever the cable altogether.
- Due to its proximity to the edge of the device, these connectors are a hot spot for liquid damage. Be sure to inspect for corrosion if you suspect liquid may have come into play.
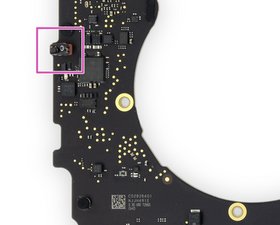
Few people think about the technology used to detect whether their laptop display is open or closed–it’s less sophisticated than you might suspect. Magnets present in the bezel of the display are detected by small sensors mounted in the chassis of the laptop. The lid closes, sensors see a magnetic field, the device gets the cue to sleep. Vice versa when you open it back up–simple, right? Despite the relative simplicity of the mechanism, they can still fail in a number of ways.
- To test for this issue, see if you can use magnets to trigger the wake signal by running them along the left or right sides of the MacBook’s housing.
- If you encounter difficulty, try to use a similar method to get a more specific idea of . Run the magnet along the left and right edges of the display, to map the magnets' location.
- This issue is most common on Retina MacBook Airs. The sensors on these models are mounted in peripheral components rather than on the logic board itself. One sensor is part of the microphone assembly, the other is in the right speaker.
- In MacBook Pros, at least one sensor is mounted to the logic board itself. These can usually be identified by locating a raised part of the logic board near the left or right edges.
Liquid in your electronics can wreak havoc on any system it touches. Aside from lack of power, lack of image or backlight is one of the most common MacBook issues resulting from spill. If at any point, even a little bit of liquid got into your machine and rolled into the wrong spot, you could end up with display problems or worse.
- Liquid damage can affect MacBooks having image issues in three key areas: around the backlight circuit, the display connector and on the TCON board.
- Liquid damage indicators will almost always be positioned near display components. They don’t tell the whole story, but if one has been triggered, it’s a good clue.
- Even if you don’t know much about circuit board design, backlight circuits appear in similar places and layouts on nearly all MacBooks. They typically rely on a large number of capacitors in a row. They will be near the display connector on older MacBooks.
The logic board is the hub for the vast majority of a MacBook’s functionality. Any number of the small components on the board may have failed or become damaged. Logic board fault is a safe assumption of cause if nothing else on this page has worked.
- Check for obvious signs of a board issue - burned or cracked components, liquid residue, corrosion or bend. If there are signs of liquid, there’s still hope your Mac can be resurrected.
- Replacing the logic board is often the most practical solution for a DIYer whose board has failed. If you’re stuck in this pickle, and you need your data you still have options.
- If you’re feeling especially motivated, the tiny components on the board can be repaired with microsoldering. It is an art unto itself, but a worthy endeavor for those who are adventurous. If you’re curious and want to know more about getting into micro soldering, here’s some good reading and some good watching to get you started.
- If you don’t want to undertake this yourself, your local repair shop may be able to help! Ask them if they offer this sort of repair, or can recommend someone who does.
- No estimateModerate

Find compatible replacement parts for your Mac Laptop. All parts and fix kits are backed by the iFixit Quality Guarantee.
Related Problems


7 common problems
View all