
How to Run First Aid with Disk Utility

  1. How to Run First Aid with Disk Utility, How to Run First Aid with Disk Utility: step 1, image 1 of 2 How to Run First Aid with Disk Utility, How to Run First Aid with Disk Utility: step 1, image 2 of 2
    • Open Disk Utilities, which can be found in the Applications folder under Utilities

    • Pro Tip: Take the shortcut and use Spotlight. (This method is used in this guide)

  2. How to Run First Aid with Disk Utility: step 2, image 1 of 2 How to Run First Aid with Disk Utility: step 2, image 2 of 2
    • Once the Disk Utility App opens, click the "View" menu.

    • Select "Show All Devices"

    • Older versions of macOS may not have this button. If so, skip to the next step.

  3. How to Run First Aid with Disk Utility: step 3, image 1 of 1
    • In the Sidebar, click the last volume in the list.

    • By default it will likely be named "Macintosh HD - Data" or simply "Macintosh HD" on Macs running 10.14 Mojave or earlier.

  4. How to Run First Aid with Disk Utility: step 4, image 1 of 3 How to Run First Aid with Disk Utility: step 4, image 2 of 3 How to Run First Aid with Disk Utility: step 4, image 3 of 3
    • Click on the First Aid button at the top of the window.

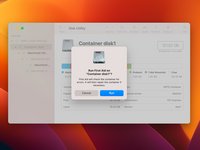
    • A dialogue box will appear asking if you would like to run First Aid.

    • Click "Run".

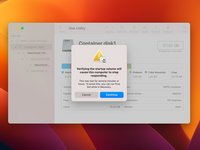
    • A second dialogue box will pop up prompting for acknowledgement that verifying your startup disk will cause it to be non-responsive.

    • Click “Continue”.

  5. How to Run First Aid with Disk Utility: step 5, image 1 of 3 How to Run First Aid with Disk Utility: step 5, image 2 of 3 How to Run First Aid with Disk Utility: step 5, image 3 of 3
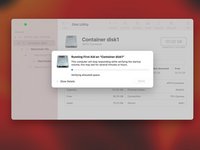
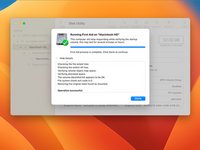
    • This procedure will take a few minutes to complete. The machine may freeze up, or lock up during this procedure.

    • Patience is key here.

    • Disk repair may fail, or give an error message. Restart your machine and run it again if this is the case, it may repair further issues.

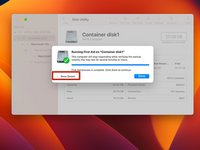
    • Once completed, click done.

    • Pro Tip: To see the entire process including corrected errors, click on the arrow next to 'Show Details'.

    • Repeat this on all items in the Disk Utility list for your internal drive. Move upward through the list. Order of operations is all volumes first, then the container and finally the disk itself.

  6. How to Run First Aid with Disk Utility: step 6, image 1 of 1
    • If you continue to receive errors, repeat this process using the Disk Utility function in Internet Recovery.

Conclusion

Close Disk Utility, and the internal drive should be ready to go.

39 other people completed this guide.

Mike

Member since: 11/01/10

14,240 Reputation

3 Guides authored

Team

0 Comments

Add Comment

View Statistics:

Past 24 Hours: 14

Past 7 Days: 57

Past 30 Days: 249

All Time: 14,313