
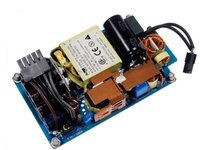
iMac G5 17" Model A1144
1.9 GHz
Holiday Deals, Built to Last - Shop Now
Plus Free Shipping on $75+ in the Contiguous USA

Condition
Frequently Bought Together
Sale price $23.96
Regular price $29.95
Replace a damaged or burnt out power supply.
| Part Number | 661-3780 |
|---|---|
| iFixit Part Number | IF165-000-2 |

Purchase with purpose
Repair with confidence
Fast shipping