Introduction
Samsung is at it again with the Note9, right on schedule. Amidst a brutal anti-Apple ad campaign, they’re hoping a cool new S Pen is enough to carry the day. Could there be more waiting for us under the hood? We’ll tear down to find out!
Phone in to our Facebook, Instagram, and Twitter to get on the teardown hotline!
What you need
Video Overview
-
-
Here are some initial Notes on the 9:
-
Notchless edge-to-edge 6.4" Super AMOLED display with 2960 × 1440 resolution (516 ppi)
-
Octa-core Qualcomm Snapdragon 845 processor paired with 6 GB RAM (8 GB optional)
-
4,000 mAh battery
-
12 MP OIS dual rear camera system with dual-aperture ƒ/1.5-ƒ/2.4 wide-angle and ƒ/2.4 telephoto modules, plus an 8 MP selfie cam
-
128 GB internal storage (512 GB internal storage optional), with additional 512 GB available via microSD expansion
-
S Pen stylus with Bluetooth connectivity
-
IP68 dust and water resistance rating
-
-
-
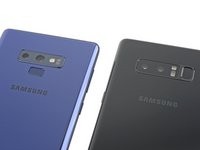
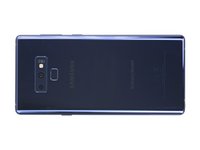
The Note9 looks very (very) similar to the Note8—and in principle at least, we're fine with that. Smartphone evolution has slowed, and even we don't think you should try to fix what isn't broken.
-
So what is new? Well, it's very slightly wider and shorter than the Note8, with an extra 0.1 inch of display—and it's a hair thicker at 8.8 mm versus 8.6 mm.
-
In an increasingly rare (but welcome) move, Samsung has kept the analog headphone jack.
-
-
-
Another subtle (but good) change: the fingerprint sensor has packed its things and moved to a happier location, south of the rear camera.
-
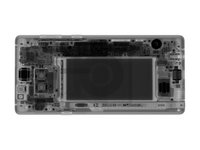
Spoiler alert: we got an early glimpse of the Note9's innards thanks to Creative Electron's wallhack abilities.
-
Now that we have a map, let's glide on into battle.
-
-
-
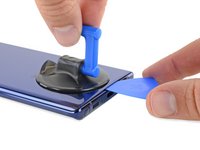
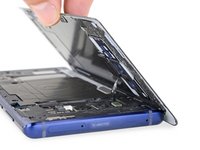
We'd like to hit the ground running, but this back panel adhesive is still pretty OP. Nerf it please, Samsung?
-
Our usual strat of heat, suction, and careful slicing does the trick eventually.
-
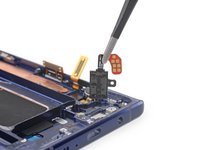
The newly relocated fingerprint sensor is a welcome change here—that flex cable location is much less vulnerable to accidental slicing and dicing.
-
That said, it's still too short. A few flappy folds like we saw on the Surface Go would make reassembly a happier affair.
-
-
-
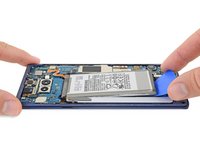
The battery's still glued down in a miserable sticky well—but the Note8 didn't blow up so the design is justified, eh Samsung?
-
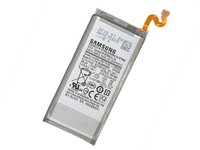
The Note9 battery weighs in at a ludicrous 15.4 Wh, eschewing the cautious 12.71 Wh Note8 battery, and eclipsing both the infamous Note7 (13.48 Wh) and the iPhone X (a "mere" 10.35 Wh).
-
Since we know you'll ask, here are some dimensions: 87.7 mm x 41.5 mm x 6 mm. Weight: 54.7 g. Now go forth and calculate energy density! Or whatever it is you do.
-
-
-
-
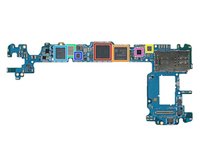
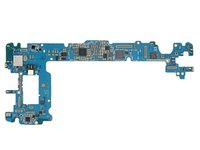
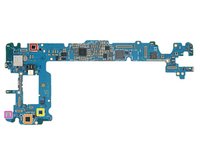
The chips that move the bits and bytes:
-
Samsung K3UH6H60AM-AGCJ 6 GB LPDDR4X SDRAM, with Qualcomm Snapdragon 845 layered underneath
-
Samsung KLUDG4U1EA-B0C1 128 GB eUFS storage
-
NXP Semiconductor PN80T NFC Controller
-
Skyworks SKY78160-51 Front-End Module WLAN
-
Avago/Broadcom AFEM-9096 Front-End Module LTE
-
Qualcomm WCD9341 Audio Codec
-
Maxim MAX77705 PMIC
-
-
-
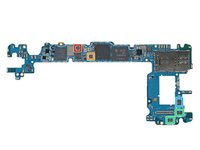
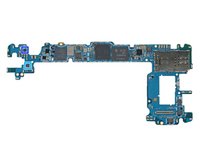
IC Identification, pt. 2:
-
Qualcomm QET4100 Envelope Tracker
-
RDA Microelectronics RDA6213N FM transceiver (likely)
-
Samsung S2MIS01 MST Driver
-
Qualcomm QDM3870 high band diversity front end module
-
Skyworks SKY13716-11 low-band LNA front-end module
-
NXP Semiconductor BGU8103 GPS/GLONASS/Galileo/BeiDou low noise amplifier
-
Antenna Tuner
-
-
-
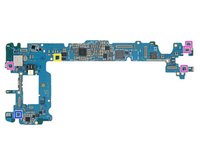
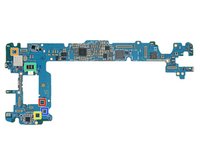
IC Identifications, pt. 3:
-
Maxim Integrated MAX585128 audio Amplifier (likely)
-
Samsung S2MPB02 camera power management
-
Samsung S2MPB03 camera power management
-
ON Semiconductor FAN48618BUC53X 1 A Boost Regulator
-
Vishay DG2730 480 Mbps DPDT analog switch
-
NXP Semiconductor PCAL6524 24-bit I/O expander
-
Knowles MEMS microphone
-
-
-
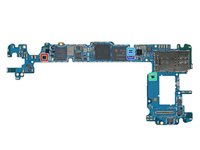
IC Identifications, pt. 4 (sensors):
-
STMicroelectronics LSM6DSL 3-axis accelerometer/gyroscope
-
AKM Semiconductor AK09918C 3-axis electronic compass
-
STMicroelectronics LPS22HB pressure sensor
-
Maxim Integrated ? heart rate sensor
-
Semtech SX9320 ? proximity sensor
-
Diodes Incorporated hall sensor (likely)
-
-
-
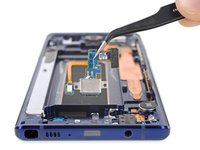
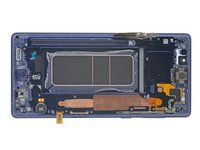
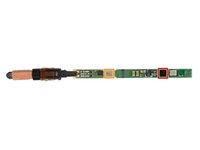
The motherboard has absorbed yesteryear's daughterboard, leaving a modular USB-C port (with a Knowles hanger-on microphone) ripe for the picking.
-
Samsung continues to provide sanctuary for the now endangered headphone jack, while saddling it with a super thin spring-contact-connected cable.
-
The heat pipe has significantly more surface area than prior generations. Perhaps those pipes proved the concept, or proved they needed to be that much beefier (because Fortnite).
-
-
-
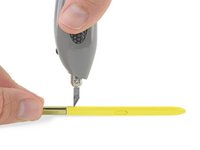
Time for S Pen extraction. We couldn't find a non-destructive way to crack it open, so we swapped in the heavy weapons—the ultrasonic
blastercutter! -
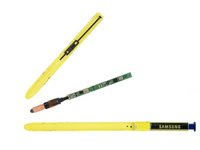
Now that Fortnite is here we were prepared for a tomato update, but the S Pen peels open like a banana.
-
What's in this loot llama? How about a DA14580 Dialog Semiconductor Bluetooth Smart SoC ...
-
... and a K8373 Seiko Instruments supercapacitor.
-
- This Note's components are more modular than ever, thanks to subtle changes to the USB-C hardware, headphone jack, and the S Pen dock's flex cable.
- The only screws used are standard Phillips screws.
- You can replace the battery if you're determined—two extremely stubborn glue barriers make it unnecessarily difficult.
- To service any component you must first painstakingly un-glue (and later re-glue) the glass rear panel.
- All-too-common display repairs require replacing the entire chassis or tediously separating the gluey cracked glass.


Final Thoughts
Repairability Score


(10 is easiest to repair)
27 Guide Comments
Pretty usual for Samsung. Just do NOT break the screen or you will cry at the replacement cost.
FYI, easiest way to remove the batteries in the S8- and S9-era Samsung phones is light heat on the display side, a syringe application of alcohol right down near the battery adhesive, and a suction cup to pull it up. Comes out like butter.
I dont get it..