Introduction
Use this guide to replace a malfunctioning power and volume button cable—this includes the switches responsible for volume up and down, the ring/silent control and the power switch, as well as a microphone and the dual-LED flash. Follow this guide if you are looking to replace the exterior power button cover and this guide for the exterior volume control button cover.
What you need
-
-
Power off your iPhone before beginning disassembly.
-
Remove the two 3.4 mm pentalobe screws on the bottom edge of the iPhone.
-
-
-
Use a hairdryer or prepare an iOpener and apply it to the lower edge of the iPhone for about a minute in order to soften up the adhesive underneath.
-
-
-
Pull up on the suction cup to create a small gap between the display assembly and the rear case.
-
Insert the flat end of a spudger into the gap.
-
-
-
Slide the spudger to the left along the lower edge of the iPhone.
-
Twist the spudger to widen the gap between the display and rear case.
-
-
-
Slide the spudger up the left side of the iPhone, starting at the lower edge and moving towards the volume control buttons and silent switch.
-
-
-
Insert the flat edge of a spudger into the bottom right corner of the device.
-
Twist the spudger to widen the gap between the display assembly and the rear case.
-
Slide the flat end of the spudger up the right side of the phone to break up the adhesive holding the display in place.
-
-
-
Slide an opening pick along the top edge of the iPhone, between the rear case and front panel, to break up the remaining adhesive holding the screen in place.
-
-
-
Pull the display assembly slightly away from the top edge of the phone to disengage the clips holding it to the rear case.
-
Open the iPhone by swinging the display up from the left side, like the back cover of a book.
-
-
-
Remove four tri-point Y000 screws securing the lower connector bracket, of the following lengths:
-
Three 1.2 mm screws
-
One 2.4 mm screw
-
-
-
Use the point of a spudger to lift the battery connector out of its socket on the logic board.
-
-
-
Use a spudger or a fingernail to disconnect the two lower display connectors by prying them straight up from their sockets on the logic board.
-
-
-
Remove the two 1.3 mm Phillips #000 screws securing the bracket over the front panel sensor assembly connector.
-
-
-
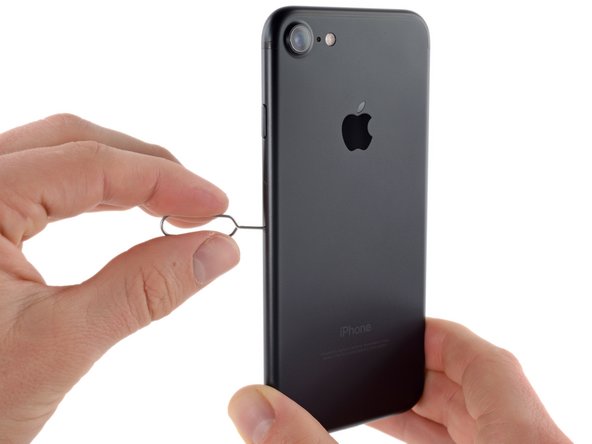
Insert a SIM card eject tool or a paperclip into the small hole in the SIM card tray.
-
Press to eject the tray.
-
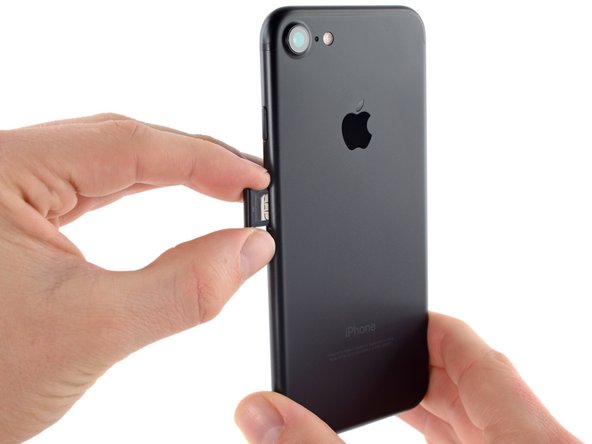
Remove the SIM card tray assembly from the iPhone.
-
-
-
Use the flat end of a spudger to disconnect the rear-facing camera connector.
-
-
-
Remove the following Phillips screws securing the rear camera bracket to the rear case:
-
One 1.3 mm screw
-
One 2.5 mm screw
-
-
-
-
Use the pointed end of a spudger to pry up and disconnect the antenna bus connector, just left of the rear camera module.
-
-
-
Remove the four Phillips screws securing the Wi-Fi antenna:
-
Three 1.2 mm screws
-
One 1.7 mm screw
-
-
-
Use the point of a spudger to lift the two antenna cable connectors up off of the sockets on the logic board.
-
-
-
Use the flat end of a spudger to gently lift the battery connector end of the logic board up.
-
-
-
Remove the two 1.9 mm Phillips screws securing the barometric vent to the rear case.
-
-
-
Use the flat end of a spudger to disconnect the Taptic Engine connector from its socket on the logic board.
-
-
-
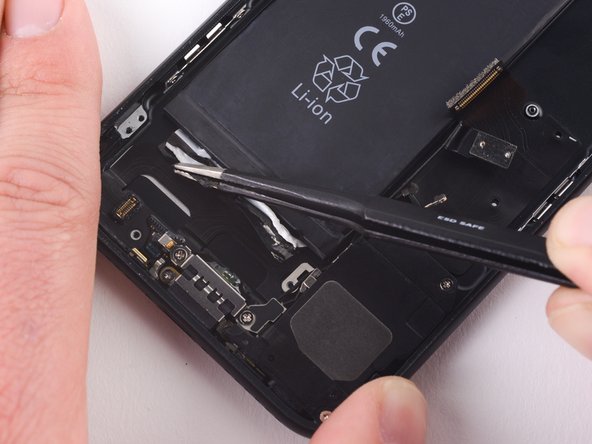
Use a pair of tweezers with blunt tips to peel back one of the adhesive strips on the lower edge of the battery.
-
-
-
Use a pair of tweezers with blunt tips to peel back the other adhesive strip on the lower edge of the battery.
-
-
-
Slowly pull one battery adhesive tab away from the battery, toward the bottom of the iPhone.
-
Pull steadily, maintaining constant tension on the strip until it slips out from between the battery and the rear case. For best results, pull the strip at a 60º angle or less.
-
-
-
Repeat the previous step for the second strip.
-
If you removed both adhesive strips successfully, skip the next step.
-
Otherwise, if either of the adhesive strips broke off underneath the battery and could not be retrieved, continue with the next step below.
-
-
-
Prepare an iOpener and apply it to the back of the rear case, directly over the battery. Alternatively, you can apply heat using a heat gun or hair dryer.
-
After about a minute, remove the iOpener, flip the phone over and use a plastic card to break up any remaining adhesive behind the battery.
-
-
-
Remove the following Phillips screws:
-
Two 1.9 mm screws securing the power button.
-
Three 2.3 mm screws securing the volume buttons.
-
-
-
Remove the following 1.3 mm Phillips screws:
-
One screw beside the rear-facing camera
-
One screw on the rear case
-
-
-
From the outside of the phone, push the hold switch into the rear case with the point of a spudger.
-
This action will free the hold switch and gasket from the rear case.
-
-
-
Moving from power button side of the phone, use an opening pick to separate the adhesive holding the antenna flex cable to the rear case.
-
-
-
Slide the point of an opening pick underneath the antenna flex cable towards the top of the phone, separating the remaining adhesive.
-
-
-
Use tweezers to move the antenna flex cable away from the edge of the phone, freeing the screw bracket from the rear case.
-
Remove the antenna flex cable.
-
-
-
Use the blade of a Halberd spudger to separate the adhesive holding the microphone to the rear case.
-
-
-
Slide the blade of a halberd spudger under the power button end of the button cable to separate it from the adhesive on the rear case.
-
Continue to separate the adhesive by moving the blade towards the top of the phone.
-
-
-
Continue to move the blade of the halberd spudger underneath the power and volume control cable.
-
-
-
Slide the halberd spudger under the volume control portion of the button cable.
-
Gently slide the blade underneath the cable towards the bottom of the phone, separating the remaining adhesive.
-