Introduction
If you've tried cleaning the lightning port to no avail, use this guide to replace a nonfunctioning Lightning connector assembly, including headphone jack, cellular antenna, and microphone.
You can also use this guide for reference when replacing the following parts:
- Headphone Jack Interconnect Cable
- Microphone Gasket
The video below includes a few extra steps, including removal of the logic board. Follow the guide steps below it for the updated, shorter procedure.
What you need
Video Overview
-
-
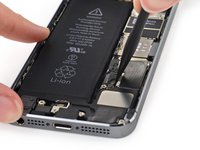
Power off your iPhone before beginning disassembly.
-
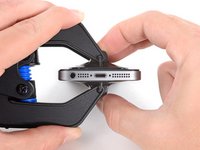
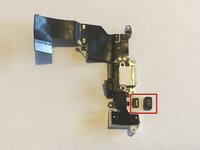
Remove the two 3.9 mm Pentalobe screws from either side of Lightning connector.
 Ask FixBot
-
-
-
If your display glass is cracked, keep further breakage contained and prevent bodily harm during your repair by taping the glass.
-
Lay overlapping strips of clear packing tape over the iPhone's display until the whole face is covered.
-
-
-
Regardless of the tool you use, you need to be sure you pull up the entire display.
-
If the glass begins to separate from the plastic, as shown in the first image, slide a plastic opening tool between the plastic frame and the metal phone body to pry the metal clips out of the case.
-
-
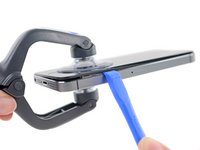
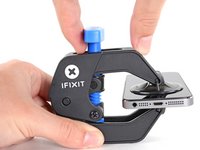
Tool used on this step:Clampy - Anti-Clamp$24.95
-
Pull the blue handle backwards to unlock the Anti-Clamp's arms.
-
Slide the arms over either the left or right edge of your iPhone.
-
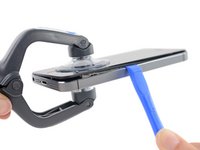
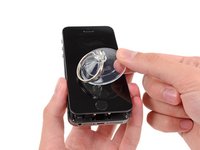
Position the suction cups near the bottom edge of the iPhone just above the home button—one on the front, and one on the back.
-
Squeeze the cups together to apply suction to the desired area.
-
-
-
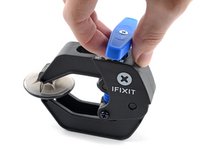
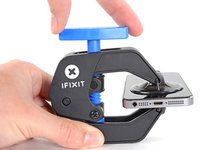
Pull the blue handle forwards to lock the arms.
-
Turn the handle clockwise 360 degrees or until the cups start to stretch.
-
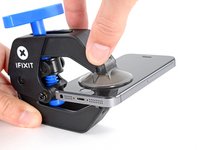
Insert an opening pick under the screen when the Anti-Clamp creates a large enough gap.
-
Skip the next two steps.
-
-
-
If you don't have an Anti-Clamp, use a single suction cup to lift the front panel:
-
Press a suction cup onto the screen, just above the home button.
-
-
-
While holding the iPhone down with one hand, pull up on the suction cup to slightly separate the home button end of the front panel from the rear case.
-
With a plastic opening tool, gently pry the edges of the rear case down, away from the front panel assembly, while you pull up with the suction cup.
-
-
-
Pull the plastic nub to release the vacuum seal on the suction cup.
-
Remove the suction cup from the screen.
-
-
Tool used on this step:Tweezers$4.99
-
Open the phone just enough to reveal the metal bracket covering the home button cable.
-
Only the phone's original home button assembly will be capable of using the Touch ID functionality. If you rip the cable, installing a new home button will only restore ordinary home button functions, not the Touch ID features.
-
Use the tip of a spudger to push the bracket free and remove it with tweezers.
-
-
-
Use the tip of a spudger to pry the home button cable connector up out of its socket.
-
-
-
-
Once the connector has been released, pull the home button end of the assembly away from the rear case, using the top of the phone as a hinge.
-
Open the display to about a 90º angle, and lean it against something to keep it propped up while you're working on the phone.
-
Add a rubber band to keep the display securely in place while you work. This prevents undue strain on the display cables.
-
-
-
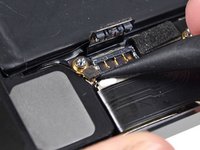
Remove the two 1.6 mm Phillips #000 screws securing the metal battery connector bracket to the logic board.
-
-
-
Use the flat end of a spudger to gently pry the battery connector up from its socket on the logic board.
-
-
-
Remove the following screws securing the front panel assembly cable bracket to the logic board:
-
One 1.7 mm Phillips #000 screw
-
One 1.2 mm Phillips #000 screw
-
One 1.3 mm Phillips #000 screw
-
One more 1.7 mm Phillips #000 screw
-
-
-
Use a spudger or a fingernail to disconnect the front-facing camera and sensor cable.
-
-
Tool used on this step:Tweezers$4.99
-
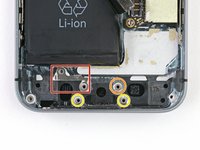
Use the tip of a spudger to pry the antenna cable up from its socket on the logic board.
-
-
-
Remove the following Phillips #000 screws:
-
One 2.9 mm screw
-
One 1.5 mm screw
-
One 3.6 mm screw
-
-
-
Use the point of a spudger to gently pry between the speaker and the rear case, lifting the speaker enough to grab with your fingers.
-
-
-
Swivel the speaker downwards and toward the left of the phone to free the upper tab from underneath the logic board.
-
Slide the speaker up and to the right to free the left-hand tab from under the home button cable connector.
-
Remove the speaker from the iPhone.
-
-
-
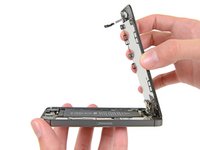
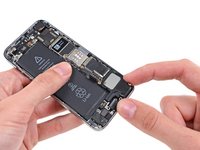
Remove the following four Phillips #000 screws:
-
One 3.1 mm screw
-
One 2.9 mm screw
-
One 1.5 mm screw
-
One 3.4 mm screw
-
-
-
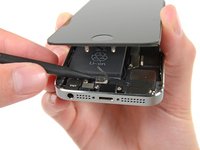
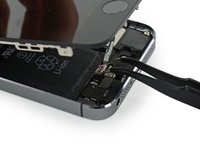
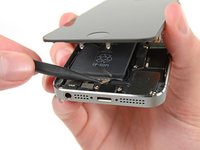
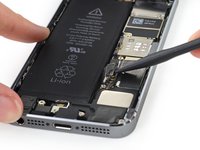
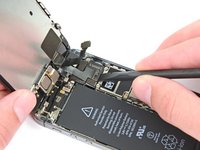
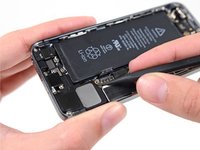
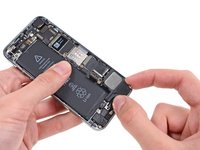
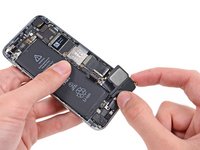
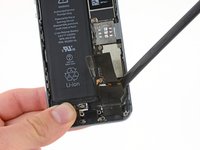
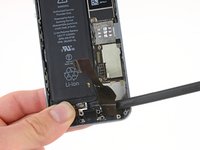
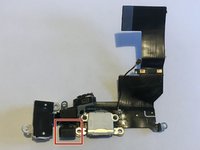
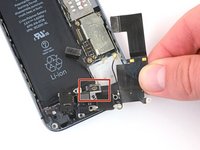
Use a spudger to pry the Lightning connector cable up from its socket on the logic board.
-
-
-
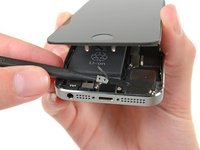
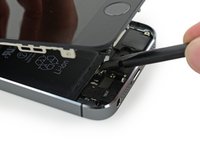
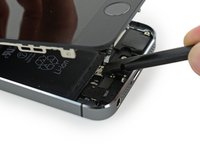
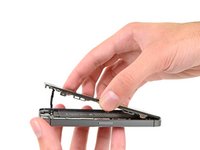
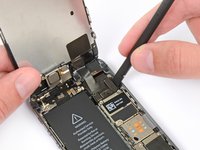
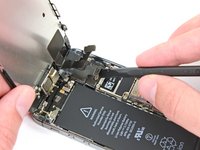
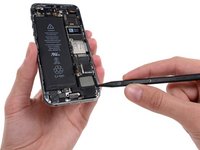
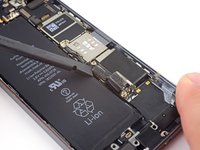
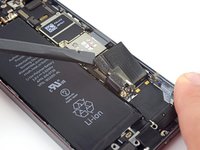
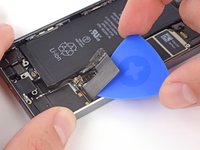
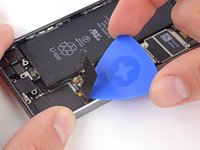
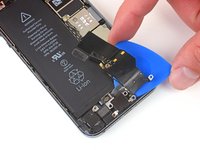
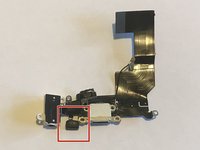
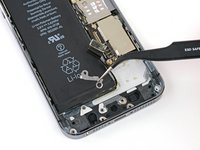
Continue prying with an opening pick to separate the Lightning connector assembly from the rear case.
-
Be sure to separate all parts of the assembly from the rear case, including the Lightning connector, headphone jack and home button cable socket.
-
-
-
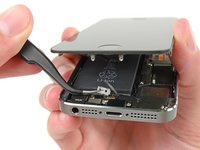
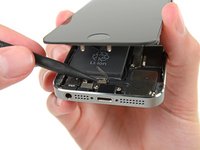
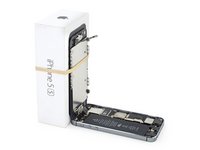
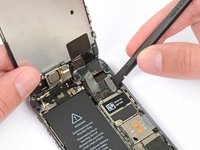
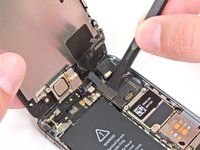
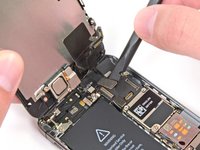
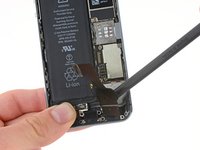
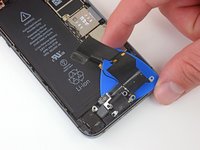
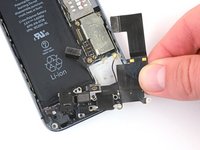
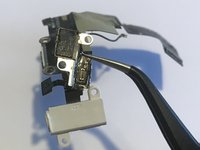
Remove the Lightning connector assembly.
-
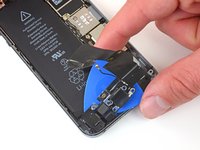
Components that commonly need to be transferred include a clip routed along the left and top edges of the headphone jack, the rubber microphone cover, and the bracket for the Touch ID cable connector. Refer to the following steps to transfer the rubber microphone cover and/or Touch ID cable connector.
-
-
Tool used on this step:Tweezers$4.99
-
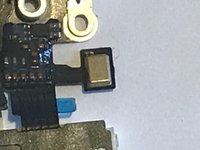
Fold the microphone cable down to straighten it out.
-
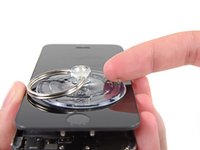
Pull the microphone cover off of the microphone with your fingers or tweezers.
-
-
-
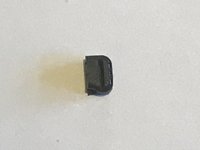
Remove any covering on the microphone (this one does not have a covering).
-
Slide the slotted side (shown facing up) onto the microphone. It may help to hold the microphone cover steady by inserting tweezers into the hole on the bottom.
-
Fold the microphone up so that it points out, as shown.
-
-
-
Flip the Touch ID cable and connector over to the reverse side of the Lightning connector assembly, and peel the Touch ID cable off of the bracket.
-
Thread the Touch ID cable on the replacement Lightning cable assembly into the bracket as shown. It is strongly recommended to affix the Touch ID cable to the bracket with mild adhesive, such as B-7000.
-
-
-
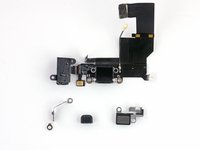
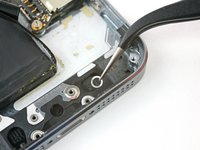
One bracket
-
One C washer
-
Two small washers
-
If you are removing more components, take these pieces out and set them aside for safe keeping.
-


To reassemble your device, follow these instructions in reverse order.
Cancel: I did not complete this guide.
400 other people completed this guide.


43 Guide Comments
I got through this successfully and it solved my problem (phone wouldn't charge/iTunes wouldn't recognize it when plugged in). With the new part it works perfectly.
Two cautions: I bought a new lightning connector assembly and I had to transfer two items from the old assembly that were not mentioned in the steps.
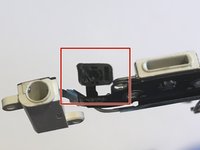
(1) There is a small black rubber "boot" which you can see in the step 38 photo. (on the very bottom between the lightning port and the headphone jack) Pull this off and put it in the same place on your new lightning connector assembly. It attaches to a fitting on the bottom wall of the aluminum case.
(2) There is a bracket that holds the home button connector socket in place. This is the socket that is exposed when you disconnect the home button cable in step 9. When you remove the old lightning connector assembly, this bracket needs to be transferred to the new assembly. It's attached by a small piece of double sided tape that you can salvage/reuse if you're careful!
Right well that wasn't too much fun. In my case the adhesive connecting the lcd/digitiser and the lcd shield/bracket had gone making opening the device quite difficult. The screen and digitizer were coming up with the suction cup but the lcd shield and the metal bracket with all the clips stayed firmly secured to the main case. My solution was to drive a flat metal prying tool on the battery side between the metal bracket and the inside wall of the main casing. Not for the faint of heart but I got there in the end.
No complaints with the rest of the repair and the iFixit replacement lightning assembly works flawlessly (my lighting port and headphone jack had become loose fitting causing headphones to easily pop out and making charging very difficult).
When all is re-assembled remember to do a hard reset to get touch ID working again as only the home button function works immediately after reassembly (security feature?). Thanks a million iFixit, this brick will live to see another year hopefully :)
Hi Barry,
Can you clarify what type of reset you had to do to get your TouchID working again as like you, only my home button is working after reassembly.
Thanks