
Xiaomi 12 Battery Replacement

What you need

  1. Xiaomi 12 Battery Replacement, Loosen the rear glass adhesive: step 1, image 1 of 1
    • Allow your phone's battery to fully drain before starting repairs. A charged battery may catch fire if damaged during the repair.

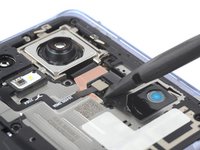
    • Unplug any cables and fully shut down your phone.

    • Prepare an iOpener and apply it to the rear glass for two minutes to loosen the adhesive underneath.

    • A hair dryer, heat gun, or hot plate may also be used, but be careful not to overheat the phone—the display and internal battery are both susceptible to heat damage.

  2. Xiaomi 12 Battery Replacement, Insert an opening pick: step 2, image 1 of 3 Xiaomi 12 Battery Replacement, Insert an opening pick: step 2, image 2 of 3 Xiaomi 12 Battery Replacement, Insert an opening pick: step 2, image 3 of 3
    • The adhesive securing the rear glass is strong, and creating a gap requires significant force. If you're having trouble, apply more heat and try again.

    • If your rear glass is badly cracked, covering it with a layer of clear packing tape may allow the suction handle to adhere. Alternatively, very strong tape may be used instead of the suction handle. If all else fails, you can superglue the suction handle to the broken rear glass.

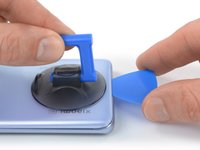
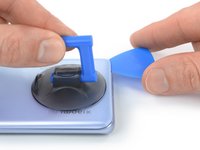
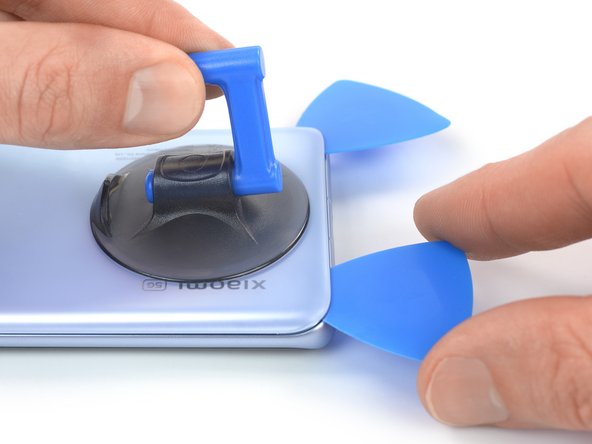
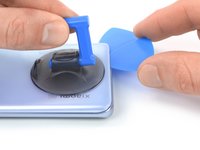
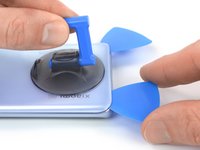
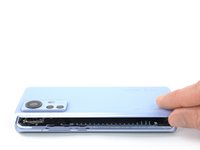
    • Apply a suction handle to the center of the rear glass's bottom edge, as close to the edge as possible.

    • Pull up on the suction handle with strong, steady force to create a gap between the rear glass and frame.

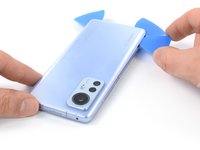
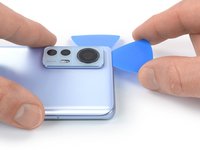
    • Insert an opening pick where the charging port is located.

  3. Xiaomi 12 Battery Replacement, Slice the bottom edge adhesive: step 3, image 1 of 2 Xiaomi 12 Battery Replacement, Slice the bottom edge adhesive: step 3, image 2 of 2
    • During the following steps, don't insert your pick more than 4 mm to avoid damaging internal components.

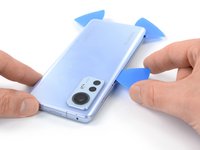
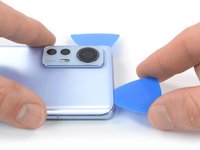
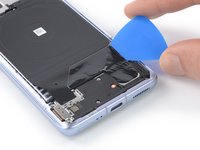
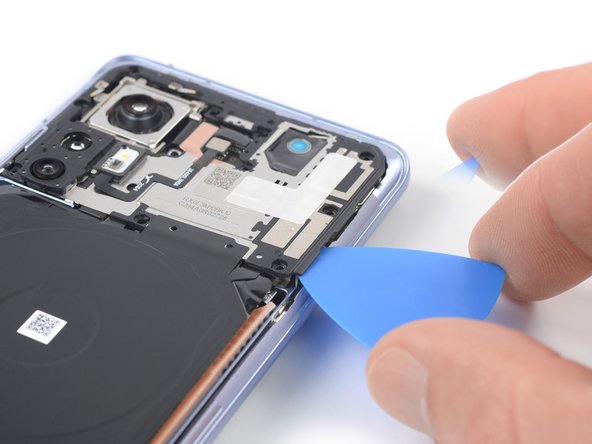
    • Slide the opening pick to the bottom right corner of the rear glass to slice its adhesive.

    • Leave the opening pick in place to prevent the adhesive from resealing.

  4. Xiaomi 12 Battery Replacement, Insert a second opening pick: step 4, image 1 of 2 Xiaomi 12 Battery Replacement, Insert a second opening pick: step 4, image 2 of 2
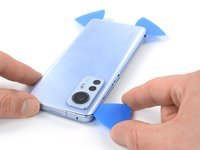
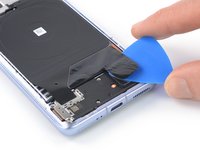
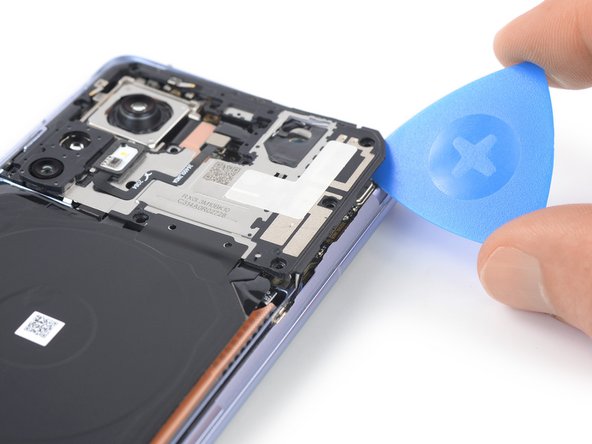
    • Insert a second opening pick at the bottom right corner and slide it to the bottom left corner of the rear glass to slice the adhesive.

    • Leave the opening pick in place to prevent the adhesive from resealing.

  5. Xiaomi 12 Battery Replacement, Slice the left edge adhesive: step 5, image 1 of 3 Xiaomi 12 Battery Replacement, Slice the left edge adhesive: step 5, image 2 of 3 Xiaomi 12 Battery Replacement, Slice the left edge adhesive: step 5, image 3 of 3
    • If the adhesive becomes hard to cut, apply your iOpener for 1–2 minutes or use a hair dryer or heat gun to reheat it.

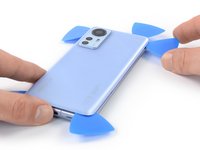
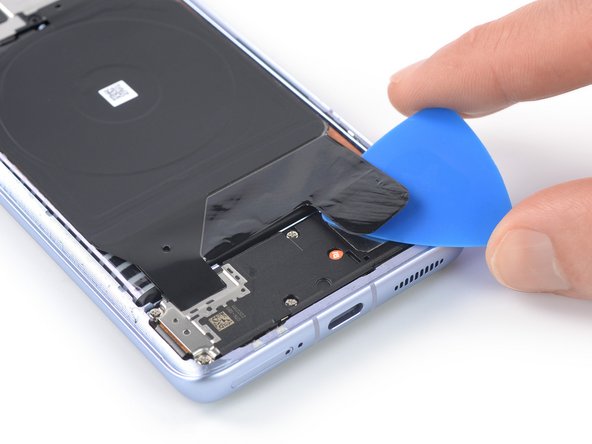
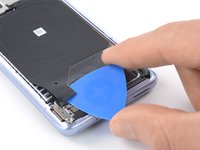
    • Insert a third opening pick under the bottom left corner of the rear glass.

    • Slide the opening pick along the left edge of the rear glass to slice the adhesive.

    • Leave the opening pick in the top left corner to prevent the adhesive from resealing.

  6. Xiaomi 12 Battery Replacement, Slice the top edge adhesive: step 6, image 1 of 2 Xiaomi 12 Battery Replacement, Slice the top edge adhesive: step 6, image 2 of 2
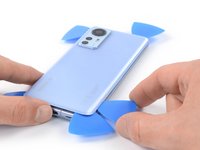
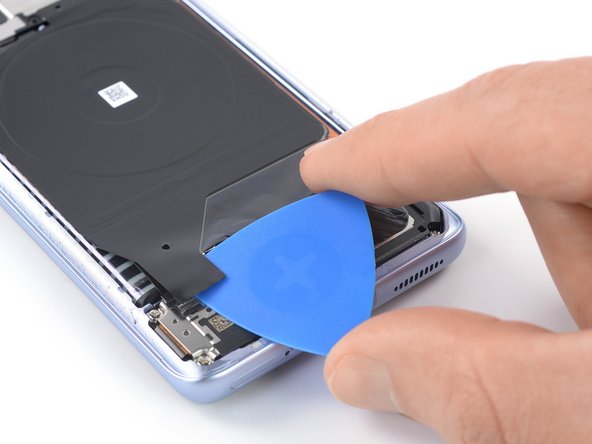
    • Insert a fourth opening pick under the top left corner of the rear glass.

    • Slide the opening pick along the top edge of the phone to slice the adhesive.

    • Leave the opening pick in the top right corner to prevent the adhesive from resealing.

  7. Xiaomi 12 Battery Replacement, Slice the right edge adhesive: step 7, image 1 of 2 Xiaomi 12 Battery Replacement, Slice the right edge adhesive: step 7, image 2 of 2
    • Insert a fifth opening pick under the top right corner of the rear glass and slide it to the bottom right corner to slice the remaining adhesive.

  8. Xiaomi 12 Battery Replacement, Remove the rear glass: step 8, image 1 of 2 Xiaomi 12 Battery Replacement, Remove the rear glass: step 8, image 2 of 2
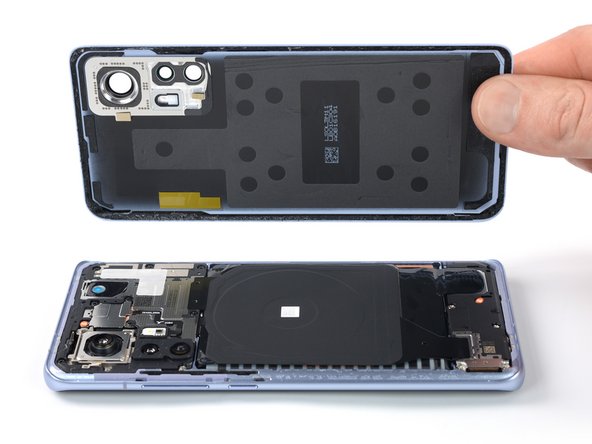
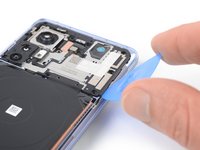
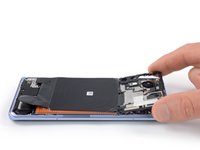
    • Remove the rear glass.

    • If the rear glass is still stuck to the frame, slide an opening pick around the entire perimeter until the rear glass separates completely.

    • During reassembly:

    • This is a good point to power on your phone and test all functions before sealing it up. Be sure to power your phone back down completely before you continue working.

    • During reassembly, secure the rear glass with pre-cut adhesive or double-sided tape after cleaning the relevant areas with high-concentration isopropyl alcohol (>90%) and a lint-free cloth.

    • After installing the rear glass, apply strong, steady pressure to your phone for several minutes to help the adhesive form a good bond—a stack of heavy books works well.

  9. Xiaomi 12 Battery Replacement, Loosen the charging coil assembly: step 9, image 1 of 3 Xiaomi 12 Battery Replacement, Loosen the charging coil assembly: step 9, image 2 of 3 Xiaomi 12 Battery Replacement, Loosen the charging coil assembly: step 9, image 3 of 3
    • The charging coil assembly is adhered to the loudspeaker with mild adhesive tape.

    • Insert an opening pick under the bottom right corner of the charging coil.

    • Slide the pick toward the charging port to separate the adhesive.

    • Insert a pick under the bottom left corner of the charging coil and separate its adhesive.

    • An interconnect cable runs underneath the bottom left corner of the charging coil. Avoid tearing, slicing, or creasing it while separating the adhesive tape.

  10. Xiaomi 12 Battery Replacement, Remove the indicator sticker: step 10, image 1 of 2 Xiaomi 12 Battery Replacement, Remove the indicator sticker: step 10, image 2 of 2
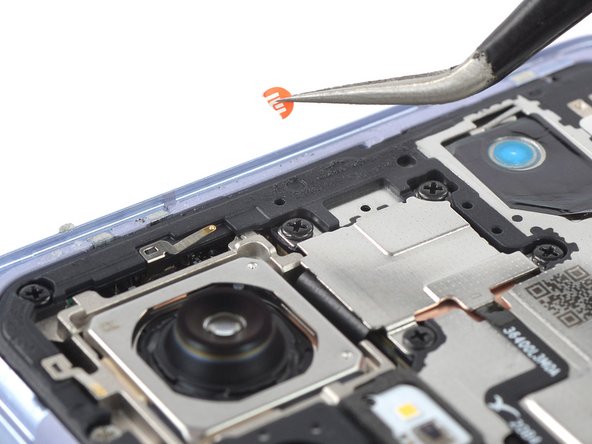
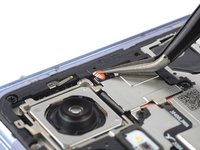
    • An orange water damage indicator sticker covers a screw on the top edge of the motherboard cover. Pierce through it with your screwdriver or use tweezers to remove it.

  11. Xiaomi 12 Battery Replacement, Unfasten the flash connector cover: step 11, image 1 of 1
    • Use a Phillips screwdriver to remove the four 5.4 mm-long screws securing the flash connector cover.

  12. Xiaomi 12 Battery Replacement, Remove the flash connector cover: step 12, image 1 of 2 Xiaomi 12 Battery Replacement, Remove the flash connector cover: step 12, image 2 of 2
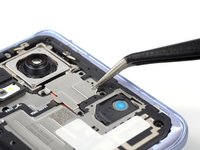
    • Use tweezers or your fingers to remove the flash connector cover.

  13. Xiaomi 12 Battery Replacement, Disconnect the flash: step 13, image 1 of 2 Xiaomi 12 Battery Replacement, Disconnect the flash: step 13, image 2 of 2
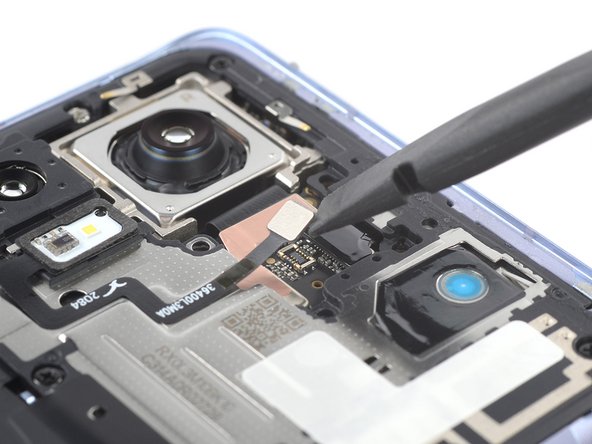
    • Use the flat end of a spudger to pry up and disconnect the the flash press connector.

  14. Xiaomi 12 Battery Replacement, Unfasten the motherboard cover screws: step 14, image 1 of 1
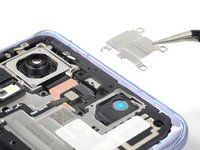
    • Use a Phillips screwdriver to remove the seven screws securing the motherboard cover:

    • Five 5.4 mm-long black screws

    • Two 4.4 mm-long silver screws

  15. Xiaomi 12 Battery Replacement, Pry up the motherboard cover: step 15, image 1 of 3 Xiaomi 12 Battery Replacement, Pry up the motherboard cover: step 15, image 2 of 3 Xiaomi 12 Battery Replacement, Pry up the motherboard cover: step 15, image 3 of 3
    • The motherboard cover is further held in place by plastic clips.

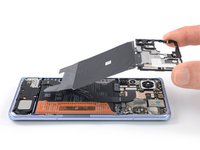
    • Insert an opening pick under the bottom right corner of the motherboard cover and pry it up.

    • Slide the pick up along the right edge of the motherboard cover.

    • Twist the pick to release the remaining clips.

  16. Xiaomi 12 Battery Replacement, Remove the motherboard cover: step 16, image 1 of 2 Xiaomi 12 Battery Replacement, Remove the motherboard cover: step 16, image 2 of 2
    • Remove the motherboard cover.

    • The charging coil is attached to the motherboard cover and will lift up at the same time.

  17. Xiaomi 12 Battery Replacement, Disconnect the battery cables: step 17, image 1 of 3 Xiaomi 12 Battery Replacement, Disconnect the battery cables: step 17, image 2 of 3 Xiaomi 12 Battery Replacement, Disconnect the battery cables: step 17, image 3 of 3
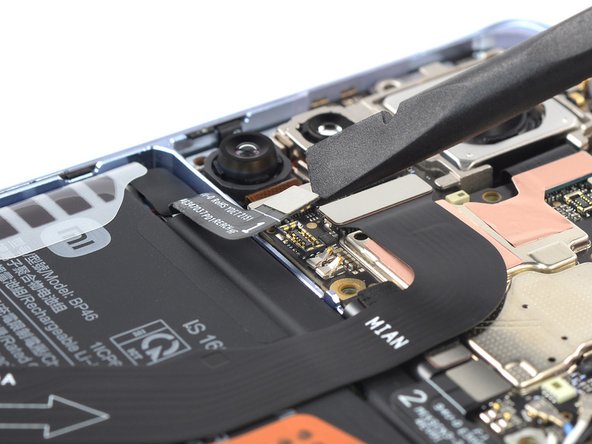
    • Use the flat end of a spudger to disconnect both battery cables by prying the connectors straight up from their sockets.

  18. Xiaomi 12 Battery Replacement, Disconnect the interconnect cable: step 18, image 1 of 2 Xiaomi 12 Battery Replacement, Disconnect the interconnect cable: step 18, image 2 of 2
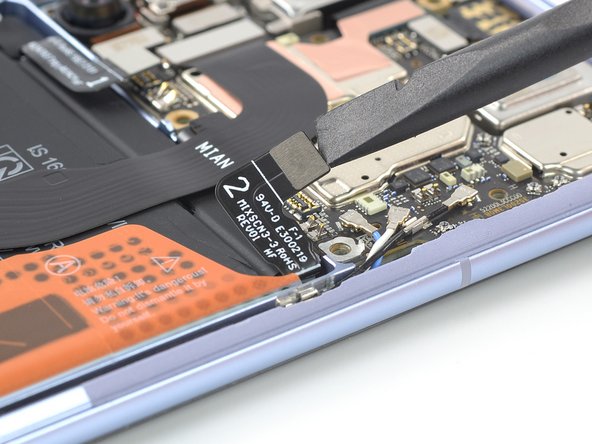
    • Use the flat end of a spudger to pry up and disconnect the interconnect cable press connector.

    • To re-attach press connectors like this one, carefully align and press down on one side until it clicks into place, then repeat on the other side. Don't press down in the middle. If the connector is misaligned, the pins can bend and cause permanent damage.

  19. Xiaomi 12 Battery Replacement, Reposition the interconnect cable: step 19, image 1 of 3 Xiaomi 12 Battery Replacement, Reposition the interconnect cable: step 19, image 2 of 3 Xiaomi 12 Battery Replacement, Reposition the interconnect cable: step 19, image 3 of 3
    • Don't crease or strain the interconnect cable during this step.

    • Flip the interconnect cable over the bottom of the phone to access to the battery.

    • It can be handy to use a small piece of tape to temporarily stick the cable onto your work surface to hold it out of your way during battery removal.

  20. Xiaomi 12 Battery Replacement, Peel up the battery pull-tabs: step 20, image 1 of 3 Xiaomi 12 Battery Replacement, Peel up the battery pull-tabs: step 20, image 2 of 3 Xiaomi 12 Battery Replacement, Peel up the battery pull-tabs: step 20, image 3 of 3
    • Take care not to puncture or bend the battery with your tools—it can leak dangerous chemicals and/or catch fire.

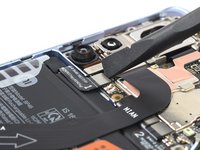
    • Use a pair of blunt nose tweezers or a clean fingernail to peel up the orange pull-tab labeled "A".

  21. Xiaomi 12 Battery Replacement: step 21, image 1 of 2 Xiaomi 12 Battery Replacement: step 21, image 2 of 2
    • Use a pair of blunt nose tweezers or a clean fingernail to peel up the orange pull-tab labeled "B".

  22. Xiaomi 12 Battery Replacement, Lift the battery: step 22, image 1 of 3 Xiaomi 12 Battery Replacement, Lift the battery: step 22, image 2 of 3 Xiaomi 12 Battery Replacement, Lift the battery: step 22, image 3 of 3
    • Strong adhesive secures the battery to the frame.

    • Grip both sides of the pull-tab labeled "A" and pull up to lift the battery out of its recess.

    • If you have trouble lifting the battery, heat the screen side with an iOpener, hair dryer, or heat gun to soften the adhesive under the battery.

    • Don't apply heat directly to the battery, as doing so is a fire hazard. Only heat the screen until it's barely too hot to touch.

  23. Xiaomi 12 Battery Replacement, Remove the battery: step 23, image 1 of 3 Xiaomi 12 Battery Replacement, Remove the battery: step 23, image 2 of 3 Xiaomi 12 Battery Replacement, Remove the battery: step 23, image 3 of 3
    Tool used on this step:
    Tesa 61395 Tape
    $5.99
    Buy
    • Peel the battery off of the remaining adhesive and remove it.

    • Never reuse a deformed or damaged battery—it's a fire hazard. Replace it with a new battery.

    • To install a new battery:

    • Use tweezers or your fingers to remove the old adhesive from the frame.

    • Use high-concentration isopropyl alcohol (>90%) and a lint-free cloth to remove any remaining adhesive residue.

    • Temporarily connect the replacement battery's cables to the motherboard and lay the battery in its recess to ensure proper fit and orientation.

    • If your replacement battery isn‘t already equipped with adhesive, apply double-sided tape such as Tesa Tape directly to the battery recess where the old adhesive was.

    • Lay the replacement battery in its recess and press down firmly on the entire surface of the battery to secure it.

Conclusion

To reassemble your device, follow these instructions in reverse order.

For optimal performance, calibrate your newly installed battery after completing this guide.

Take your e-waste to an R2 or e-Stewards certified recycler.

Repair didn’t go as planned? Try some basic troubleshooting, or ask our Xiaomi 12 answers community for help.

3 other people completed this guide.

Dominik Schnabelrauch

Member since: 11/23/16

203,488 Reputation

682 Guides authored

Team

iFixit Member of iFixit

Staff

135 Members

16,820 Guides authored

0 Comments

Add Comment

View Statistics:

Past 24 Hours: 22

Past 7 Days: 126

Past 30 Days: 559

All Time: 3,570