
TicWatch Pro 3 GPS Battery Replacement

What you need

  1. TicWatch Pro 3 GPS Battery Replacement, Power down your watch: step 1, image 1 of 2 TicWatch Pro 3 GPS Battery Replacement, Power down your watch: step 1, image 2 of 2
    • Before starting repairs, take your watch off the charger and power it down.

    • Remove the watch band.

  2. TicWatch Pro 3 GPS Battery Replacement, Unfasten the back cover: step 2, image 1 of 1
    • Use a Torx T3 screwdriver to remove the four 4.1 mm-long screws securing the back cover.

  3. TicWatch Pro 3 GPS Battery Replacement, Loosen the back cover adhesive: step 3, image 1 of 1
    • Apply a heated iOpener to the rear side of the watch for 5 minutes to loosen the adhesive underneath.

    • A hair dryer, heat gun, or hot plate may also be used, but be careful not to overheat the device.

  4. TicWatch Pro 3 GPS Battery Replacement, Pry up the back cover assembly: step 4, image 1 of 3 TicWatch Pro 3 GPS Battery Replacement, Pry up the back cover assembly: step 4, image 2 of 3 TicWatch Pro 3 GPS Battery Replacement, Pry up the back cover assembly: step 4, image 3 of 3
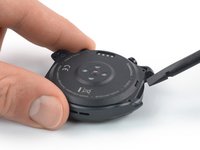
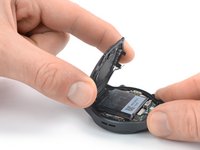
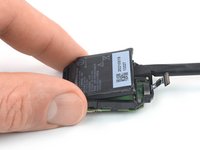
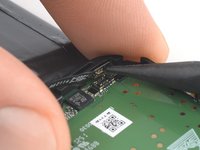
    • Insert the flat end of a spudger into the microphone opening at the top edge of the back cover.

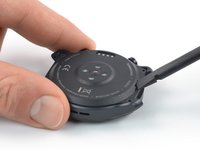
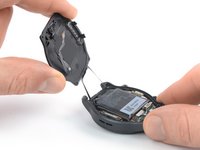
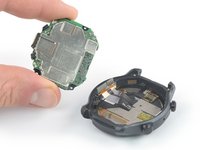
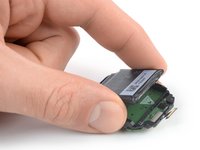
    • Pry upwards to loosen the back cover assembly. This may require some force.

    • Don't try to remove the back cover assembly all the way yet. It's still connected to the daughterboard.

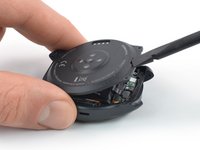
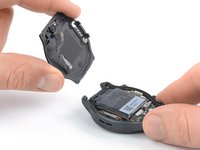
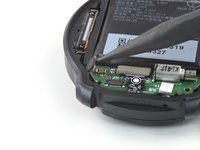
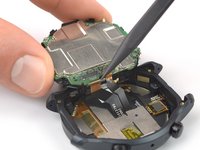
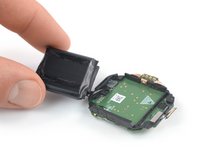
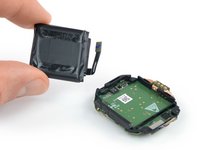
    • Swing the back cover assembly open by 45 degrees to gain access to the sensor assembly cable.

  5. TicWatch Pro 3 GPS Battery Replacement, Disconnect the sensor assembly cable: step 5, image 1 of 2 TicWatch Pro 3 GPS Battery Replacement, Disconnect the sensor assembly cable: step 5, image 2 of 2
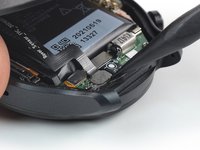
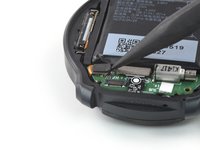
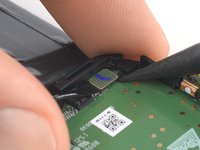
    • Use a spudger to disconnect the sensor assembly cable by prying the connector straight up from its socket.

    • To re-attach press connectors like this one, carefully align and press down on one side until it clicks into place, then repeat on the other side. Do not press down on the middle. If the connector is misaligned, the pins can bend, causing permanent damage.

  6. TicWatch Pro 3 GPS Battery Replacement, Remove the back cover assembly: step 6, image 1 of 3 TicWatch Pro 3 GPS Battery Replacement, Remove the back cover assembly: step 6, image 2 of 3 TicWatch Pro 3 GPS Battery Replacement, Remove the back cover assembly: step 6, image 3 of 3
    • Remove the back cover assembly.

  7. TicWatch Pro 3 GPS Battery Replacement, Disconnect the microphone cable: step 7, image 1 of 2 TicWatch Pro 3 GPS Battery Replacement, Disconnect the microphone cable: step 7, image 2 of 2
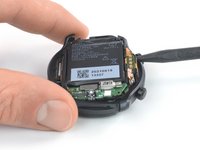
    • Use a spudger to disconnect the microphone cable by prying the connector straight up from its socket.

  8. TicWatch Pro 3 GPS Battery Replacement, Unfasten the core assembly: step 8, image 1 of 1
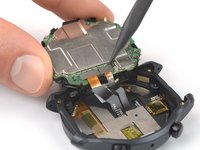
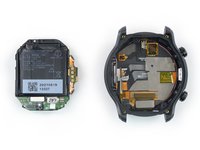
    • Use a Phillips screwdriver to remove the three 4.1 mm-long screws securing the core assembly.

  9. TicWatch Pro 3 GPS Battery Replacement, Pry up the core assembly: step 9, image 1 of 2 TicWatch Pro 3 GPS Battery Replacement, Pry up the core assembly: step 9, image 2 of 2
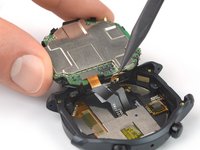
    • Insert the point of a spudger between the right edge of the core assembly and the watch frame.

    • Pry upwards to loosen the core assembly.

    • Don't try to remove the core assembly all the way yet. It's still connected to the screen.

  10. TicWatch Pro 3 GPS Battery Replacement, Swing open the core assembly: step 10, image 1 of 3 TicWatch Pro 3 GPS Battery Replacement, Swing open the core assembly: step 10, image 2 of 3 TicWatch Pro 3 GPS Battery Replacement, Swing open the core assembly: step 10, image 3 of 3
    • Carefully swing open the core assembly like the front cover of a book.

    • Avoid straining or tearing the display cables at the bottom of the core assembly.

  11. TicWatch Pro 3 GPS Battery Replacement, Disconnect the display cables: step 11, image 1 of 3 TicWatch Pro 3 GPS Battery Replacement, Disconnect the display cables: step 11, image 2 of 3 TicWatch Pro 3 GPS Battery Replacement, Disconnect the display cables: step 11, image 3 of 3
    • Use a spudger to disconnect the screen and the digitizer cables by prying the connectors straight up from their sockets.

  12. TicWatch Pro 3 GPS Battery Replacement, Remove the core assembly: step 12, image 1 of 2 TicWatch Pro 3 GPS Battery Replacement, Remove the core assembly: step 12, image 2 of 2
    • Remove the core assembly.

  13. TicWatch Pro 3 GPS Battery Replacement, Disconnect the interconnect cable: step 13, image 1 of 2 TicWatch Pro 3 GPS Battery Replacement, Disconnect the interconnect cable: step 13, image 2 of 2
    • Use a spudger to disconnect the interconnect cable by prying the connector straight up from its socket.

  14. TicWatch Pro 3 GPS Battery Replacement, Remove the daughterboard: step 14, image 1 of 2 TicWatch Pro 3 GPS Battery Replacement, Remove the daughterboard: step 14, image 2 of 2
    Tool used on this step:
    Tweezers
    $4.99
    Buy
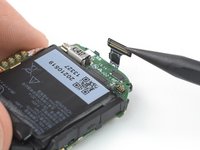
    • Use a pair of tweezers to remove the daughterboard.

  15. TicWatch Pro 3 GPS Battery Replacement, Pry up the battery: step 15, image 1 of 2 TicWatch Pro 3 GPS Battery Replacement, Pry up the battery: step 15, image 2 of 2
    • The battery is held in place by mild adhesive.

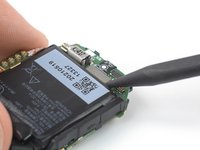
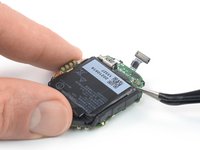
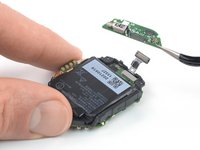
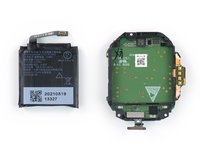
    • Insert the flat end of a spudger between the bottom edge of the battery and the midframe.

    • Take care not to puncture or bend the battery with your tool—a punctured or bent battery may leak dangerous chemicals or cause a fire.

    • Pry upwards to loosen the battery.

    • If you're struggling to pry up the battery, place a heated iOpener onto the motherboard to loosen the adhesive underneath. Don't apply the iOpener directly onto the battery.

    • Don't try to remove the battery all the way yet. It's still connected to the motherboard.

  16. TicWatch Pro 3 GPS Battery Replacement, Reposition the battery: step 16, image 1 of 2 TicWatch Pro 3 GPS Battery Replacement, Reposition the battery: step 16, image 2 of 2
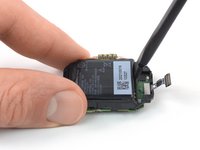
    • Carefully fold the battery over to gain access to the battery cable connector.

    • Avoid straining or tearing the battery cable.

  17. TicWatch Pro 3 GPS Battery Replacement, Disconnect the battery: step 17, image 1 of 2 TicWatch Pro 3 GPS Battery Replacement, Disconnect the battery: step 17, image 2 of 2
    • Use a spudger to disconnect the battery cable by prying the connector straight up from its socket.

  18. TicWatch Pro 3 GPS Battery Replacement, Remove the battery: step 18, image 1 of 2 TicWatch Pro 3 GPS Battery Replacement, Remove the battery: step 18, image 2 of 2
    • Remove the battery.

    • Do not reinstall a damaged or deformed battery, as doing so is a potential safety hazard.

    • Secure the new battery with pre-cut adhesive or double-sided adhesive tape. In order to position it correctly, apply the new adhesive into the device at the places where the old adhesive was located, not directly onto the battery. Press the new battery firmly into place.

Conclusion

Compare your new replacement part to the original part—you may need to transfer remaining components or remove adhesive backings from the new part before you install it.

To reassemble your device, follow these instructions in reverse order.

During reassembly, apply new adhesive where it's necessary after cleaning the relevant areas with isopropyl alcohol (>90%).

For optimal performance, calibrate your newly installed battery after completing this guide.

Take your e-waste to an R2 or e-Stewards certified recycler.

Repair didn’t go as planned? Try some basic troubleshooting, or ask our TicWatch Pro 3 answers community for help.

17 other people completed this guide.

Dominik Schnabelrauch

Member since: 11/23/16

204,845 Reputation

682 Guides authored

Team

iFixit Member of iFixit

Staff

136 Members

17,404 Guides authored

13 Comments

Where did you buy a replacement battery (if you did)? I have scoured thru aliexpress, ebay, and tried to find shattered-screen watches I could transplant from, with no luck so far. I guess I'll keep looking. My watch barely lasted a year before the battery life halved. The voltage sag is so bad the watch bootloops whenever it vibrates below 30% voltage.

George - Reply

I've found a listing in aliexpress for an aftermarket battery but need to de-solder the original BMS and transfer to this new battery. Here's the link to aliexpress.

https://www.aliexpress.com/item/10050049...

Daniel Lee - Reply

I don't think it's tin welding, but most likely TIG welding.

Difficult to open it, but the less experienced could solder the battery contacts on the top without opening the old solder.

https://imgur.com/zhFXcQ4

https://imgur.com/cKJb137

marco deirossi - Reply

A small problem (solved) that I encountered with the battery purchased as compatible from ali-express is the greater ( >5mm)

distance (compared to the battery) of the original two poles of the battery.

You have to bend them carefully inwards to be able to weld them afterwards.

https://imgur.com/5mrfzDk

https://imgur.com/v2OCVCc

https://imgur.com/Izw3dU1

https://imgur.com/QsnAN6I

marco deirossi - Reply

Add Comment

View Statistics:

Past 24 Hours: 33

Past 7 Days: 245

Past 30 Days: 1,034

All Time: 14,430