Free Shipping on Domestic Orders $75+

Steam Machine (2026) Fan Replacement

What you need

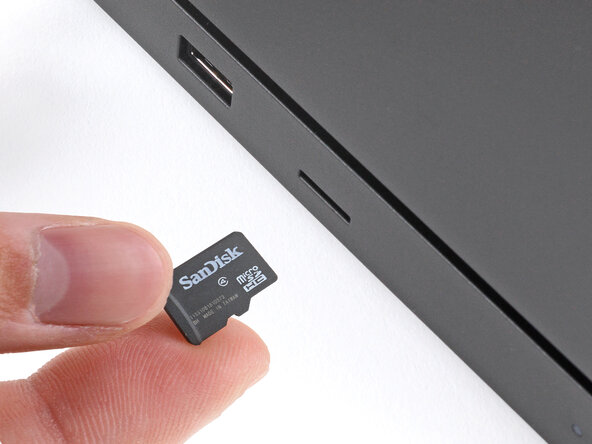
    1. Steam Machine (2026) Fan Replacement, Before you begin: step 1, image 1 of 3 Steam Machine (2026) Fan Replacement, Before you begin: step 1, image 2 of 3 Steam Machine (2026) Fan Replacement, Before you begin: step 1, image 3 of 3
      • Before you begin this repair:

      • Power down your Steam Machine and disconnect the power cable.

      • Unplug any remaining cables or accessories from all ports.

      • If you have a microSD card installed, remove it. Otherwise, it may break during this procedure.

      Ask FixBot

      Add Comment

    1. Steam Machine (2026) Fan Replacement, Reposition the Steam Machine: step 2, image 1 of 1
      • Reposition the Steam Machine so the bottom is facing up.

      Ask FixBot

      Add Comment

    2. Steam Machine (2026) Fan Replacement, Remove the feet: step 3, image 1 of 3 Steam Machine (2026) Fan Replacement, Remove the feet: step 3, image 2 of 3 Steam Machine (2026) Fan Replacement, Remove the feet: step 3, image 3 of 3
      • Use a T8 Torx screwdriver to remove the four rubber feet.

      Ask FixBot

      Add Comment

    1. Steam Machine (2026) Fan Replacement, Reposition the Steam Machine: step 4, image 1 of 1
      • Reposition the Steam Machine so the back panel is facing up.

      Ask FixBot

      Add Comment

    2. Steam Machine (2026) Fan Replacement, Loosen the back panel screws: step 5, image 1 of 2 Steam Machine (2026) Fan Replacement, Loosen the back panel screws: step 5, image 2 of 2
      • Use a T8 Torx screwdriver to fully loosen the two captive screws securing the back panel.

      Ask FixBot

      Add Comment

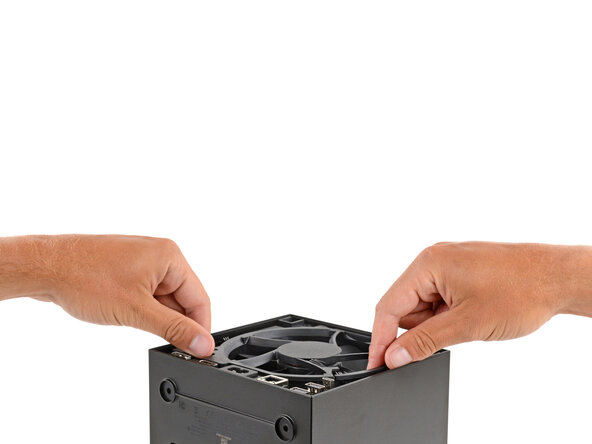
    3. Steam Machine (2026) Fan Replacement, Remove the back panel: step 6, image 1 of 3 Steam Machine (2026) Fan Replacement, Remove the back panel: step 6, image 2 of 3 Steam Machine (2026) Fan Replacement, Remove the back panel: step 6, image 3 of 3
      • The back panel is secured by two hinge clips near the bottom corners and two locking clips on the sides.

      • Lift the top edge of the panel (near the screws) until the two locking clips release.

      • If you're having trouble getting an initial grip on the panel, use a spudger to lift it enough to grab with your fingers.

      • Slide the panel towards the top edge and lift to remove it.

      Ask FixBot

      Add Comment

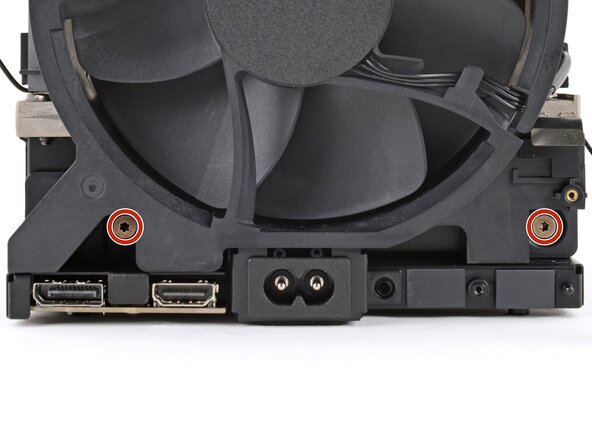
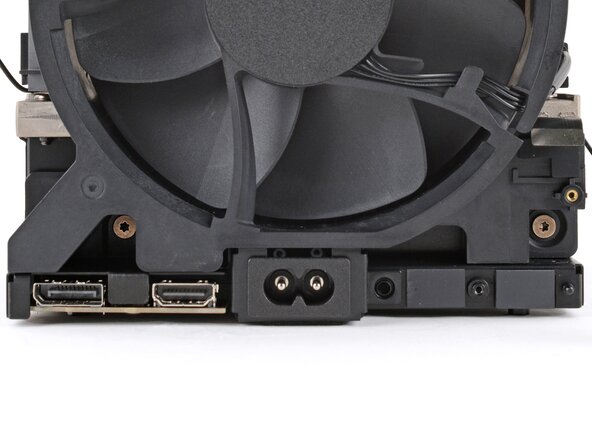
    4. Steam Machine (2026) Fan Replacement, Remove the inner assembly screws: step 7, image 1 of 2 Steam Machine (2026) Fan Replacement, Remove the inner assembly screws: step 7, image 2 of 2
      • Use a T8 Torx screwdriver to remove the two 7.3 mm‑long screws securing the inner assembly.

      Ask FixBot

      Add Comment

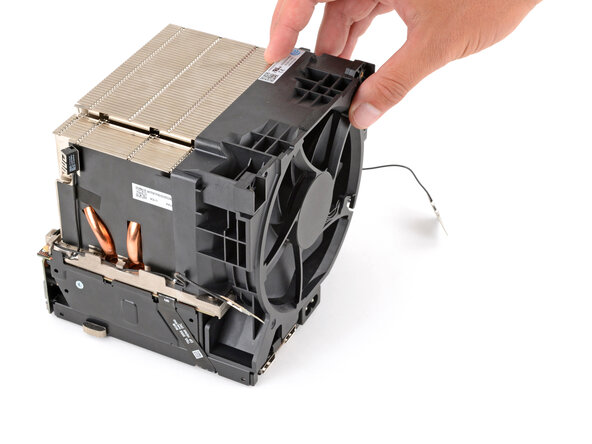
    5. Steam Machine (2026) Fan Replacement, Remove the inner assembly: step 8, image 1 of 3 Steam Machine (2026) Fan Replacement, Remove the inner assembly: step 8, image 2 of 3 Steam Machine (2026) Fan Replacement, Remove the inner assembly: step 8, image 3 of 3
      • After removal, don't lay the inner assembly down on the microSD and USB ports. These ports are fragile and shouldn't have the weight of the assembly resting on them.

      • Grip the inner assembly under the fan and lift it straight up and out of the shell.

      • Set the inner assembly down so the SSD is on top.

      Ask FixBot

      Add Comment

    1. Steam Machine (2026) Fan Replacement, Reposition the inner assembly: step 9, image 1 of 1
      • Spin the inner assembly so the fan faces you.

      Ask FixBot

      Add Comment

    2. Steam Machine (2026) Fan Replacement, Remove the cable cover screws: step 10, image 1 of 2 Steam Machine (2026) Fan Replacement, Remove the cable cover screws: step 10, image 2 of 2
      • Use a T8 Torx screwdriver to remove the 5.1 mm‑long screw securing the rear USB and Ethernet port cable cover.

      Ask FixBot

      Add Comment

    3. Steam Machine (2026) Fan Replacement, Remove the cable cover: step 11, image 1 of 2 Steam Machine (2026) Fan Replacement, Remove the cable cover: step 11, image 2 of 2
      • Remove the cable cover.

      • During reassembly, make sure the tab on the edge of the cable cover slides into its cutout in the fan.

      Ask FixBot

      Add Comment

    4. Steam Machine (2026) Fan Replacement, Disconnect the board: step 12, image 1 of 2 Steam Machine (2026) Fan Replacement, Disconnect the board: step 12, image 2 of 2
      • Use the flat end of a spudger to pry up and disconnect the board's press connector.

      Ask FixBot

      Add Comment

    5. Steam Machine (2026) Fan Replacement, Remove the board screw: step 13, image 1 of 2 Steam Machine (2026) Fan Replacement, Remove the board screw: step 13, image 2 of 2
      • Use a T8 Torx screwdriver to remove the 5.1 mm‑long screw securing the rear USB and Ethernet port board.

      Ask FixBot

      Add Comment

    6. Steam Machine (2026) Fan Replacement, Remove the board: step 14, image 1 of 2 Steam Machine (2026) Fan Replacement, Remove the board: step 14, image 2 of 2
      • Slide the board straight away fron the inner assembly to remove it.

      Ask FixBot

      Add Comment

    1. Steam Machine (2026) Fan Replacement, Reposition the inner assembly: step 15, image 1 of 2 Steam Machine (2026) Fan Replacement, Reposition the inner assembly: step 15, image 2 of 2
      • Reposition the inner assembly so the antenna marked AUX ANT is facing up.

      Ask FixBot

      Add Comment

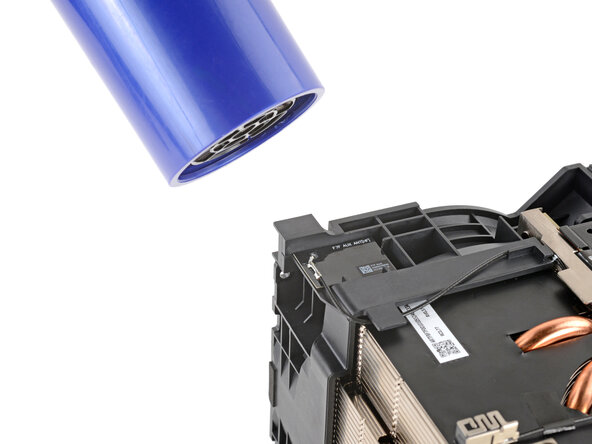
    2. Steam Machine (2026) Fan Replacement, Heat the auxiliary antenna: step 16, image 1 of 3 Steam Machine (2026) Fan Replacement, Heat the auxiliary antenna: step 16, image 2 of 3 Steam Machine (2026) Fan Replacement, Heat the auxiliary antenna: step 16, image 3 of 3
      • Mild adhesive secures the auxiliary antenna to the fan. Heating the antenna softens the adhesive, making it easier to separate. If you don't want to remove the antennas from the fan, you can disconnect and de-route them.

      • Lay a heated iOpener on the auxiliary antenna for two minutes.

      • Check out this guide for instruction on heating an iOpener.

      • Alternatively, you can use a hair dryer to soften the adhesive. For tips on using a hair dryer without accidentally melting plastic, check out this guide.

      Ask FixBot

      Add Comment

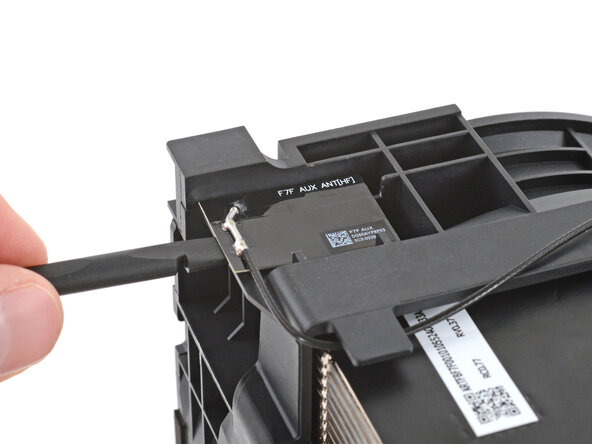
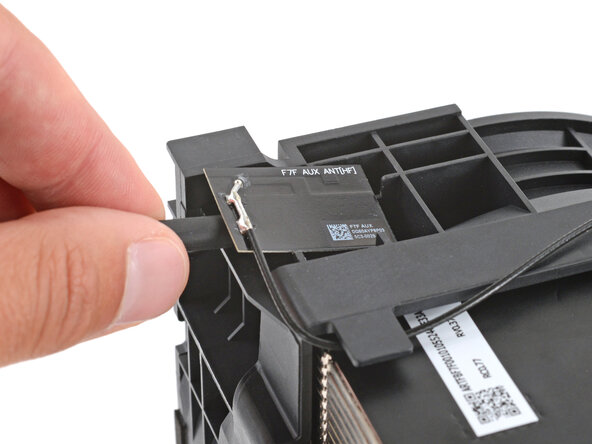
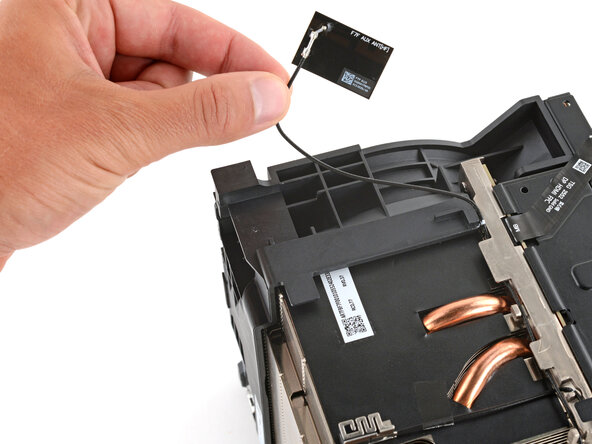
    3. Steam Machine (2026) Fan Replacement, Separate the auxiliary antenna: step 17, image 1 of 3 Steam Machine (2026) Fan Replacement, Separate the auxiliary antenna: step 17, image 2 of 3 Steam Machine (2026) Fan Replacement, Separate the auxiliary antenna: step 17, image 3 of 3
      Tool used on this step:
      Tesa 61395 Tape
      $2.95
      Buy
      • Slide the flat end of a spudger under the antenna and lift to separate the adhesive.

      • During reassembly, the adhesive should be sticky enough to reuse. If it isn't, use thin double-sided tape to secure the antenna.

      Ask FixBot

      Add Comment

    4. Steam Machine (2026) Fan Replacement, De-route the auxiliary antenna: step 18, image 1 of 3 Steam Machine (2026) Fan Replacement, De-route the auxiliary antenna: step 18, image 2 of 3 Steam Machine (2026) Fan Replacement, De-route the auxiliary antenna: step 18, image 3 of 3
      • Guide the antenna cable out of its clips on the fan.

      Ask FixBot

      Add Comment

    5. Steam Machine (2026) Fan Replacement, Reposition the inner assembly: step 19, image 1 of 2 Steam Machine (2026) Fan Replacement, Reposition the inner assembly: step 19, image 2 of 2
      • Reposition the inner assembly so the antenna marked MAIN ANT is facing up.

      Ask FixBot

      Add Comment

    6. Steam Machine (2026) Fan Replacement, Heat the main antenna: step 20, image 1 of 3 Steam Machine (2026) Fan Replacement, Heat the main antenna: step 20, image 2 of 3 Steam Machine (2026) Fan Replacement, Heat the main antenna: step 20, image 3 of 3
      • Mild adhesive secures the main antenna to the fan. Heating the antenna softens the adhesive, making it easier to separate.

      • Lay a heated iOpener on the main antenna for two minutes.

      • Check out this guide for instruction on heating an iOpener.

      • Alternatively, you can use a hair dryer to soften the adhesive. For tips on using a hair dryer without accidentally melting plastic, check out this guide.

      Ask FixBot

      Add Comment

    7. Steam Machine (2026) Fan Replacement, Separate the main antenna: step 21, image 1 of 3 Steam Machine (2026) Fan Replacement, Separate the main antenna: step 21, image 2 of 3 Steam Machine (2026) Fan Replacement, Separate the main antenna: step 21, image 3 of 3
      Tool used on this step:
      Tesa 61395 Tape
      $2.95
      Buy
      • Slide the flat end of a spudger under the antenna and lift to separate the adhesive.

      • During reassembly, the adhesive should be sticky enough to reuse. If it isn't, use thin double-sided tape to secure the antenna.

      Ask FixBot

      Add Comment

    8. Steam Machine (2026) Fan Replacement, De-route the main antenna: step 22, image 1 of 3 Steam Machine (2026) Fan Replacement, De-route the main antenna: step 22, image 2 of 3 Steam Machine (2026) Fan Replacement, De-route the main antenna: step 22, image 3 of 3
      • Guide the antenna cable out of its plastic clips.

      Ask FixBot

      Add Comment

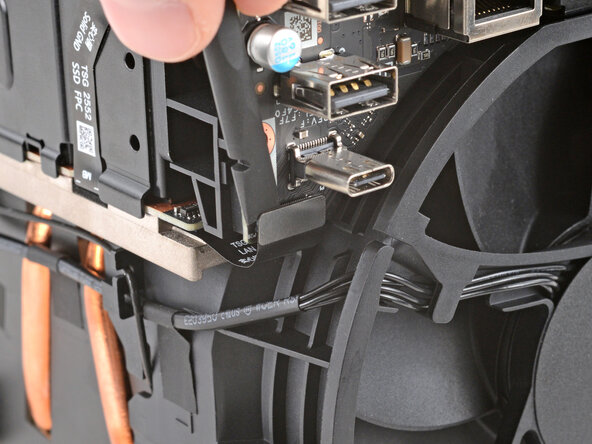
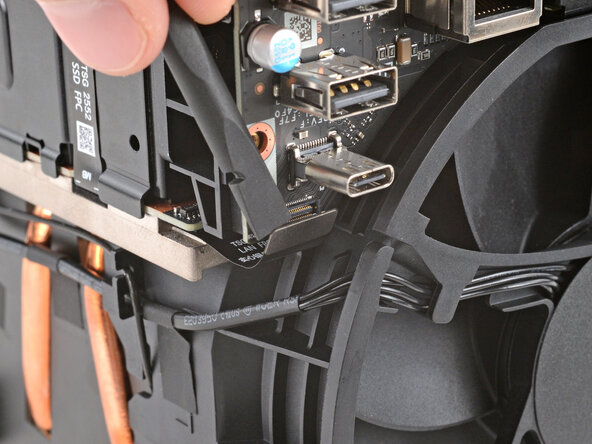
    9. Steam Machine (2026) Fan Replacement, Disconnect the fan: step 23, image 1 of 3 Steam Machine (2026) Fan Replacement, Disconnect the fan: step 23, image 2 of 3 Steam Machine (2026) Fan Replacement, Disconnect the fan: step 23, image 3 of 3
      • The fan connector can be tricky to disconnect. Be careful: excessive force could rip the socket off the board.

      • Use a pair of angled tweezers to firmly grip the head of the fan cable connector.

      • To get the best grip, hold the tweezers close to the pointed ends.

      • Gently rock the connector side-to-side while lifting to disconnect it.

      Ask FixBot

      Add Comment

    10. Steam Machine (2026) Fan Replacement, Peel up the fan cable: step 24, image 1 of 2 Steam Machine (2026) Fan Replacement, Peel up the fan cable: step 24, image 2 of 2
      • Peel up the tape securing the fan cable to the heatsink.

      Ask FixBot

      Add Comment

    11. Steam Machine (2026) Fan Replacement, Reposition the inner assembly: step 25, image 1 of 1
      • Reposition the inner assembly so the fan is facing you and the power cable socket is on the bottom.

      Ask FixBot

      Add Comment

    12. Steam Machine (2026) Fan Replacement, Remove the fan screws: step 26, image 1 of 2 Steam Machine (2026) Fan Replacement, Remove the fan screws: step 26, image 2 of 2
      • Use a T8 Torx screwdriver to remove the two 7.3 mm‑long screws securing the fan.

      Ask FixBot

      Add Comment

    13. Steam Machine (2026) Fan Replacement, Remove the fan: step 27, image 1 of 2 Steam Machine (2026) Fan Replacement, Remove the fan: step 27, image 2 of 2
      • Slide the fan straight away from the inner assembly to remove it.

      • During reassembly, make sure no cables get stuck behind the fan when sliding it back in place.

      Ask FixBot

      Add Comment

Conclusion

To reassemble your device, follow these instructions in reverse order.

When putting your Steam Machine back where it lives, make sure it's in an area with at least a few inches of space on all sides. If your console sits in an entertainment center, make sure at least one panel is open to provide airflow. Avoid keeping the console on carpet or other similar surfaces, as your device is more likely to suck up dirt, dust, and hair.

Take your e-waste to an R2 or e-Stewards certified recycler.

Repair didn’t go as planned? Try some basic troubleshooting, or ask our Answers community for help.

Cancel: I did not complete this guide.

Spencer Day

Member since: 09/14/22

205,121 Reputation

1,266 Guides authored

0 Guide Comments

Add Comment

View Statistics:

Past 24 Hours: 95

Past 7 Days: 107

Past 30 Days: 140

All Time: 161