Introduction
Use this guide to replace a worn-out or dead battery in your OnePlus 8T.
If your battery is swollen, take appropriate precautions. For your safety, discharge your battery below 25% before disassembling your phone. This reduces the risk of a dangerous thermal event if the battery is accidentally damaged during the repair.
You’ll need replacement adhesive to reattach components when reassembling the device.
What you need
-
-
Switch off your phone.
-
Heat an iOpener to loosen the adhesive beneath the rear glass. Apply the iOpener for at least two minutes. You might want to repeat this step several times during the rear glass removal.
 Ask FixBot
-
-
-
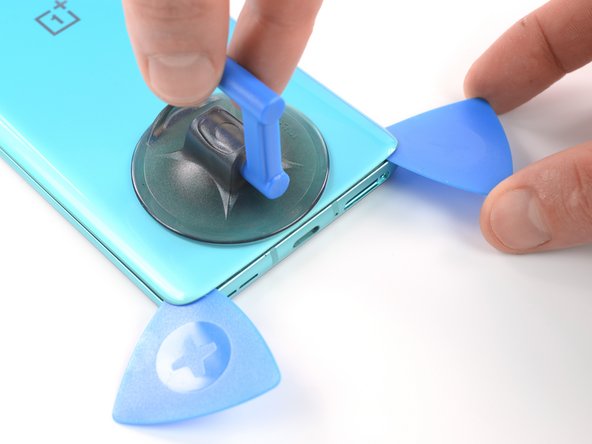
Apply a suction cup to the back of the phone, as close as possible to the center of the bottom edge.
-
Pull on the suction cup to create a gap between the rear glass and the frame.
-
Insert the tip of an opening pick into the gap and slide it to the bottom left corner.
-
Leave the opening pick in its place to prevent the adhesive from resealing.
-
-
-
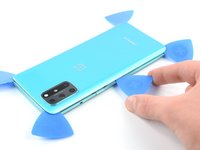
Insert a second opening under the bottom left corner.
-
Slide the opening pick along the bottom edge to the bottom right corner.
-
Leave the pick in its place to prevent the adhesive from resealing.
-
-
-
Insert a third opening pick under the bottom right corner.
-
Slide the opening pick along the right edge to the top right corner.
-
Leave the opening picks in their place to prevent the adhesive from resealing.
-
-
-
Insert a fourth opening pick under the top right corner.
-
Slide it along the top edge to the top left corner to cut the adhesive.
-
Leave the opening pick in its place to prevent the adhesive from resealing.
-
-
-
Insert a fifth opening pick under the top left corner.
-
Slide the opening pick along the left edge to the bottom left corner to cut the remaining adhesive.
-
-
-
-
Use a Phillips screwdriver to remove the nine 3.8 mm-long screws securing the motherboard cover.
-
-
-
Insert the tip of an opening pick under the bottom left corner of the motherboard cover.
-
Use the opening pick to lift the motherboard cover up and release the plastic clips that hold it in place.
-
-
-
Use a spudger to disconnect the battery by prying the connector straight up from its socket.
-
-
-
Use the flat end of a spudger to disconnect the two flex cables which are covering the battery.
-
-
-
Bend the two flex cables toward the bottom of the phone and out of the way of the battery.
-
-
-
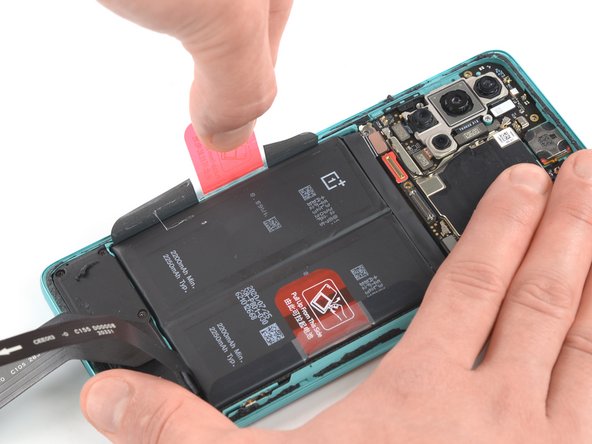
Peel back the red pull tab and the black sticker from the left edge of the battery.
-
Pull the tab up with slow and steady force to separate the battery from the adhesive holding it in place.
-
-
-
Peel back the red pull tab and the black sticker from the right edge of the battery.
-
Pull the tab up with slow and steady force to separate the battery from the adhesive holding it in place.
-


If possible, turn on your device and test your repair before installing new adhesive and resealing.
Secure the new battery with pre-cut adhesive or double-sided adhesive tape. In order to position it correctly, apply the new adhesive into the device at the places where the old adhesive was located, not directly onto the battery. Press the new battery firmly into place.
To reassemble your device, follow these instructions in reverse order. Apply new adhesive where necessary after cleaning the relevant areas with isopropyl alcohol (>90%).
For optimal performance, calibrate your newly installed battery: Charge it to 100% and keep charging it for at least 2 more hours. Then use your device until it shuts off due to low battery. Finally, charge it uninterrupted to 100%.
Take your e-waste to an R2 or e-Stewards certified recycler.
Repair didn’t go as planned? Try some basic troubleshooting, or ask our Answers community for help.
Cancel: I did not complete this guide.
40 other people completed this guide.


18 Guide Comments
This doesn't look too bad. Heat the back cover enough to cut through the adhesive, then lift off the back cover. Unscrew 9 tiny #00 phillips screws and pop off the mobo cover. Lift 3 ribbon cable connectors. Pull the battery off the adhesive. Clean off all the old adhesive from under the battery and around the edge of the back cover. Then reverse the process to reassemble. You would need a new battery, and a new back cover if you broke the original one trying to remove it. You can get a new back cover from Amazon for $20, but the reviews all said it's not Gorilla Glass, and it's far less durable and crack-resistant than the OEM cover. Finding a good quality replacement battery seems to be more difficult, I don't see even one battery for sale on Amazon that says specifically that it fits this phone.
My refurbished OP8T's battery gave up randomly one day. Plugging in any charger/any attempt to boot would just briefly showed a lightning bolt icon and would fade to black.
With that said, I completed my fix yesterday evening without any issues. I used a blow-dryer to loosen the back cover rather than the iFixit heating tool, and it worked fantastically. I removed the dead stock battery and replaced it with a 4600mAh from eBay, taking care to move the sticky pull tabs from the old battery to the new for future repairs. The battery and two removed cables snapped in with an audible click.
When reseating the motherboard cover, be aware there's a little connector that needs to line up with the board, and that will click into place.
I resealed my device with gorilla glue (but there are better, more tailored glues on Amazon). I am a little worried about water and dust getting in now that I've broken the seal, so I would be very wary of that.
In total, repairs cost about $40 and 40 minutes of my time. Great guide!
Update 10/10/2023
So exactly a year later, my OnePlus 8T has given up on me. A few weeks ago, I noticed it began randomly shutting off. The screen would "fade" to black and I'd have to hold the power button down to start it back up. Today, it turned off completely and refuses to turn back on or boot into recovery.
I'm not sure if this was due to the third-party battery giving out (Generic 4600mAh battery from eBay) or if it was caused by any range of software issues. I'll be leaving it on the charger overnight and attempting another battery swap shortly, so hopefully that works.
Michael, please let us know how the next replacement goes. I’m attempting my first replacement right now. Thanks.
A question, the 8T has a battery rated at 4400mAh, while the battery in the store is 2200mAh. is this a mistake or does the replacement battery have half the battery life of the original?