
Motorola Edge (2022) Motherboard Replacement

What you need

  1. Motorola Edge (2022) Motherboard Replacement, Heat the right edge: step 1, image 1 of 1
    • Completely power off your phone before you begin.

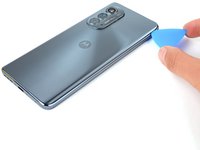
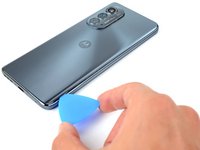
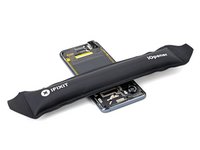
    • Heat an iOpener and apply it to the back cover's right edge for two minutes.

    • A hair dryer, heat gun, or hot plate may also be used, but be careful not to overheat the phone—the display and internal battery are both susceptible to heat damage.

  2. Motorola Edge (2022) Motherboard Replacement, Separate the right adhesive: step 2, image 1 of 3 Motorola Edge (2022) Motherboard Replacement, Separate the right adhesive: step 2, image 2 of 3 Motorola Edge (2022) Motherboard Replacement, Separate the right adhesive: step 2, image 3 of 3
    • Apply a suction cup to the back of the phone, as close to the middle of the right edge as possible.

    • Pull up on the suction cup with a strong, steady force to create a gap between the back cover and the frame.

    • Depending on the age of your phone, this may be difficult. If you're having trouble, apply more heat to the edge and try again.

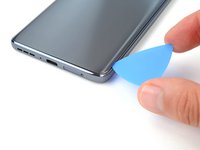
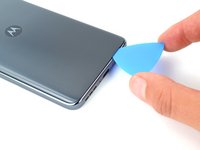
    • Insert an opening pick into the gap.

  3. Motorola Edge (2022) Motherboard Replacement, Slice the right adhesive: step 3, image 1 of 2 Motorola Edge (2022) Motherboard Replacement, Slice the right adhesive: step 3, image 2 of 2
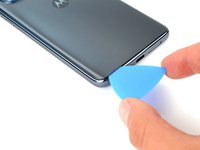
    • Slide the pick along the right edge to slice the adhesive.

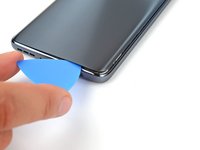
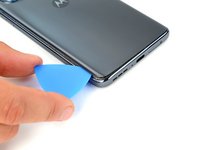
    • Leave the pick in the bottom right edge to prevent the adhesive from resealing.

  4. Motorola Edge (2022) Motherboard Replacement, Heat the bottom edge: step 4, image 1 of 1
    • Apply a heated iOpener to the back cover's bottom edge for two minutes.

  5. Motorola Edge (2022) Motherboard Replacement, Slice the bottom right corner adhesive: step 5, image 1 of 2 Motorola Edge (2022) Motherboard Replacement, Slice the bottom right corner adhesive: step 5, image 2 of 2
    • Rotate the pick around the bottom right corner to slice the adhesive.

  6. Motorola Edge (2022) Motherboard Replacement: step 6, image 1 of 2 Motorola Edge (2022) Motherboard Replacement: step 6, image 2 of 2
    • Slide the pick along the bottom edge to slice the adhesive.

    • Leave the pick in the bottom left edge to prevent the adhesive from resealing.

  7. Motorola Edge (2022) Motherboard Replacement: step 7, image 1 of 1
    • Apply a heated iOpener to the back cover's left edge for two minutes.

  8. Motorola Edge (2022) Motherboard Replacement: step 8, image 1 of 2 Motorola Edge (2022) Motherboard Replacement: step 8, image 2 of 2
    • Rotate the pick around the bottom left corner to slice the adhesive.

  9. Motorola Edge (2022) Motherboard Replacement: step 9, image 1 of 2 Motorola Edge (2022) Motherboard Replacement: step 9, image 2 of 2
    • Slide the pick along the edge to slice the adhesive.

    • Leave the pick in the top left edge to prevent the adhesive from resealing.

  10. Motorola Edge (2022) Motherboard Replacement: step 10, image 1 of 1
    • Apply a heated iOpener to the back cover's top edge for two minutes.

  11. Motorola Edge (2022) Motherboard Replacement: step 11, image 1 of 2 Motorola Edge (2022) Motherboard Replacement: step 11, image 2 of 2
    • Rotate the pick around the top left corner to slice the adhesive.

  12. Motorola Edge (2022) Motherboard Replacement: step 12, image 1 of 2 Motorola Edge (2022) Motherboard Replacement: step 12, image 2 of 2
    • Slide the pick along the top edge to slice the adhesive.

  13. Motorola Edge (2022) Motherboard Replacement, Remove the back cover: step 13, image 1 of 2 Motorola Edge (2022) Motherboard Replacement, Remove the back cover: step 13, image 2 of 2
    • Lift the back cover from the phone and remove it.

    • If the back cover is still stuck to the midframe, slide an opening pick around the edges of the phone until the cover separates completely.

  14. Motorola Edge (2022) Motherboard Replacement, Separate the camera bezel adhesive: step 14, image 1 of 2 Motorola Edge (2022) Motherboard Replacement, Separate the camera bezel adhesive: step 14, image 2 of 2
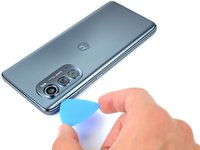
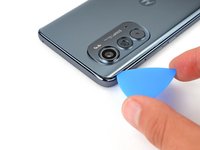
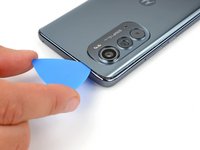
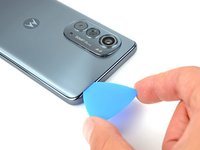
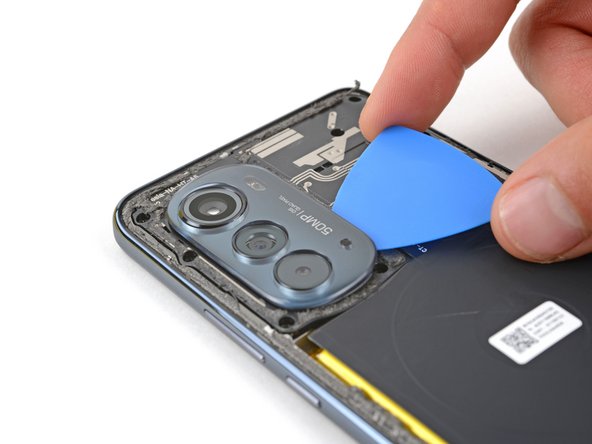
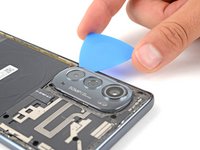
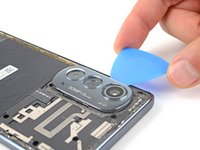
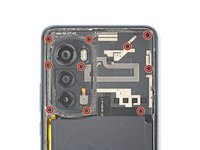
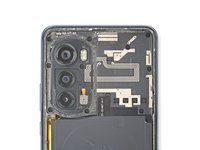
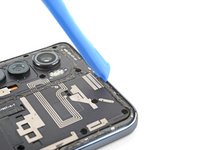
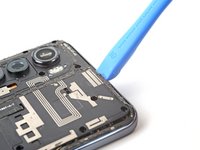
    • Insert an opening pick between the right edge of the camera bezel and the motherboard cover.

    • Slide the pick back and forth along the edge to slice the adhesive.

  15. Motorola Edge (2022) Motherboard Replacement: step 15, image 1 of 2 Motorola Edge (2022) Motherboard Replacement: step 15, image 2 of 2
    • Insert an opening pick between the left edge of the camera bezel and the motherboard cover.

    • Slide the pick back and forth along the edge to slice the adhesive.

  16. Motorola Edge (2022) Motherboard Replacement, Remove the camera bezel: step 16, image 1 of 2 Motorola Edge (2022) Motherboard Replacement, Remove the camera bezel: step 16, image 2 of 2
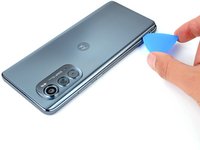
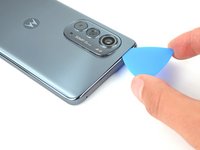
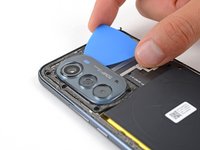
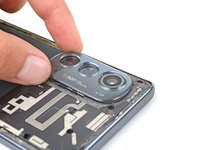
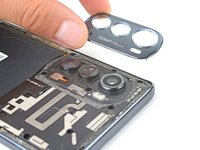
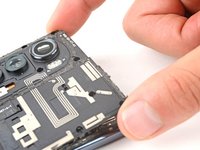
    • Lift the camera bezel from the phone and remove it.

    • During reassembly:

    • This is a good point to test your phone's functionality before sealing it up. Use this guide to run a hardware test. Be sure to power your phone back down completely before you continue working.

    • If you are replacing the fingerprint sensor or screen assembly, use this guide to calibrate the fingerprint sensor.

    • Follow this guide to replace the back cover and camera bezel adhesive.

  17. Motorola Edge (2022) Motherboard Replacement, Detach the left wireless charging coil tape: step 17, image 1 of 2 Motorola Edge (2022) Motherboard Replacement, Detach the left wireless charging coil tape: step 17, image 2 of 2
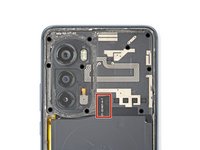
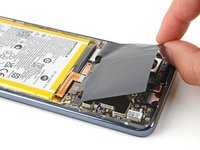
    • Insert the pointed end of a spudger underneath the tape that connects the wireless charging coil to the speaker on the bottom left of the phone.

    • Slowly lift the spudger up until the tape detaches from the speaker.

  18. Motorola Edge (2022) Motherboard Replacement, Detach the right wireless charging coil tape: step 18, image 1 of 2 Motorola Edge (2022) Motherboard Replacement, Detach the right wireless charging coil tape: step 18, image 2 of 2
    • Insert a spudger underneath the tape that connects the wireless charging coil to the daughterboard cover on the bottom right of the phone.

    • Slowly lift the spudger up until the tape detaches.

  19. Motorola Edge (2022) Motherboard Replacement: step 19, image 1 of 2 Motorola Edge (2022) Motherboard Replacement: step 19, image 2 of 2
    • Use a Phillips screwdriver to remove the 10 4 mm screws securing the motherboard cover.

  20. Motorola Edge (2022) Motherboard Replacement: step 20, image 1 of 2 Motorola Edge (2022) Motherboard Replacement: step 20, image 2 of 2
    • Adhesive secures the motherboard cover to the motherboard itself.

    • Apply a heated iOpener between the bottom edge of the motherboard cover for two minutes.

  21. Motorola Edge (2022) Motherboard Replacement: step 21, image 1 of 3 Motorola Edge (2022) Motherboard Replacement: step 21, image 2 of 3 Motorola Edge (2022) Motherboard Replacement: step 21, image 3 of 3
    • Insert an opening tool between the motherboard cover and the midframe.

    • Pry up with the opening tool until you are able to grab the motherboard cover with your fingers.

    • During reassembly, press down around the perimeter of the motherboard cover to engage the clips.

  22. Motorola Edge (2022) Motherboard Replacement, Remove the motherboard cover: step 22, image 1 of 3 Motorola Edge (2022) Motherboard Replacement, Remove the motherboard cover: step 22, image 2 of 3 Motorola Edge (2022) Motherboard Replacement, Remove the motherboard cover: step 22, image 3 of 3
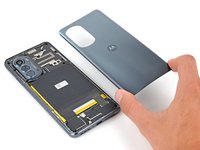
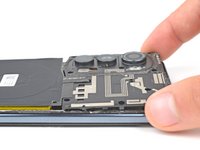
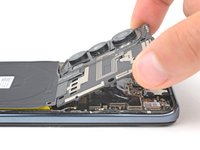
    • Slowly pull the motherboard cover up and away from the phone and remove it.

  23. Motorola Edge (2022) Motherboard Replacement, Move the graphite film: step 23, image 1 of 2 Motorola Edge (2022) Motherboard Replacement, Move the graphite film: step 23, image 2 of 2
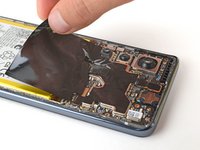
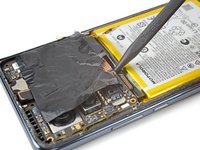
    • Use your fingers to move the graphite film that covers the battery out of the way.

  24. Motorola Edge (2022) Motherboard Replacement, Disconnect the battery: step 24, image 1 of 2 Motorola Edge (2022) Motherboard Replacement, Disconnect the battery: step 24, image 2 of 2
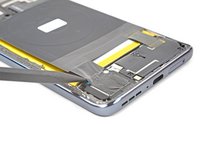
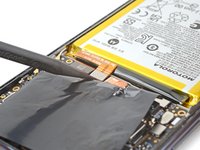
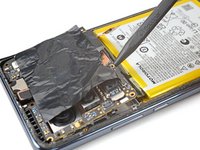
    • Use the pointed end of a spudger to pry up and disconnect the battery's press connector.

    • To re-attach press connectors like this one, carefully align and press down on one side until it clicks into place, then repeat on the other side. Do not press down on the middle. If the connector is misaligned, the pins can bend, causing permanent damage.

  25. Motorola Edge (2022) Motherboard Replacement, Disconnect the interconnect cable: step 25, image 1 of 2 Motorola Edge (2022) Motherboard Replacement, Disconnect the interconnect cable: step 25, image 2 of 2
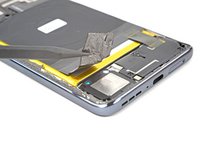
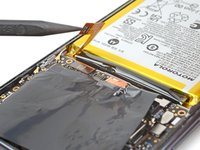
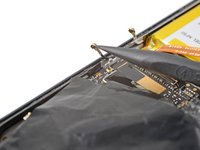
    • Use the pointed end of a spudger to pry up and disconnect the interconnect cable's press connector.

  26. Motorola Edge (2022) Motherboard Replacement, Disconnect the screen cable: step 26, image 1 of 2 Motorola Edge (2022) Motherboard Replacement, Disconnect the screen cable: step 26, image 2 of 2
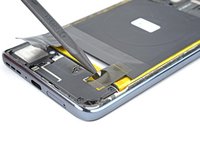
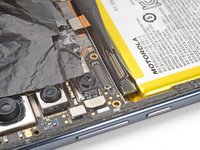
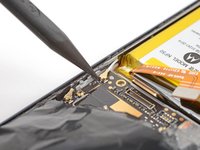
    • Use the pointed end of a spudger to pry up and disconnect the screen's press connector.

  27. Motorola Edge (2022) Motherboard Replacement, Disconnect the button assembly cable: step 27, image 1 of 2 Motorola Edge (2022) Motherboard Replacement, Disconnect the button assembly cable: step 27, image 2 of 2
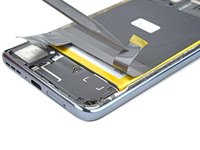
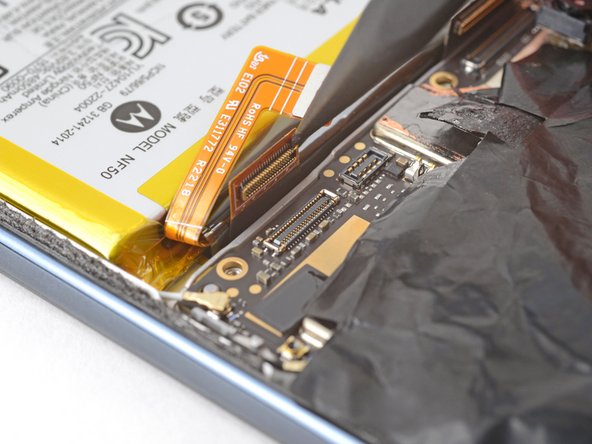
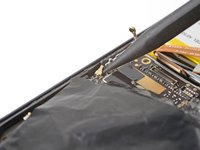
    • Use the pointed end of a spudger to pry up and disconnect the button assembly's press connector.

  28. Motorola Edge (2022) Motherboard Replacement, Disconnect the white coaxial cable: step 28, image 1 of 2 Motorola Edge (2022) Motherboard Replacement, Disconnect the white coaxial cable: step 28, image 2 of 2
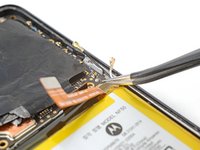
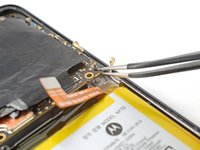
    • Use the pointed end of a spudger to pry up and disconnect the white antenna's coaxial connector.

    • Pry under the rounded edge of the coaxial connector, not the straight edge. If you pry under the straight edge you may rip the socket off of the motherboard.

    • During reassembly, make sure to put the cable back in its clip on the motherboard.

    • To re-attach coaxial connectors like this one, hold the connectors in place and gently press them straight down with your finger or the pointed end of a spudger.

  29. Motorola Edge (2022) Motherboard Replacement: step 29, image 1 of 2 Motorola Edge (2022) Motherboard Replacement: step 29, image 2 of 2
    • Repeat the previous step on the black antenna's coaxial connector.

    • During reassembly, make sure to put the cable back in its clip on the motherboard.

  30. Motorola Edge (2022) Motherboard Replacement: step 30, image 1 of 2 Motorola Edge (2022) Motherboard Replacement: step 30, image 2 of 2
    • Take care not to puncture or bend the battery with your tweezers—a punctured or bent battery may leak dangerous chemicals or cause a fire.

    • Use a pair of tweezers to grip the bottom right corner of the motherboard near the peg on the right edge of the phone.

    • Pull the motherboard up and over the peg with a slow, steady force. This should release a few clips securing the motherboard.

    • This may require multiple attempts and significant force, as the peg wedges the motherboard in very tightly.

  31. Motorola Edge (2022) Motherboard Replacement: step 31, image 1 of 2 Motorola Edge (2022) Motherboard Replacement: step 31, image 2 of 2
    • Insert the pointed end of a spudger under the middle of the motherboard's bottom edge.

    • Gently pry up on the motherboard to release the clips securing it.

  32. Motorola Edge (2022) Motherboard Replacement: step 32, image 1 of 2 Motorola Edge (2022) Motherboard Replacement: step 32, image 2 of 2
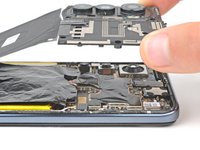
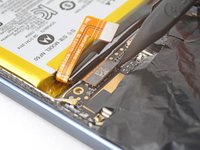
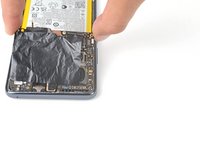
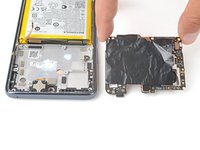
    • Remove the motherboard from the phone.

    • During reassembly:

    • Clean off the old thermal paste from the midframe and motherboard using isopropyl alcohol and a microfiber cloth. Apply new thermal paste before reassembly.

    • Ensure that all of the cables that connect to the motherboard (interconnect, battery, antenna, display, and button assembly) are out of they way so they do not get stuck under the motherboard when it's reinserted.

  33. Motorola Edge (2022) Motherboard Replacement, Peel back the camera tape: step 33, image 1 of 2 Motorola Edge (2022) Motherboard Replacement, Peel back the camera tape: step 33, image 2 of 2
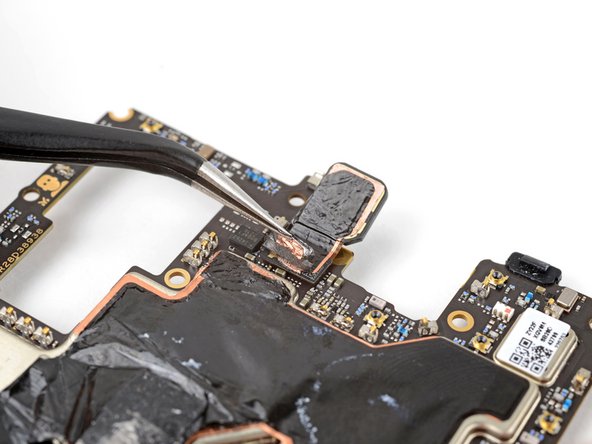
    • Use tweezers to peel back the tape connecting the camera to the motherboard.

  34. Motorola Edge (2022) Motherboard Replacement, Remove the front camera: step 34, image 1 of 2 Motorola Edge (2022) Motherboard Replacement, Remove the front camera: step 34, image 2 of 2
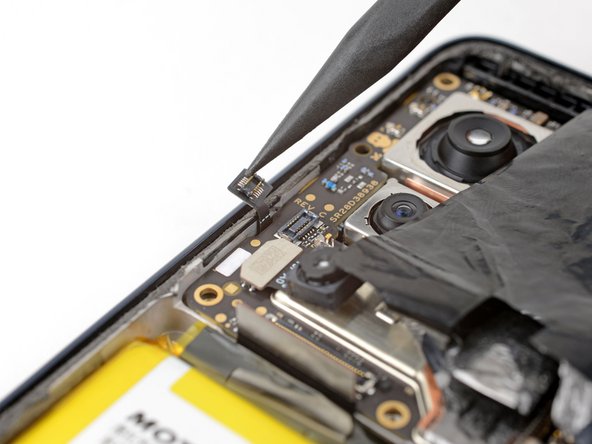
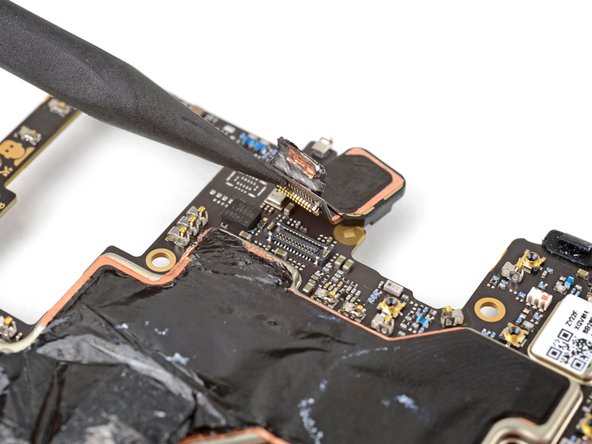
    • Use the pointed end of a spudger to pry up and disconnect the front camera's press connector.

    • There's no adhesive securing the front camera to the motherboard. Be careful disconnecting the press connector, as it may eject the camera.

  35. Motorola Edge (2022) Motherboard Replacement, Remove the depth camera: step 35, image 1 of 2 Motorola Edge (2022) Motherboard Replacement, Remove the depth camera: step 35, image 2 of 2
    • Use the pointed end of a spudger to pry up and disconnect the depth camera's press connector.
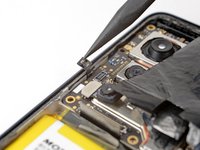
    • There's no adhesive securing the depth camera to the motherboard. Be careful disconnecting the press connector, as it may eject the camera.

    • Remove the camera.

  36. Motorola Edge (2022) Motherboard Replacement, Remove the main camera: step 36, image 1 of 2 Motorola Edge (2022) Motherboard Replacement, Remove the main camera: step 36, image 2 of 2
    • Flip the motherboard over to access the main and ultra wide cameras.

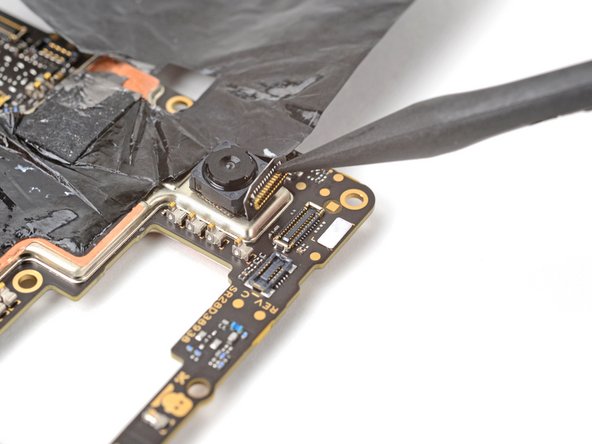
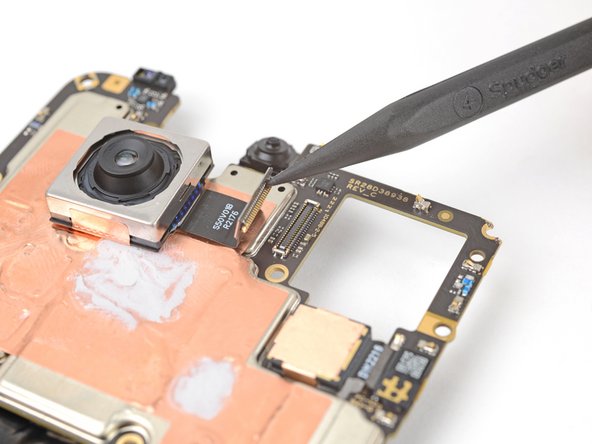
    • Use the pointed end of a spudger to pry up and disconnect the main camera's press connector.

    • There's no adhesive securing the main camera to the motherboard. Be careful disconnecting the press connector, as it may eject the camera.

    • Remove the camera.

  37. Motorola Edge (2022) Motherboard Replacement: step 37, image 1 of 2 Motorola Edge (2022) Motherboard Replacement: step 37, image 2 of 2
    • Use the pointed end of a spudger to pry up and disconnect the ultra wide camera's press connector.

    • There's no adhesive securing the ultra wide camera to the motherboard. Be careful disconnecting the press connector, as it may eject the camera.

    • Remove the camera.

  38. Motorola Edge (2022) Motherboard Replacement: step 38, image 1 of 1
    • You are now left with the motherboard.

Conclusion

Compare your new replacement part to the original part—be sure to transfer remaining components and remove adhesive backings from the new part before installing.

To reassemble your device, follow the instructions in reverse order.

Take your e-waste to an R2 or e-Stewards certified recycler.

Repair didn’t go as planned? Try some basic troubleshooting, or ask our Answers community for help.

Spencer Day

Member since: 09/14/22

49,319 Reputation

361 Guides authored

Team

iFixit Member of iFixit

Staff

136 Members

16,576 Guides authored

0 Comments

Add Comment

View Statistics:

Past 24 Hours: 2

Past 7 Days: 3

Past 30 Days: 27

All Time: 477