
15% Off Selected iFixit Tools — Limited Time
Free Shipping on Domestic Orders $75+

MacBook Neo USB Ports Replacement

What you need

  1. MacBook Neo USB Ports Replacement, Prepare the MacBook for disassembly: step 1, image 1 of 3 MacBook Neo USB Ports Replacement, Prepare the MacBook for disassembly: step 1, image 2 of 3 MacBook Neo USB Ports Replacement, Prepare the MacBook for disassembly: step 1, image 3 of 3
    • Fully shut down the MacBook and close the lid. Keep the lid closed until you've physically disconnected the battery.

    • Disconnect any cables and accessories.

    • Flip the computer upside‑down on a clean work surface.

    Ask FixBot

    Add Comment

  2. MacBook Neo USB Ports Replacement, Remove the bottom cover screws: step 2, image 1 of 1
    • Use a P5 pentalobe driver to remove the eight screws securing the bottom cover:

    • Six 4.1 mm‑long screws

    • Two 4.5 mm‑long screws

    • During reassembly, partially install the screws to ensure alignment, then tighten the screws at each corner (like top‑right, bottom‑left, etc.) before the rest.

    Ask FixBot

    Add Comment

  3. MacBook Neo USB Ports Replacement, Pry up the bottom cover: step 3, image 1 of 3 MacBook Neo USB Ports Replacement, Pry up the bottom cover: step 3, image 2 of 3 MacBook Neo USB Ports Replacement, Pry up the bottom cover: step 3, image 3 of 3
    • The bottom cover is held in place with two clips, one on each side.

    • Use your fingers to lift the top right corner of the bottom cover, near the USB‑C ports, until the clip along the right edge releases.

    • If you're having trouble, use the flat end of a spudger to pry up the corner until you can grab it with your fingers. You can also slide an opening pick down each edge to release the clips.

    • Repeat this process on the left side to release its clip.

    Ask FixBot

    Add Comment

  4. MacBook Neo USB Ports Replacement, Remove the bottom cover: step 4, image 1 of 2 MacBook Neo USB Ports Replacement, Remove the bottom cover: step 4, image 2 of 2
    • Remove the bottom cover.

    • During reassembly, align the bottom cover with its screw holes, then press on the two short sides until the clip on each side snaps into place.

    Ask FixBot

    Add Comment

  5. MacBook Neo USB Ports Replacement, Remove the battery connector cover: step 5, image 1 of 1
    • Use a Torx Plus 3IP driver to remove the two 1.7 mm‑long screws securing the battery connector cover.

    • While the MacBook Neo uses Torx Plus screws, standard Torx bits also work (T3 in place of 3IP, for example). Apply constant, downward force to prevent stripping the screw.

    Ask FixBot

    Add Comment

  6. MacBook Neo USB Ports Replacement: step 6, image 1 of 2 MacBook Neo USB Ports Replacement: step 6, image 2 of 2
    • Use tweezers or your fingers to remove the battery connector cover.

    Ask FixBot

    Add Comment

  7. MacBook Neo USB Ports Replacement, Disconnect the battery: step 7, image 1 of 2 MacBook Neo USB Ports Replacement, Disconnect the battery: step 7, image 2 of 2
    • Use the flat end of a spudger to pry up and disconnect the battery press connector.

    • To reconnect, align the connector carefully over its socket and press down—first on one of the short sides, then the other—until it clicks into place. Don't try to force the connector into place. If you're having trouble, reposition it and try again.

    Ask FixBot

    Add Comment

  8. MacBook Neo USB Ports Replacement, Disconnect the USB ports: step 8, image 1 of 1
    • Use a Torx Plus 3IP driver to remove the two 1.7 mm‑long screws securing the USB ports connector cover.

    Ask FixBot

    Add Comment

  9. MacBook Neo USB Ports Replacement: step 9, image 1 of 2 MacBook Neo USB Ports Replacement: step 9, image 2 of 2
    • Use tweezers or your fingers to remove the USB ports connector cover.

    Ask FixBot

    Add Comment

  10. MacBook Neo USB Ports Replacement: step 10, image 1 of 2 MacBook Neo USB Ports Replacement: step 10, image 2 of 2
    • Use the flat end of a spudger to disconnect the USB ports press connector.

    Ask FixBot

    Add Comment

  11. MacBook Neo USB Ports Replacement, Remove the USB ports: step 11, image 1 of 1
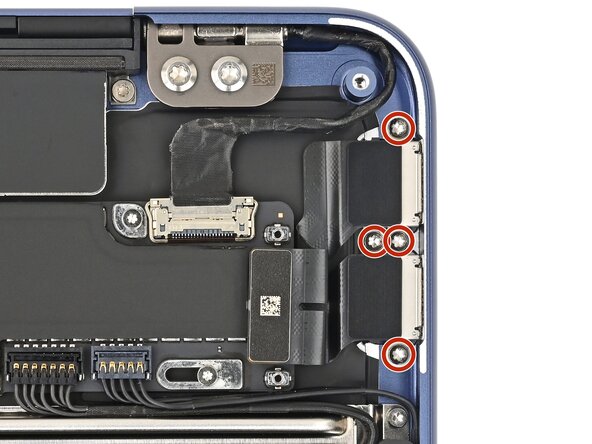
    • Use a Torx Plus 5IP driver to remove the four 2.8 mm‑long screws securing the USB ports.

    Ask FixBot

    Add Comment

  12. MacBook Neo USB Ports Replacement, Reassembly information: step 12, image 1 of 3 MacBook Neo USB Ports Replacement, Reassembly information: step 12, image 2 of 3 MacBook Neo USB Ports Replacement, Reassembly information: step 12, image 3 of 3
    • During reassembly:

    • Use a Torx Plus 5IP driver to partially install the four 2.8 mm‑long screws securing them.

    • Plug both ends of a USB‑C to USB‑C cable into the ports. If either port feels stiff, shift the port and reconnect the cable until it feels smooth.

    • Fully tighten the screws securing the USB ports, and disconnect the cable from both.

    • Skip the step above this one.

    Ask FixBot

    Add Comment

  13. MacBook Neo USB Ports Replacement: step 13, image 1 of 2 MacBook Neo USB Ports Replacement: step 13, image 2 of 2
    • Lift the USB ports by their cable and remove them.

    Ask FixBot

    Add Comment

Conclusion

Compare the new replacement part to the original part—you may need to remove plastic liners from the new part before you install it.

To reassemble the MacBook, follow these instructions in reverse order.

Take your e-waste to an R2 or e-Stewards certified recycler.

Repair didn’t go as planned? Try some basic troubleshooting, or ask our Answers community for help.

Cancel: I did not complete this guide.

Nick Schultz

Member since: 03/24/24

56,933 Reputation

318 Guides authored

0 Guide Comments

Add Comment

View Statistics:

Past 24 Hours: 7

Past 7 Days: 39

Past 30 Days: 42

All Time: 80