Introduction
This week, Apple refreshed their lineup of peripheral input devices, so we're summoning all the teardown strength we can muster. Thus far, we've cracked open the second generation Magic Trackpad and the first ever Magic Keyboard, and now we're turning our attention to the Magic Mouse 2. Will this new design stand the test of time? Join us as we find out!
Does this teardown just click with you? Stay up to date with our latest investigations by following us on Twitter, Instagram, or Facebook!
What you need
Video Overview
-
-
This mouse promises to be the most functional yet. Let's see how the specs stack up:
-
Multi-touch gesture control
-
Bluetooth wireless connectivity
-
Lightning port (for charging and pairing)
-
Internal lithium-ion battery
-
-
-
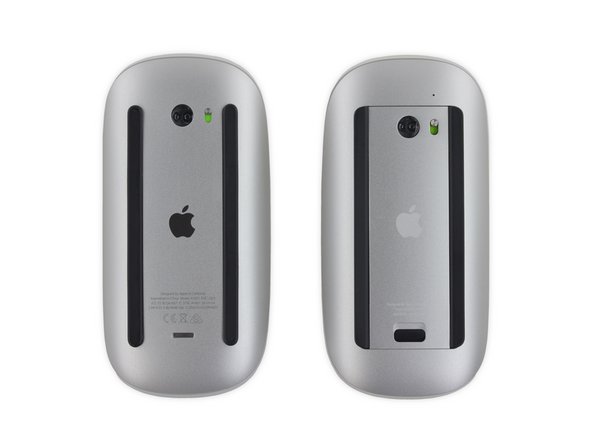
At first glance, the new Magic Mouse (left) looks just like its older sibling. Mouse twins!
-
However, with the two mice on their backs, the differences are more readily apparent.
-
Naturally, the rechargeable Magic Mouse 2 has forgone the battery door and traded a battery latch for its new Lightning port.
-
Apple also changed the color of the printing, and removed the status LED, maybe to match the rest of the peripherals.
-
-
-
This isn't our first time around a Magic Mouse, so we know we'll have to take our iOpener for a spin.
-
In the previous model, strong adhesive secured the aluminum belly to the mouse. We don't expect this model will be any different in that regard.
-
-
-
-
Apple has mentioned that their mouse has an "optimized foot design." We thought we'd peel off those feet on the off-chance that the new model hides screws underneath.
-
After lots of heat and half a dozen prying tools wedged under the casing, the mouse is partially released from the gluey mess beneath.
-
Aeons later, we finally separate the lower casing from the mouse and get our first view of its (still sticky) midframe.
-
-
-
Popping four plastic clips open lets us into the battery chamber.
-
Also check that clear acrylic. It's only painted on the underside, leaving the top and sides clear—so fetch!
-
With the upper casing lifted up, we get a clear view of what makes this mouse so sense-ational—that capacitative array.
-
-
-
Finally something we understand! Screws! Unfortunately, they're holding down a bracket over a ribbon cable which prevents us from separating the mouse bits just yet—but hey, that ribbon cable seatbelt will make the mouse better withstand drops.
-
Finally separated from the base of the mouse, the upper casing provides a clearer view of its capacitative touch-sensing array.
-
A little spring provides some resistance and distributes force when the mouse is clicked, making it seem like the small button on the right occupies the whole width of the mouse. Cooool!
-
-
-
This lil' logic board looks ripe for the picking!
-
Broadcom BCM20733 Enhanced Data Rate Bluetooth 3.0 Single-Chip Solution
-
Unknown 303S0499—probably a proprietary Apple touch controller
-
NXP 1608A1 Charging IC
-
Texas Instruments 56AYZ21
-
ST Microelectronics STM32F103VB 72 MHz 32-bit RISC ARM Cortex-M3
-
-
-
Hiding beneath the logic board, we find a teensy switch that makes the mouse click its click (no Taptic Engine just yet).
-
Luckily, it's held in only by the board above, and is a welcome relief after wading through the rest of this tar pit.
-
As a common failure part for computer mice, it's nice that Apple used a fairly standard and easily-sourced switch—although its replacement will require dealing with all of that glue (and soldering in the replacement switch).
-
-
-
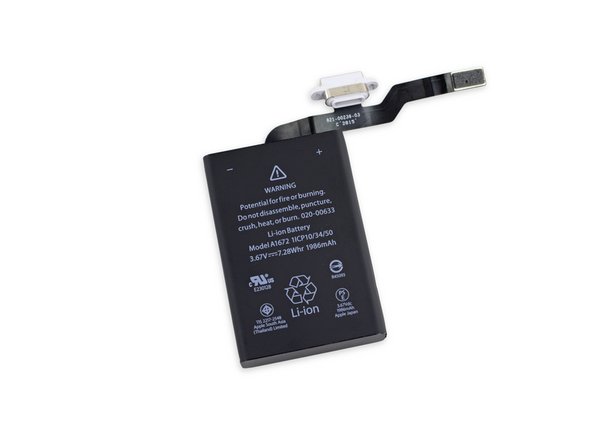
We turn our attention to the battery, which sits snug as a bug in its little plastic box, making it annoying to extract.
-
As it turns out, that's not the only thing holding it down—there's a mess of glue to contend with as well. Removing the battery is even less fun than we feared.
-
This small accessory doesn't pack light—that 3.67 V, 7.28 Wh, 1986 mAh li-ion cell holds about 9% more juice than the one in the iPhone 6s!
-
-
-
The Magic Mouse 2 Repairability Score: 2 out of 10 (10 is easiest to repair)
-
The Lightning port and battery can be replaced (as a single component), independent of the logic board—if you can get the device open.
-
Replacing a malfunctioning switch requires prying through intense adhesive and soldering.
-
Excessive use of strong adhesive makes it very difficult to remove the rear panel, hindering access to every internal component.
-
Without a service manual, it is very difficult to open the mouse without damaging internal components such as the optical sensor and power switch.
-


54 Guide Comments
hmmm... what was wrong with just replacing batteries?
Now we have a device that has a limited life span of about 2-5 years due to the battery (which can develop faults)....
I dont like Apple purposely creating limit life span products, and using tones of glue to make them difficult to repair - this is not good and quite distrusting of Apple... Steve Jobs would hate all this glue -- what ever happened to good well-built great designed products???
On keyboards, little. On mice, I get through a lot of batteries.
alex -
And there was plenty of glue around in Apple products where SJ was running the show.
98% of these mice will never need repairing outside warranty. That glue makes for a product that is less likely to go wrong.
Of course iFixit doesn't care [in a positive sense] about reliability. They want products that they can sell you a fix for.
alex -
On the contrary, it was after Steve Jobs return to Apple that they moved away from maintanable hardware to gluey messes. And honestly, there's nothing wrong with that. Apple banks on the fact that the vast majority of its customers will accept nigh non-existent repairability in exchange for sleek form factors, and they're absolutely right. That means that the few percent of computer users who value repairability and upgradeability can take their business elsewhere, and honestly, that sort of person wasn't in the market for an overpriced product that's more fashion accessory than it is a tool in the first place.
dbgrogg -