
iPhone 5 Screen Replacement

What you need

Video Overview

  1. iPhone 5 Screen Replacement, Taping the display glass: step 1, image 1 of 3 iPhone 5 Screen Replacement, Taping the display glass: step 1, image 2 of 3 iPhone 5 Screen Replacement, Taping the display glass: step 1, image 3 of 3
    • If your display glass is cracked, keep further breakage contained and prevent bodily harm during your repair by taping the glass.

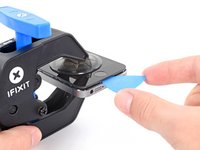
    • Lay overlapping strips of clear packing tape over the iPhone's display until the whole face is covered.

    • Wear safety glasses to protect your eyes from any glass shaken free during the repair.

  2. iPhone 5 Screen Replacement, Remove the Pentalobe screws: step 2, image 1 of 1
    • Before you proceed, discharge your iPhone battery below 25%. A charged lithium-ion battery can catch fire and/or explode if accidentally punctured.

    • Power off your iPhone before beginning disassembly.

    • Remove the two 3.6 mm Pentalobe screws next to the Lightning connector.

  3. iPhone 5 Screen Replacement, How to prevent display separation: step 3, image 1 of 3 iPhone 5 Screen Replacement, How to prevent display separation: step 3, image 2 of 3 iPhone 5 Screen Replacement, How to prevent display separation: step 3, image 3 of 3
    • In the following steps you will be pulling the display up out of the phone body. The display is composed of a glass screen and a plastic bezel with metal clips.

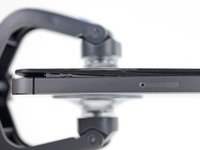
    • Regardless of the tool you use, you need to be sure you pull up the entire display.

    • If the glass begins to separate from the plastic, as shown in the first image, slide a plastic opening tool between the plastic frame and the metal phone body to pry the metal clips out of the case.

    • If you are reassembling a phone with a separated display bezel, you may want to place a thin strip of adhesive between the plastic bezel and the glass to keep the phone closed.

  4. iPhone 5 Screen Replacement, Anti-Clamp instructions: step 4, image 1 of 3 iPhone 5 Screen Replacement, Anti-Clamp instructions: step 4, image 2 of 3 iPhone 5 Screen Replacement, Anti-Clamp instructions: step 4, image 3 of 3
    Tool used on this step:
    Anti-Clamp
    $24.95
    Buy
    • The next two steps demonstrate the Anti-Clamp, a tool we designed to make the opening procedure easier. If you aren't using the Anti-Clamp, skip down two steps for an alternate method.

    • For complete instructions on how to use the Anti-Clamp, check out this guide.

    • Pull the blue handle backwards to unlock the Anti-Clamp's arms.

    • Slide the arms over either the left or right edge of your iPhone.

    • Position the suction cups near the bottom edge of the iPhone just above the home button—one on the front, and one on the back.

    • Squeeze the cups together to apply suction to the desired area.

    • If you find that the surface of your iPhone is too slippery for the Anti-Clamp to hold onto, you can use tape to create a grippier surface.

  5. iPhone 5 Screen Replacement: step 5, image 1 of 3 iPhone 5 Screen Replacement: step 5, image 2 of 3 iPhone 5 Screen Replacement: step 5, image 3 of 3
    • Pull the blue handle forwards to lock the arms.

    • Turn the handle clockwise 360 degrees or until the cups start to stretch.

    • Make sure the suction cups remain aligned with each other. If they begin to slip out of alignment, loosen the suction cups slightly and realign the arms.

    • Insert an opening pick under the screen when the Anti-Clamp creates a large enough gap.

    • If the Anti-Clamp doesn't create a sufficient gap, apply more heat to the area and rotate the handle a quarter turn.

    • Don't crank more than a quarter turn at a time, and wait one minute between turns. Let the Anti-Clamp and time do the work for you.

    • Skip the next two steps.

  6. iPhone 5 Screen Replacement, Manual Opening Procedure: step 6, image 1 of 1
    • Press a suction cup onto the screen, just above the home button.

    • Be sure the cup is completely on the screen to get a tight seal.

    • If you're opening an iPhone with cracked glass, neatly lay a couple strips of packing tape across the front and squeeze out as many bubbles as you can. This will give the suction cup a surface to grab, and minimize the spread of broken glass.

  7. iPhone 5 Screen Replacement, Start lifting the front panel assembly: step 7, image 1 of 1
    • Make sure the suction cup is firmly attached to the front panel assembly.

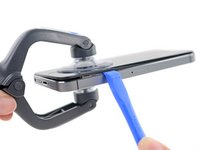
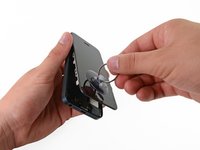
    • While holding the iPhone down with one hand, pull up on the suction cup to slightly separate the front panel assembly from the rear case.

    • Take your time and apply firm, constant force. The screen is a much tighter fit than most devices.

    • With a plastic opening tool, begin to gently pry the rear case down, away from the screen, while you pull up with the suction cup.

    • There are several clips attaching the front panel assembly to the rear case, so you may need to use a combination of the suction cup and plastic opening tool to free the front panel assembly.

  8. iPhone 5 Screen Replacement, Detaching the front panel side clips: step 8, image 1 of 1
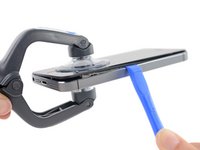
    • Continue to pry up around the sides of the front panel assembly, detaching the clips along the left and right side.

  9. iPhone 5 Screen Replacement, Opening up the phone: step 9, image 1 of 3 iPhone 5 Screen Replacement, Opening up the phone: step 9, image 2 of 3 iPhone 5 Screen Replacement, Opening up the phone: step 9, image 3 of 3
    • Do not try to completely remove the front panel assembly from the rear case, as there are several ribbon cables still attached at the top of the iPhone.

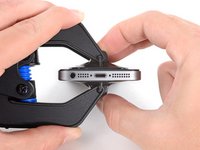
    • Once the clips have been released on the bottom and sides of the front panel assembly, pull the bottom of the assembly away from the rear case.

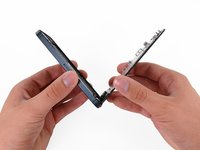
    • Open the display to about a 90º angle, and lean it against something to keep it propped up while you're working on the phone.

    • Add a rubber band to keep the display securely in place while you work. This prevents undue strain on the display cables.

  10. iPhone 5 Screen Replacement, Removing the battery connector bracket screws: step 10, image 1 of 1
    • Remove the following two screws securing the metal battery connector bracket to the logic board:

    • One 1.8 mm Phillips screw

    • One 1.6 mm Phillips screw

  11. iPhone 5 Screen Replacement, Removing the battery connector bracket: step 11, image 1 of 1
    • Remove the metal battery connector bracket from the iPhone.

  12. iPhone 5 Screen Replacement, Disconnecting the battery connector: step 12, image 1 of 1
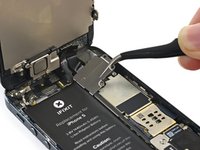
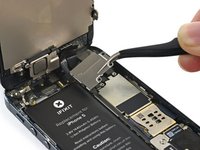
    • Use a plastic opening tool to gently pry the battery connector up from its socket on the logic board.

    • Be careful not to dislodge the small surface-mounted components surrounding the socket.

    • Be very careful to only pry up on the battery connector itself and not the socket on the logic board. If you pry up on the logic board socket or the board itself, you may destroy the socket or damage nearby components on the board.

  13. iPhone 5 Screen Replacement, Removing the front panel assembly cable bracket screws: step 13, image 1 of 1
    • Remove the following screws securing the front panel assembly cable bracket to the logic board:

    • Two 1.2 mm Phillips screws

    • One 1.6 mm Phillips screw

    • This screw tends to not be attracted to a magnetized screwdriver. Take care not to lose it when removing, and make sure it gets back into the right place—a magnetized screw may interfere with the compass.

  14. iPhone 5 Screen Replacement, Removing the front panel assembly cable bracket: step 14, image 1 of 2 iPhone 5 Screen Replacement, Removing the front panel assembly cable bracket: step 14, image 2 of 2
    • Lift the display cable bracket toward the battery to unhook it, and remove it from the iPhone.

    • During reassembly, clip the left-hand hooks under the logic board and lower the bracket towards the outside of the phone.

  15. iPhone 5 Screen Replacement, Disconnecting the front panel assembly cables: step 15, image 1 of 3 iPhone 5 Screen Replacement, Disconnecting the front panel assembly cables: step 15, image 2 of 3 iPhone 5 Screen Replacement, Disconnecting the front panel assembly cables: step 15, image 3 of 3
    • Make sure the battery is disconnected before you disconnect or reconnect the cables in this step.

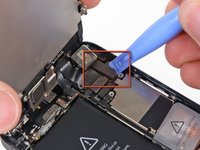
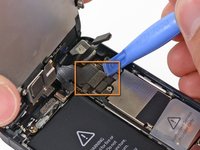
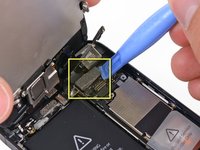
    • Use a plastic opening tool or a fingernail to disconnect the three front panel assembly cables:

    • Front-facing camera and sensor cable

    • LCD cable

    • Digitizer cable

    • When reassembling your phone, the LCD cable may pop off the connector. This can cause white lines, or nothing at all to appear when powering your phone back on. If that happens, simply reconnect the cable and power cycle your phone. The best way to power cycle your phone is to disconnect and reconnect the battery.

  16. iPhone 5 Screen Replacement, Separating front panel assembly and rear case: step 16, image 1 of 1
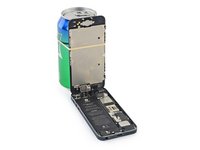
    • Remove the front panel assembly from the rear case.

Conclusion

To reassemble your device, follow these instructions in reverse order.

888 other people completed this guide.

Andrew Optimus Goldheart

Member since: 10/17/09

502,106 Reputation

407 Guides authored

Team

iFixit Member of iFixit

Staff

135 Members

16,475 Guides authored

38 Comments

My brother in-law had water damage to his screen and the carrier was going to charge him and arm and a leg for a new phone so I ordered the complete display assembly from right here on iFixit that came with all the necessary tools. Took me a little over 5 minutes between repairing and chit chat to finish. It was a really easy repair and my brother in-law was never happier to have his phone back at a fraction of the cost the carrier was quoting.

lattestonetech24 - Reply

Thanks for your guide for replace new touch screen

i had save one tiny screw from inside assembally :) :) :)

nilesh2411 - Reply

My display didn't shut down when i have a call and i put the phone near my ear! I plug my broken display and it work well but not the new one...please someone help! btw thanks for the guide and for the fast delivery

PENI Teuarii - Reply

I know you posted this awhile ago, but if anyone else is wondering, how to fix the issue where the display won't turn off while on a phone call, You MUST transfer over the small plastic retaining brackets from the old display, and put them in the correct position! By correct position, I mean the two small transparent points need to line up with the receptors on your iPhone's front panel assembly (Camera, light sensor, mic).

Max Rysdon -

This one is for Max:

Max, can you explain better what you mean by plastic retaining brackets? I'm about to swap my screen out and I wanna be able to do this

u60n0ness -

Add Comment

View Statistics:

Past 24 Hours: 22

Past 7 Days: 120

Past 30 Days: 497

All Time: 460,233