Free Shipping on Domestic Orders $75+

iPad Pro 13" Screen Removal

Prerequisite Only
This is a prerequisite-only guide! This guide is part of another procedure and isn’t meant to be used alone.

What you need

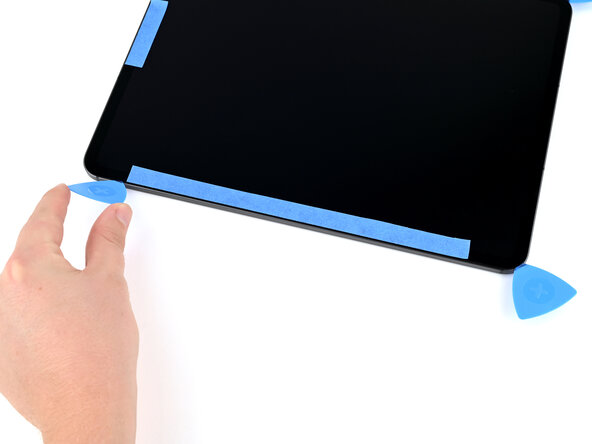
    1. iPad Pro 13" Screen Removal, Mark your opening picks: step 1, image 1 of 1
      • While removing the display, don't insert picks more than 3.5 mm.

      • Mark your opening picks at 3.5 mm.

      Ask FixBot

      Add Comment

    2. iPad Pro 13" Screen Removal, Heat the top-right corner: step 2, image 1 of 1
      • Apply a heated iOpener to the top-right corner of the screen for two minutes to soften the adhesive.

      • You can also use a hair dryer or heat gun to soften the adhesive, but be careful not to overheat the iPad as the screen and battery can be damaged by heat.

      • Use this same procedure for all future steps where heat is needed to soften adhesive, unless otherwise noted.

      Ask FixBot

      Add Comment

    3. iPad Pro 13" Screen Removal, Anti-Clamp instructions: step 3, image 1 of 3 iPad Pro 13" Screen Removal, Anti-Clamp instructions: step 3, image 2 of 3 iPad Pro 13" Screen Removal, Anti-Clamp instructions: step 3, image 3 of 3
      • The next three steps show how to use the Anti-Clamp. For complete Anti-Clamp instructions, including how to work with a broken screen, check out this guide.

      • If you don't have an Anti-Clamp, read these steps for important tips, then follow the alternate method using a suction handle, which comes after these steps.

      • Unlock the Anti-Clamp by pulling the blue handle backwards, away from the suction cups.

      • Place something under the bottom-left corner of the iPad to hold it level, then place the Anti-Clamp on your work surface and insert the top-right corner of the iPad between the Anti-Clamp's suction cups.

      • Hold the bottom of the Anti-Clamp and press down on the top arm to engage the suction cups.

      • Make sure the top and bottom suction cups are aligned, and remain aligned for this entire procedure.

      Ask FixBot

      Add Comment

    4. iPad Pro 13" Screen Removal: step 4, image 1 of 2 iPad Pro 13" Screen Removal: step 4, image 2 of 2
      • Pull the blue handle forward, towards the suction cups, to engage the twist mechanism.

      • Turn the blue handle clockwise one full rotation or until the suction cups start to stretch.

      • If a suction cup pops off, reapply it. If needed, apply some suction tape for a grippier surface.

      Ask FixBot

      Add Comment

    5. iPad Pro 13" Screen Removal: step 5, image 1 of 3 iPad Pro 13" Screen Removal: step 5, image 2 of 3 iPad Pro 13" Screen Removal: step 5, image 3 of 3
      • Wait at least one minute for the Anti-Clamp to pull the screen up until there's a small gap between the screen and the frame.

      • Rely on heat and time to lift the screen. Don't try to force it open.

      • If the screen isn't lifting after two minutes:

      • Make sure there's tension on the suction cups. Crank the handle just until you feel resistance, but don't crank too much or the suction cups will release.

      • Apply more heat while the Anti-Clamp is engaged. You can thread a heated iOpener through the Anti-Clamp or use a hair dryer or heat gun.

      • If the screen is still not releasing, crank the handle a half-turn and wait another minute while applying more heat periodically, still being careful not to overheat the iPad. Repeat as needed.

      • Once the screen lifts, insert a marked opening pick into the gap, no more than 3.5 mm deep.

      • Slide the opening pick around the corner and leave it inserted.

      Ask FixBot

      Add Comment

    6. iPad Pro 13" Screen Removal, Suction handle instructions: step 6, image 1 of 3 iPad Pro 13" Screen Removal, Suction handle instructions: step 6, image 2 of 3 iPad Pro 13" Screen Removal, Suction handle instructions: step 6, image 3 of 3
      • If you don't have an Anti‑Clamp, use a single suction handle instead.

      • If the screen is badly cracked, make a handle out of very strong tape instead of a suction cup. If nothing else works, you can use strong glue to stick the suction cup to the broken screen.

      • Apply the suction handle near the top‑right corner with the open part of the handle facing away from the edge.

      • Hold the iPad down with one hand, away from the suction cup, and pull the suction handle up and towards the center of the iPad.

      • As soon as a small gap appears between the screen and the frame, insert a marked opening pick no more than 3.5 mm into the gap and release tension on the suction cup.

      • If you're having trouble lifting the screen, be patient and apply more heat while pulling on the suction handle.

      • Slide the pick gently around the corner and leave it inserted.

      Ask FixBot

      Add Comment

    7. iPad Pro 13" Screen Removal, Heat the top edge: step 7, image 1 of 1
      • Use an iOpener, hair dryer, or heat gun to soften the adhesive under the top edge of the screen.

      • This iPad cools very quickly. To get the screen off, work in sections of about 3 inches at a time. So, for this step, start with heating the right side of the top edge.

      Ask FixBot

      Add Comment

    8. iPad Pro 13" Screen Removal, Slice the top edge adhesive: step 8, image 1 of 3 iPad Pro 13" Screen Removal, Slice the top edge adhesive: step 8, image 2 of 3 iPad Pro 13" Screen Removal, Slice the top edge adhesive: step 8, image 3 of 3
      • Be patient while slicing the screen adhesive. If you suddenly feel more resistance, stop and apply more heat. If you're using an iOpener, you can apply heat while you're sliding the pick.

      • Insert an additional marked opening pick beside the first pick, on the top edge of the iPad, no more than 3.5 mm.

      • Slice the adhesive by slowly sliding the opening pick under the screen towards the front camera, stopping before you get to the masking tape.

      Ask FixBot

      Add Comment

    9. iPad Pro 13" Screen Removal: step 9, image 1 of 3 iPad Pro 13" Screen Removal: step 9, image 2 of 3 iPad Pro 13" Screen Removal: step 9, image 3 of 3
      • Be careful not to damage the sensitive components, like the front camera and microphone, under the screen. Work slowly. If you feel resistance, stop, slide the pick back partially, apply more heat, and continue.

      • Lift the opening pick so it's at a sharp angle pointing into the iPad.

      • Slice the adhesive by sliding the pick under the taped section of the screen.

      Ask FixBot

      Add Comment

    10. iPad Pro 13" Screen Removal: step 10, image 1 of 2 iPad Pro 13" Screen Removal: step 10, image 2 of 2
      • Finish slicing the adhesive by sliding the opening pick to the top-left corner.

      • Leave the opening pick inserted.

      Ask FixBot

      Add Comment

    11. iPad Pro 13" Screen Removal, Slice the right edge adhesive: step 11, image 1 of 3 iPad Pro 13" Screen Removal, Slice the right edge adhesive: step 11, image 2 of 3 iPad Pro 13" Screen Removal, Slice the right edge adhesive: step 11, image 3 of 3
      • Heat the right edge of the iPad.

      • Insert an opening pick beside the first opening pick you inserted, on the right edge.

      • Working in small sections, slice the adhesive, applying more heat as needed.

      Ask FixBot

      Add Comment

    12. iPad Pro 13" Screen Removal, Slice the bottom-right corner adhesive: step 12, image 1 of 3 iPad Pro 13" Screen Removal, Slice the bottom-right corner adhesive: step 12, image 2 of 3 iPad Pro 13" Screen Removal, Slice the bottom-right corner adhesive: step 12, image 3 of 3
      • Heat the bottom-right corner of the iPad.

      • Carefully slide the opening pick from the previous step around the bottom-right corner.

      • Leave the pick inserted.

      Ask FixBot

      Add Comment

    13. iPad Pro 13" Screen Removal, Slice the bottom edge adhesive: step 13, image 1 of 3 iPad Pro 13" Screen Removal, Slice the bottom edge adhesive: step 13, image 2 of 3 iPad Pro 13" Screen Removal, Slice the bottom edge adhesive: step 13, image 3 of 3
      • Heat the bottom edge of the iPad, focusing on the right end.

      • Insert an opening pick beside the pick in the corner, on the bottom edge, no more than 3.5 mm deep.

      • Lift the pick so it enters the iPad at a sharp angle.

      • Carefully slide the pick under the screen across the bottom edge of the iPad.

      • Work slowly to avoid damaging the delicate ribbon cables under the screen in this section. If you feel any resistance, stop, slide your pick back partially, apply more heat, and try again.

      Ask FixBot

      Add Comment

    14. iPad Pro 13" Screen Removal, Slice the bottom-left corner adhesive: step 14, image 1 of 3 iPad Pro 13" Screen Removal, Slice the bottom-left corner adhesive: step 14, image 2 of 3 iPad Pro 13" Screen Removal, Slice the bottom-left corner adhesive: step 14, image 3 of 3
      • Heat the bottom-left corner of the iPad.

      • Carefully slide the opening pick around the bottom-left corner.

      • Leave the pick inserted.

      Ask FixBot

      Add Comment

    15. iPad Pro 13" Screen Removal, Slice the left edge adhesive: step 15, image 1 of 3 iPad Pro 13" Screen Removal, Slice the left edge adhesive: step 15, image 2 of 3 iPad Pro 13" Screen Removal, Slice the left edge adhesive: step 15, image 3 of 3
      • Heat the left edge of the iPad, focusing on the bottom end.

      • Insert an opening pick above the pick already inserted near the bottom-left corner.

      • Carefully slide the pick to the beginning of the masking tape.

      Ask FixBot

      Add Comment

    16. iPad Pro 13" Screen Removal: step 16, image 1 of 3 iPad Pro 13" Screen Removal: step 16, image 2 of 3 iPad Pro 13" Screen Removal: step 16, image 3 of 3
      • Lift the pick so it enters the iPad at a sharp angle.

      • Slide the opening pick to the top-left corner.

      • Work slowly to avoid damaging the ambient light sensor near the middle of the screen. If you feel resistance, stop, pull the pick back slightly, apply more heat, and try again.

      • Don't try to remove the iPad screen yet. You should be able to lift the iPad screen about a half–inch out of the frame all the way around the edge.

      • If the screen is still adhered anywhere, use heat and an opening pick to slice the adhesive. Use opening picks to keep the screen lifted while you work.

      Ask FixBot

      Add Comment

    17. iPad Pro 13" Screen Removal, Reposition the screen: step 17, image 1 of 3 iPad Pro 13" Screen Removal, Reposition the screen: step 17, image 2 of 3 iPad Pro 13" Screen Removal, Reposition the screen: step 17, image 3 of 3
      • Once the screen is completely free of the adhesive, lift it about a half-inch and rotate it slightly counterclockwise so the screw next to the front camera is visible.

      Ask FixBot

      Add Comment

    18. iPad Pro 13" Screen Removal, Remove the microphone connector cover: step 18, image 1 of 3 iPad Pro 13" Screen Removal, Remove the microphone connector cover: step 18, image 2 of 3 iPad Pro 13" Screen Removal, Remove the microphone connector cover: step 18, image 3 of 3
      • Use a JCIS or JIS 00 screwdriver to remove the 1.3 mm‑long screw securing the microphone connector cover.

      • Small iFixit Phillips bits are designed to work with JIS screws, so you can use an iFixit PH 00 driver. You can try Phillips drivers from other manufacturers, but you risk stripping the screw.

      • Use tweezers or your fingers to remove the microphone connector cover. Be careful not to damage the foam on the back.

      Ask FixBot

      Add Comment

    19. iPad Pro 13" Screen Removal, Disconnect the microphone: step 19, image 1 of 2 iPad Pro 13" Screen Removal, Disconnect the microphone: step 19, image 2 of 2
      Ask FixBot

      Add Comment

    20. iPad Pro 13" Screen Removal, Open the iPad: step 20, image 1 of 2 iPad Pro 13" Screen Removal, Open the iPad: step 20, image 2 of 2
      • Open the iPad like a book from the top edge.

      • Hold the screen above the iPad body and place a soft cloth on top of the iPad to protect both the screen and the iPad body.

      • Place the screen face-down on the cloth, being careful not to strain the cables still attached to the iPad body.

      Ask FixBot

      Add Comment

    21. iPad Pro 13" Screen Removal, Remove the display connectors cover: step 21, image 1 of 3 iPad Pro 13" Screen Removal, Remove the display connectors cover: step 21, image 2 of 3 iPad Pro 13" Screen Removal, Remove the display connectors cover: step 21, image 3 of 3
      • Place cloths over the batteries to protect them while you work.

      • Use a JCIS or JIS 00 screwdriver to remove the screws securing the display connectors cover:

      • Four 2.1 mm‑long screws towards the center of the iPad

      • Two 1.6 mm‑long screws near the edge of the iPad

      • Use tweezers or your fingers to remove the display connectors cover.

      Ask FixBot

      Add Comment

    22. iPad Pro 13" Screen Removal, Disconnect the screen: step 22, image 1 of 3 iPad Pro 13" Screen Removal, Disconnect the screen: step 22, image 2 of 3 iPad Pro 13" Screen Removal, Disconnect the screen: step 22, image 3 of 3
      • Use the tip of a spudger to pry up and disconnect the wide display cable press connector.

      • Then, use the tip of a spudger to pry up and disconnect the Multi‑Touch cable press connector.

      Ask FixBot

      Add Comment

    23. iPad Pro 13" Screen Removal: step 23, image 1 of 3 iPad Pro 13" Screen Removal: step 23, image 2 of 3 iPad Pro 13" Screen Removal: step 23, image 3 of 3
      • Use the tip of a spudger to pry up and disconnect both of the display power cable press connectors.

      Ask FixBot

      Add Comment

    24. iPad Pro 13" Screen Removal, Remove the screen: step 24, image 1 of 2 iPad Pro 13" Screen Removal, Remove the screen: step 24, image 2 of 2
      • Remove the screen.

      Ask FixBot

      Add Comment

Finish Line

Cancel: I did not complete this guide.

Nick Schultz

Member since: 03/24/24

65,446 Reputation

343 Guides authored

0 Guide Comments

Add Comment

View Statistics:

Past 24 Hours: 0

Past 7 Days: 3

Past 30 Days: 10

All Time: 148