Introduction
Welcome! Does the battery in your controller not last as long as it used to or not at all? You must be looking to replace the battery in your Nintendo Switch Pro Controller, well you have come to the right place! Below you will find instructions for replacing the battery in your controller, read them carefully and follow the steps in order from one to six.
The Switch Pro Controller uses JIS screws. Be sure not to use a Phillips screwdriver to remove them, as it will potentially strip the screws.
NOTE: an improperly sync Switch Pro controller will not charge properly. To determine if your battery is faulty and needs replacing, you can first re-sync your controller and, while plugged in, check within the Switch controllers menu if it is charging properly.
CAUTION: The handling of any swollen batteries should be done with the utmost care. For information on how to identify, what to do with, how to handle, and how to dispose of swollen batteries follow the link below.
What you need
-
-
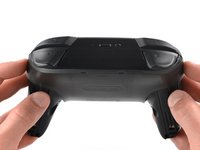
Flip the controller over so the model stickers face the ceiling.
-
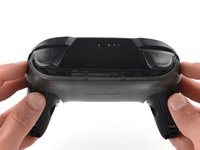
Use a JIS #00 screwdriver to remove the two black 8.4 mm screws that secure the handles, located at the ends of the handles.
 Ask FixBot
-
-
-
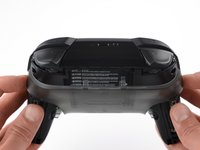
Carefully remove the handle covers by pulling them away from the main body.
-
-
-
-
Use a JIS #00 screwdriver to remove the four silver 6.8 mm screws that secure the clear back plastic cover.
-
-
-
Carefully pry away the clear plastic cover using your fingernail.
-
-
-
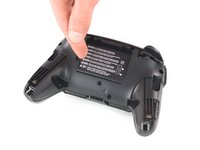
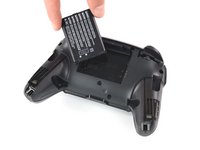
Remove the lithium-ion battery by using a fingernail or plastic opening tool to pry it up on the left side.
-


To reassemble your device, follow these instructions in reverse order.
For optimal performance, calibrate your newly installed battery after completing this guide.
Take your e-waste to an R2 or e-Stewards certified recycler.
Repair didn’t go as planned? Try some basic troubleshooting, or ask our Answers community for help.
Cancel: I did not complete this guide.
45 other people completed this guide.

Team

Cal Poly, Team S11-G2, Regan Fall 2019 Member of Cal Poly, Team S11-G2, Regan Fall 2019
CPSU-REGAN-F19S11G2
5 Members
45 Guides authored
14 Guide Comments
easy peasy only have to recycle battery