
Free Shipping on Domestic Orders $75+

MacBook Neo Trackpad Replacement

What you need

  1. MacBook Neo Trackpad Replacement, Prepare the MacBook for disassembly: step 1, image 1 of 3 MacBook Neo Trackpad Replacement, Prepare the MacBook for disassembly: step 1, image 2 of 3 MacBook Neo Trackpad Replacement, Prepare the MacBook for disassembly: step 1, image 3 of 3
    • Fully shut down the MacBook and close the lid. Keep the lid closed until you've physically disconnected the battery.

    • Disconnect any cables and accessories.

    • Flip the computer upside‑down on a clean work surface.

    Ask FixBot

    Add Comment

  2. MacBook Neo Trackpad Replacement, Remove the bottom cover screws: step 2, image 1 of 1
    • Use a P5 pentalobe driver to remove the eight screws securing the bottom cover:

    • Six 4.1 mm‑long screws

    • Two 4.5 mm‑long screws

    Ask FixBot

    Add Comment

  3. MacBook Neo Trackpad Replacement, Pry up the bottom cover: step 3, image 1 of 3 MacBook Neo Trackpad Replacement, Pry up the bottom cover: step 3, image 2 of 3 MacBook Neo Trackpad Replacement, Pry up the bottom cover: step 3, image 3 of 3
    • Use your fingers to pry up the bottom cover from the top‑right corner, near the USB‑C ports, until the clip along the right edge of the laptop pops up.

    • If you're having trouble, use the flat end of a spudger to pry up the corner until you can grab it with your fingers. You can also slide an opening pick down each edge to release the clips.

    • Repeat this process on the left side to release its clip.

    Ask FixBot

    Add Comment

  4. MacBook Neo Trackpad Replacement, Remove the bottom cover: step 4, image 1 of 2 MacBook Neo Trackpad Replacement, Remove the bottom cover: step 4, image 2 of 2
    • Pick up the bottom cover and lift it off the MacBook.

    Ask FixBot

    Add Comment

  5. MacBook Neo Trackpad Replacement, Remove the battery connector cover: step 5, image 1 of 1
    • Use a Torx Plus 3IP driver to remove the two 1.7 mm‑long screws securing the battery connector cover.

    • While the MacBook Neo uses Torx Plus screws, standard Torx bits also work (T3 in place of 3IP, for example). Apply constant, downward force to prevent stripping.

    Ask FixBot

    Add Comment

  6. MacBook Neo Trackpad Replacement: step 6, image 1 of 2 MacBook Neo Trackpad Replacement: step 6, image 2 of 2
    • Use tweezers or your fingers to remove the battery connector cover.

    Ask FixBot

    Add Comment

  7. MacBook Neo Trackpad Replacement, Disconnect the battery: step 7, image 1 of 2 MacBook Neo Trackpad Replacement, Disconnect the battery: step 7, image 2 of 2
    • Use the flat end of a spudger to pry up and disconnect the battery press connector.

    Ask FixBot

    Add Comment

  8. MacBook Neo Trackpad Replacement, Disconnect the trackpad: step 8, image 1 of 2 MacBook Neo Trackpad Replacement, Disconnect the trackpad: step 8, image 2 of 2
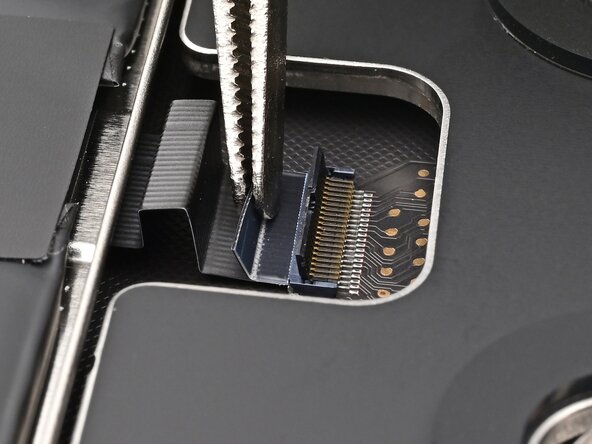
    • Use the flat end of a spudger to lift the hinged locking flap on the trackpad cable ZIF connector.

    Ask FixBot

    Add Comment

  9. MacBook Neo Trackpad Replacement: step 9, image 1 of 2 MacBook Neo Trackpad Replacement: step 9, image 2 of 2
    • Use tweezers or your fingers to gently pull the trackpad cable out of its socket.

    Ask FixBot

    Add Comment

  10. MacBook Neo Trackpad Replacement, Remove the trackpad base plate screws: step 10, image 1 of 1
    • Use a Torx Plus 8IP driver to remove the four 5.3 mm‑long black screws securing the trackpad base plate.

    Ask FixBot

    Add Comment

  11. MacBook Neo Trackpad Replacement, Remove the trackpad base plate: step 11, image 1 of 3 MacBook Neo Trackpad Replacement, Remove the trackpad base plate: step 11, image 2 of 3 MacBook Neo Trackpad Replacement, Remove the trackpad base plate: step 11, image 3 of 3
    • Pick up and remove the trackpad base plate.

    Ask FixBot

    Add Comment

  12. MacBook Neo Trackpad Replacement, Remove the trackpad screws: step 12, image 1 of 1
    • Use a Torx Plus 8IP driver to remove the four 5.0 mm‑long silver screws securing the trackpad.

    Ask FixBot

    Add Comment

  13. MacBook Neo Trackpad Replacement, Remove the trackpad: step 13, image 1 of 3 MacBook Neo Trackpad Replacement, Remove the trackpad: step 13, image 2 of 3 MacBook Neo Trackpad Replacement, Remove the trackpad: step 13, image 3 of 3
    • Pick up the trackpad from the center and slide it out from beneath its cable to remove it.

    Ask FixBot

    Add Comment

  14. MacBook Neo Trackpad Replacement, Disassembly complete: step 14, image 1 of 1
    • Congratulations on completing disassembly! The remaining steps will show how to reassemble the MacBook.

    Ask FixBot

    Add Comment

  15. MacBook Neo Trackpad Replacement, Install the trackpad: step 15, image 1 of 3 MacBook Neo Trackpad Replacement, Install the trackpad: step 15, image 2 of 3 MacBook Neo Trackpad Replacement, Install the trackpad: step 15, image 3 of 3
    • Hold the new trackpad from the center to slide it beneath its cable and set it into the frame.

    Ask FixBot

    Add Comment

  16. MacBook Neo Trackpad Replacement, Install the trackpad screws: step 16, image 1 of 1
    • Use a Torx Plus 8IP driver to install the four 5.0 mm‑long silver screws securing the trackpad.

    Ask FixBot

    Add Comment

  17. MacBook Neo Trackpad Replacement, Install the trackpad base plate: step 17, image 1 of 2 MacBook Neo Trackpad Replacement, Install the trackpad base plate: step 17, image 2 of 2
    • Align the trackpad base plate with its screw holes, making sure the notch on its long edge is facing the battery.

    • Set the trackpad base plate into place.

    Ask FixBot

    Add Comment

  18. MacBook Neo Trackpad Replacement, Install the trackpad base plate screws: step 18, image 1 of 1
    • Use a Torx Plus 8IP driver to install the four 5.3 mm‑long black screws securing the trackpad base plate.

    Ask FixBot

    Add Comment

  19. MacBook Neo Trackpad Replacement, Connect the trackpad: step 19, image 1 of 3 MacBook Neo Trackpad Replacement, Connect the trackpad: step 19, image 2 of 3 MacBook Neo Trackpad Replacement, Connect the trackpad: step 19, image 3 of 3
    • Make sure the locking flap is flipped up and gently insert the trackpad cable into its socket.

    • Flip the locking flap down to secure the cable.

    Ask FixBot

    Add Comment

  20. MacBook Neo Trackpad Replacement, Loosen the trackpad screws: step 20, image 1 of 2 MacBook Neo Trackpad Replacement, Loosen the trackpad screws: step 20, image 2 of 2
    • Use a Torx Plus 8IP driver to loosen (not remove) the four 5.0 mm‑long silver screws securing the trackpad.

    Ask FixBot

    Add Comment

  21. MacBook Neo Trackpad Replacement, Align the trackpad: step 21, image 1 of 3 MacBook Neo Trackpad Replacement, Align the trackpad: step 21, image 2 of 3 MacBook Neo Trackpad Replacement, Align the trackpad: step 21, image 3 of 3
    • Cut a stack of two sticky notes horizontally in half, then vertically into four equally‑sized pieces.

    • Slide the non-sticky side of each piece into the gap between the trackpad and the frame, centrally on each edge.

    • Fold each piece down and adhere it to the laptop.

    Ask FixBot

    Add Comment

  22. MacBook Neo Trackpad Replacement, Tighten the trackpad screws: step 22, image 1 of 3 MacBook Neo Trackpad Replacement, Tighten the trackpad screws: step 22, image 2 of 3 MacBook Neo Trackpad Replacement, Tighten the trackpad screws: step 22, image 3 of 3
    • Close the laptop, flip it upside down, and use a Torx Plus 8IP driver to tighten the four 5.0 mm‑long silver screws securing the trackpad.

    • Reopen the laptop, remove the sticky notes, and inspect it to ensure it's centered. If it isn't, loosen the screws from the last bullet and hold it in the correct position while you tighten them.

    • Carefully close the laptop.

    Ask FixBot

    Add Comment

  23. MacBook Neo Trackpad Replacement, Connect the battery: step 23, image 1 of 2 MacBook Neo Trackpad Replacement, Connect the battery: step 23, image 2 of 2
    • Align the battery connector carefully over its socket and press down until it clicks into place. Don't try to force the connector into place. If you're having trouble, reposition it and try again.

    Ask FixBot

    Add Comment

  24. MacBook Neo Trackpad Replacement, Install the battery connector cover: step 24, image 1 of 3 MacBook Neo Trackpad Replacement, Install the battery connector cover: step 24, image 2 of 3 MacBook Neo Trackpad Replacement, Install the battery connector cover: step 24, image 3 of 3
    • Set the battery connector cover in place, aligned with its screw holes.

    • Use a Torx Plus 3IP driver to install the two 1.7 mm‑long screws securing the battery connector cover.

    Ask FixBot

    Add Comment

  25. MacBook Neo Trackpad Replacement, Install the bottom cover: step 25, image 1 of 2 MacBook Neo Trackpad Replacement, Install the bottom cover: step 25, image 2 of 2
    • Align the bottom cover with its screw holes, then press on the two short sides until the clip on each side snaps into place.

    Ask FixBot

    Add Comment

  26. MacBook Neo Trackpad Replacement, Install the bottom cover screws: step 26, image 1 of 1
    • To ensure alignment, we recommend you partially install all the screws before fully tightening them.

    • Use a P5 pentalobe driver to install the eight screws securing the bottom cover:

    • Six 4.1 mm‑long screws

    • Two 4.5 mm‑long screws

    Ask FixBot

    Add Comment

Conclusion

Congratulations on completing your repair!

Take your e-waste to an R2 or e-Stewards certified recycler.

Repair didn’t go as planned? Try some basic troubleshooting, or ask our Answers community for help.

Cancel: I did not complete this guide.

Nick Schultz

Member since: 03/24/24

56,872 Reputation

321 Guides authored

0 Guide Comments

Add Comment

View Statistics:

Past 24 Hours: 10

Past 7 Days: 18

Past 30 Days: 22

All Time: 81