
Free Shipping on Domestic Orders $75+

MacBook Neo Keyboard Replacement

What you need

  1. MacBook Neo Keyboard Replacement, Prepare the MacBook for disassembly: step 1, image 1 of 3 MacBook Neo Keyboard Replacement, Prepare the MacBook for disassembly: step 1, image 2 of 3 MacBook Neo Keyboard Replacement, Prepare the MacBook for disassembly: step 1, image 3 of 3
    • Fully shut down the MacBook and close the lid. Keep the lid closed until you've physically disconnected the battery.

    • Disconnect any cables and accessories.

    • Flip the computer upside‑down on a clean work surface.

    Ask FixBot

    Add Comment

  2. MacBook Neo Keyboard Replacement, Remove the bottom cover screws: step 2, image 1 of 1
    • Use a P5 pentalobe driver to remove the eight screws securing the bottom cover:

    • Six 4.1 mm‑long screws

    • Two 4.5 mm‑long screws

    • During reassembly, partially install the screws to ensure alignment, then tighten the screws at each corner (like top‑right, bottom‑left, etc.) before the rest.

    Ask FixBot

    Add Comment

  3. MacBook Neo Keyboard Replacement, Pry up the bottom cover: step 3, image 1 of 3 MacBook Neo Keyboard Replacement, Pry up the bottom cover: step 3, image 2 of 3 MacBook Neo Keyboard Replacement, Pry up the bottom cover: step 3, image 3 of 3
    • The bottom cover is held in place with two clips, one on each side.

    • Use your fingers to lift the top right corner of the bottom cover, near the USB‑C ports, until the clip along the right edge releases.

    • If you're having trouble, use the flat end of a spudger to pry up the corner until you can grab it with your fingers. You can also slide an opening pick down each edge to release the clips.

    • Repeat this process on the left side to release its clip.

    Ask FixBot

    Add Comment

  4. MacBook Neo Keyboard Replacement, Remove the bottom cover: step 4, image 1 of 2 MacBook Neo Keyboard Replacement, Remove the bottom cover: step 4, image 2 of 2
    • Remove the bottom cover.

    • During reassembly, align the bottom cover with its screw holes, then press on the two short sides until the clip on each side snaps into place.

    Ask FixBot

    Add Comment

  5. MacBook Neo Keyboard Replacement, Remove the battery connector cover: step 5, image 1 of 1
    • Use a Torx Plus 3IP driver to remove the two 1.7 mm‑long screws securing the battery connector cover.

    • While the MacBook Neo uses Torx Plus screws, standard Torx bits also work (T3 in place of 3IP, for example). Apply constant, downward force to prevent stripping the screw.

    Ask FixBot

    Add Comment

  6. MacBook Neo Keyboard Replacement: step 6, image 1 of 2 MacBook Neo Keyboard Replacement: step 6, image 2 of 2
    • Use tweezers or your fingers to remove the battery connector cover.

    Ask FixBot

    Add Comment

  7. MacBook Neo Keyboard Replacement, Disconnect the battery: step 7, image 1 of 2 MacBook Neo Keyboard Replacement, Disconnect the battery: step 7, image 2 of 2
    • Use the flat end of a spudger to pry up and disconnect the battery press connector.

    • To reconnect, align the connector carefully over its socket and press down—first on one of the short sides, then the other—until it clicks into place. Don't try to force the connector into place. If you're having trouble, reposition it and try again.

    Ask FixBot

    Add Comment

  8. MacBook Neo Keyboard Replacement, Remove the antenna connector cover: step 8, image 1 of 1
    • Use a Torx Plus 3IP driver to remove the 1.7 mm‑long screw securing the antenna connector cover.

    Ask FixBot

    Add Comment

  9. MacBook Neo Keyboard Replacement: step 9, image 1 of 2 MacBook Neo Keyboard Replacement: step 9, image 2 of 2
    • Use tweezers or your fingers to remove the antenna connector cover.

    Ask FixBot

    Add Comment

  10. MacBook Neo Keyboard Replacement, Disconnect the antenna: step 10, image 1 of 3 MacBook Neo Keyboard Replacement, Disconnect the antenna: step 10, image 2 of 3 MacBook Neo Keyboard Replacement, Disconnect the antenna: step 10, image 3 of 3
    • Insert one arm of angled tweezers under the metal neck of one of the antenna coaxial connectors and lift straight up to disconnect it.

    • Repeat the process to disconnect the second antenna cable.

    • To reconnect, use tweezers to hold each connector in place over its socket and gently press down with your finger or a spudger—the connector should "snap" into place. If you're having trouble, reposition the head and try again.

    Ask FixBot

    Add Comment

  11. MacBook Neo Keyboard Replacement, Remove the antenna: step 11, image 1 of 1
    • Use a Torx Plus 5IP driver to remove the four 2.9 mm‑long screws securing the antenna.

    Ask FixBot

    Add Comment

  12. MacBook Neo Keyboard Replacement: step 12, image 1 of 2 MacBook Neo Keyboard Replacement: step 12, image 2 of 2
    • Pick up the antenna by its edges and remove it.

    Ask FixBot

    Add Comment

  13. MacBook Neo Keyboard Replacement, Disconnect the display cable: step 13, image 1 of 2 MacBook Neo Keyboard Replacement, Disconnect the display cable: step 13, image 2 of 2
    • Use the flat end of a spudger to gently push under the metal buckle of the display cable connector, located on the top‑right corner of the logic board, to unclip it.

    Ask FixBot

    Add Comment

  14. MacBook Neo Keyboard Replacement: step 14, image 1 of 2 MacBook Neo Keyboard Replacement: step 14, image 2 of 2
    • Grab the buckle and cable together and gently pull the connector straight out of its socket.

    Ask FixBot

    Add Comment

  15. MacBook Neo Keyboard Replacement, Disconnect the camera cable: step 15, image 1 of 3 MacBook Neo Keyboard Replacement, Disconnect the camera cable: step 15, image 2 of 3 MacBook Neo Keyboard Replacement, Disconnect the camera cable: step 15, image 3 of 3
    • Repeat this procedure to disconnect the camera cable, located on the left edge of the logic board.

    • To reconnect:

    • Grip the buckle and insert the connector fully into its socket. Realign it as necessary and don't try to force it in.

    • Flip the buckle over the socket and press it down until it clicks into place.

    Ask FixBot

    Add Comment

  16. MacBook Neo Keyboard Replacement, Free the camera cable: step 16, image 1 of 3 MacBook Neo Keyboard Replacement, Free the camera cable: step 16, image 2 of 3 MacBook Neo Keyboard Replacement, Free the camera cable: step 16, image 3 of 3
    • Pick up the buckle and cable together and gently pull the camera cable out of its channel securing it to the frame.

    • Free the cable so it's not wrapped around the corner of the laptop frame.

    Ask FixBot

    Add Comment

  17. MacBook Neo Keyboard Replacement, Free the display cable: step 17, image 1 of 2 MacBook Neo Keyboard Replacement, Free the display cable: step 17, image 2 of 2
    • Hold the display cable's buckle and cable together and free it from the laptop frame.

    Ask FixBot

    Add Comment

  18. MacBook Neo Keyboard Replacement, Loosen the hinge screws: step 18, image 1 of 2 MacBook Neo Keyboard Replacement, Loosen the hinge screws: step 18, image 2 of 2
    • Use a Torx Plus 8IP screwdriver to loosen (not remove) all four hinge screws.

    Ask FixBot

    Add Comment

  19. MacBook Neo Keyboard Replacement, Reassembly information: step 19, image 1 of 3 MacBook Neo Keyboard Replacement, Reassembly information: step 19, image 2 of 3 MacBook Neo Keyboard Replacement, Reassembly information: step 19, image 3 of 3
    Tool used on this step:
    IC-LOC-Blue Nonpermanent Threadlocker
    $6.99
    Buy
    • During reassembly:

    • Loosen the hinge screws at least one full turn.

    • Adjust the screen until it's correctly centered and aligned on each side. The screen should sit flush with the rest of the laptop.

    • You can stand the laptop up on one side to help align the screen. Support it with one hand while tightening the screws with the other.

    • Fully tighten the four hinge screws.

    • If the screen clicks or snaps upon opening, loosen the hinge screws and adjust the alignment. Make sure the screen doesn't sit too far forward, or it can catch on the body when opening and closing.

    • If desired, add a little blue threadlocker to the screw threads to prevent them from loosening over time.

    Ask FixBot

    Add Comment

  20. MacBook Neo Keyboard Replacement, Open the laptop: step 20, image 1 of 2 MacBook Neo Keyboard Replacement, Open the laptop: step 20, image 2 of 2
    • Open the laptop all the way and gently place it keyboard side down on a table, so the screen hangs over the edge.

    • You can place a soft cloth under the keyboard to protect it.

    Ask FixBot

    Add Comment

  21. MacBook Neo Keyboard Replacement, Remove the hinge screws: step 21, image 1 of 3 MacBook Neo Keyboard Replacement, Remove the hinge screws: step 21, image 2 of 3 MacBook Neo Keyboard Replacement, Remove the hinge screws: step 21, image 3 of 3
    • Keep a firm grip on the laptop, as it can easily fall off the table.

    • Support the screen with one hand.

    • With your free hand, use a Torx Plus 8IP screwdriver to remove the four 6.2 mm–long screws securing the hinges.

    Ask FixBot

    Add Comment

  22. MacBook Neo Keyboard Replacement, Remove the screen: step 22, image 1 of 3 MacBook Neo Keyboard Replacement, Remove the screen: step 22, image 2 of 3 MacBook Neo Keyboard Replacement, Remove the screen: step 22, image 3 of 3
    • Hold the screen with both hands and lift the hinges out of their recesses to remove it.

    • During reassembly, be careful not to scratch the new screen on the edge of the laptop frame. If the screen itself has any plastic liners, leave them in place until reassembly is complete.

    Ask FixBot

    Add Comment

  23. MacBook Neo Keyboard Replacement, Reassembly information: step 23, image 1 of 3 MacBook Neo Keyboard Replacement, Reassembly information: step 23, image 2 of 3 MacBook Neo Keyboard Replacement, Reassembly information: step 23, image 3 of 3
    • During reassembly, follow this step to install the foam on the keyboard shield:

    • If you don't have replacement foam, you can safely skip this step—it's not required.

    • Remove the bottom adhesive liner off the keyboard shield foam stickers.

    • Align the foam with the bottom and left edges of the battery and set it into place.

    • Press the keyboard shield foam onto the frame to secure it, then remove the top liner.

    Ask FixBot

    Add Comment

  24. MacBook Neo Keyboard Replacement, Remove the USB ports connector cover: step 24, image 1 of 1
    • Use a Torx Plus 3IP driver to remove the two 1.7 mm‑long screws securing the USB ports connector cover.

    Ask FixBot

    Add Comment

  25. MacBook Neo Keyboard Replacement: step 25, image 1 of 2 MacBook Neo Keyboard Replacement: step 25, image 2 of 2
    • Use tweezers or your fingers to remove the USB ports connector cover.

    Ask FixBot

    Add Comment

  26. MacBook Neo Keyboard Replacement, Disconnect the USB ports: step 26, image 1 of 2 MacBook Neo Keyboard Replacement, Disconnect the USB ports: step 26, image 2 of 2
    • Use the flat end of a spudger to disconnect the USB ports press connector.

    Ask FixBot

    Add Comment

  27. MacBook Neo Keyboard Replacement, Remove the USB ports: step 27, image 1 of 1
    • Use a Torx Plus 5IP driver to remove the four 2.8 mm‑long screws securing the USB ports.

    Ask FixBot

    Add Comment

  28. MacBook Neo Keyboard Replacement: step 28, image 1 of 2 MacBook Neo Keyboard Replacement: step 28, image 2 of 2
    • Lift the USB ports by their cable and remove them.

    Ask FixBot

    Add Comment

  29. MacBook Neo Keyboard Replacement, Reassembly information: step 29, image 1 of 3 MacBook Neo Keyboard Replacement, Reassembly information: step 29, image 2 of 3 MacBook Neo Keyboard Replacement, Reassembly information: step 29, image 3 of 3
    • During reassembly:

    • Set the USB ports into the frame, then use a Torx Plus 5IP driver to partially install the four 2.8 mm‑long screws securing them.

    • Plug both ends of a USB‑C to USB‑C cable into the ports. If either port feels stiff, shift the port and reconnect the cable until it feels smooth.

    • Fully tighten the screws securing the USB ports, and disconnect the cable from both.

    Ask FixBot

    Add Comment

  30. MacBook Neo Keyboard Replacement, Disconnect the right speaker: step 30, image 1 of 3 MacBook Neo Keyboard Replacement, Disconnect the right speaker: step 30, image 2 of 3 MacBook Neo Keyboard Replacement, Disconnect the right speaker: step 30, image 3 of 3
    • Insert the point of a spudger beneath the right speaker connector, located on the left side of the logic board directly above the battery, and pry it straight up to disconnect it.

    Ask FixBot

    Add Comment

  31. MacBook Neo Keyboard Replacement, Disconnect the headphone jack and left speaker: step 31, image 1 of 3 MacBook Neo Keyboard Replacement, Disconnect the headphone jack and left speaker: step 31, image 2 of 3 MacBook Neo Keyboard Replacement, Disconnect the headphone jack and left speaker: step 31, image 3 of 3
    • Repeat to disconnect the headphone jack and left speaker connectors, located on the opposite end of the logic board.

    • To reconnect, align the connector over its socket and gently press down with your fingertip or the flat end of a spudger until it sits flush.

    Ask FixBot

    Add Comment

  32. MacBook Neo Keyboard Replacement, Free the speaker cables: step 32, image 1 of 3 MacBook Neo Keyboard Replacement, Free the speaker cables: step 32, image 2 of 3 MacBook Neo Keyboard Replacement, Free the speaker cables: step 32, image 3 of 3
    • Gently lift the speaker cables out of their channels around the battery.

    Ask FixBot

    Add Comment

  33. MacBook Neo Keyboard Replacement, Free the headphone jack cable: step 33, image 1 of 3 MacBook Neo Keyboard Replacement, Free the headphone jack cable: step 33, image 2 of 3 MacBook Neo Keyboard Replacement, Free the headphone jack cable: step 33, image 3 of 3
    • The headphone jack cable is secured to the battery with adhesive.

    • Gently peel up the headphone jack cable and lift it out of its channel around the battery.

    Ask FixBot

    Add Comment

  34. MacBook Neo Keyboard Replacement, Lift the keyboard cable cover: step 34, image 1 of 2 MacBook Neo Keyboard Replacement, Lift the keyboard cable cover: step 34, image 2 of 2
    • Don't tear or fully remove this cover—it'll be used to disconnect the cable.

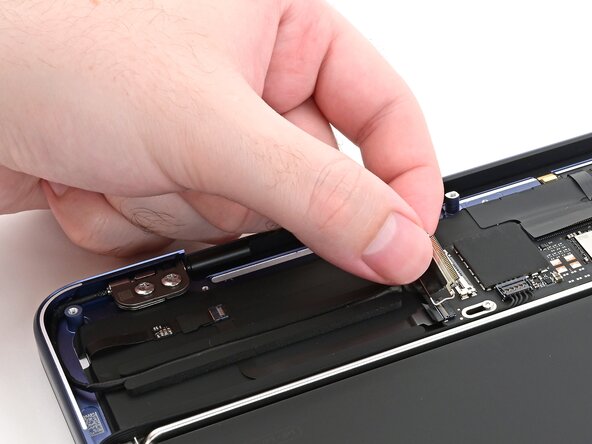
    • Use tweezers to peel up the black sticker over the keyboard cable, just until it comes off the socket on the board. Make sure it stays attached to the cable.

    Ask FixBot

    Add Comment

  35. MacBook Neo Keyboard Replacement, Disconnect the keyboard: step 35, image 1 of 2 MacBook Neo Keyboard Replacement, Disconnect the keyboard: step 35, image 2 of 2
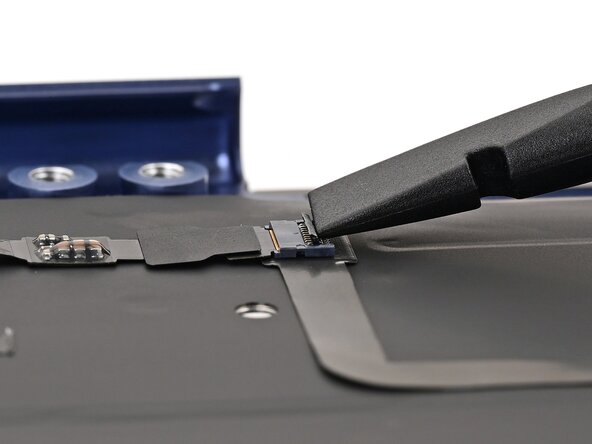
    • Use the flat end of a spudger to flip up the hinged locking flap on the keyboard cable ZIF connector.

    Ask FixBot

    Add Comment

  36. MacBook Neo Keyboard Replacement: step 36, image 1 of 2 MacBook Neo Keyboard Replacement: step 36, image 2 of 2
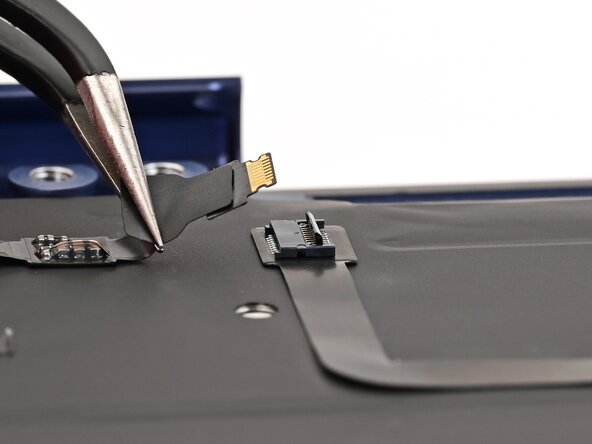
    • Use tweezers or your fingers to gently grip the keyboard cable by its cover and slide the cable out of its socket.

    Ask FixBot

    Add Comment

  37. MacBook Neo Keyboard Replacement, Disconnect the microphone: step 37, image 1 of 3 MacBook Neo Keyboard Replacement, Disconnect the microphone: step 37, image 2 of 3 MacBook Neo Keyboard Replacement, Disconnect the microphone: step 37, image 3 of 3
    • Flip up the hinged locking flap and disconnect the microphone cable ZIF connector, adjacent to the keyboard cable.

    Ask FixBot

    Add Comment

  38. MacBook Neo Keyboard Replacement, Disconnect the trackpad: step 38, image 1 of 3 MacBook Neo Keyboard Replacement, Disconnect the trackpad: step 38, image 2 of 3 MacBook Neo Keyboard Replacement, Disconnect the trackpad: step 38, image 3 of 3
    • Repeat to disconnect the trackpad cable ZIF connector, adjacent to the microphone cable.

    Ask FixBot

    Add Comment

  39. MacBook Neo Keyboard Replacement, Disconnect the Touch ID sensor: step 39, image 1 of 3 MacBook Neo Keyboard Replacement, Disconnect the Touch ID sensor: step 39, image 2 of 3 MacBook Neo Keyboard Replacement, Disconnect the Touch ID sensor: step 39, image 3 of 3
    • If the laptop doesn't have Touch ID, skip this step.

    • Repeat to disconnect the Touch ID cable ZIF connector, located on the left edge of the logic board.

    Ask FixBot

    Add Comment

  40. MacBook Neo Keyboard Replacement, Remove the logic board screws: step 40, image 1 of 1
    • Use a Torx Plus 3IP driver to remove the five 1.7 mm‑long screws securing the logic board.

    Ask FixBot

    Add Comment

  41. MacBook Neo Keyboard Replacement, Remove the logic board: step 41, image 1 of 3 MacBook Neo Keyboard Replacement, Remove the logic board: step 41, image 2 of 3 MacBook Neo Keyboard Replacement, Remove the logic board: step 41, image 3 of 3
    • Carefully lift the logic board around the cables and out of the MacBook.

    • Use your fingers or a spudger to free any cables that get snagged as you lift the board.

    Ask FixBot

    Add Comment

  42. MacBook Neo Keyboard Replacement, Check cables during reassembly: step 42, image 1 of 1
    • When you reinstall the logic board, verify that no cables get trapped under the board as you lower it into place:

    • Keyboard, microphone, and trackpad cables

    • Audio board cable

    • USB ports cable

    • Touch ID board cable (if present)

    Ask FixBot

    Add Comment

  43. MacBook Neo Keyboard Replacement, Remove the battery screws: step 43, image 1 of 1
    • Ensure the cables freed from around the battery are out of the way of the screws securing it.

    • Use a Torx Plus 5IP driver to remove the eighteen 2.8 mm‑long screws securing the battery.

    • Don't remove the four tall screws marked in yellow.

    • During reassembly, install the screws on the top‑left and bottom‑right corners of the battery first to align it. Then, install the remaining screws.

    Ask FixBot

    Add Comment

  44. MacBook Neo Keyboard Replacement, Remove the battery: step 44, image 1 of 3 MacBook Neo Keyboard Replacement, Remove the battery: step 44, image 2 of 3 MacBook Neo Keyboard Replacement, Remove the battery: step 44, image 3 of 3
    • Be careful not to pinch the cables near the bottom edge of the battery.

    • Insert the flat end of a spudger beneath the battery's left edge and lift it until you can grab it with your fingers.

    • Tilt the top edge of the battery upwards to a roughly 45‑degree angle and remove it.

    • During reassembly, insert the bottom edge of the battery first. Lower the top edge, then wiggle it into place so the standoff screws in the frame slot through their holes on the battery.

    Ask FixBot

    Add Comment

  45. MacBook Neo Keyboard Replacement, Disconnect the trackpad: step 45, image 1 of 3 MacBook Neo Keyboard Replacement, Disconnect the trackpad: step 45, image 2 of 3 MacBook Neo Keyboard Replacement, Disconnect the trackpad: step 45, image 3 of 3
    • Use the flat end of a spudger to lift the hinged locking flap on the trackpad cable ZIF connector.

    • Use tweezers or your fingers to gently pull the trackpad cable out of its socket.

    Ask FixBot

    Add Comment

  46. MacBook Neo Keyboard Replacement, Remove the trackpad cable: step 46, image 1 of 3 MacBook Neo Keyboard Replacement, Remove the trackpad cable: step 46, image 2 of 3 MacBook Neo Keyboard Replacement, Remove the trackpad cable: step 46, image 3 of 3
    • Slowly peel up the trackpad cable to separate the light adhesive securing it to the keyboard shield.

    • Remove the trackpad cable.

    Ask FixBot

    Add Comment

  47. MacBook Neo Keyboard Replacement, Lift the keyboard cable: step 47, image 1 of 3 MacBook Neo Keyboard Replacement, Lift the keyboard cable: step 47, image 2 of 3 MacBook Neo Keyboard Replacement, Lift the keyboard cable: step 47, image 3 of 3
    • Be careful not to damage the microphone cable, located on top of the keyboard cable.

    • Peel up the keyboard cable on the top edge of the keyboard shield.

    • If the cable is strongly adhered, use a hair dryer or iOpener to heat it until warm before peeling up. This will soften the adhesive.

    Ask FixBot

    Add Comment

  48. MacBook Neo Keyboard Replacement, Remove the foam strips: step 48, image 1 of 3 MacBook Neo Keyboard Replacement, Remove the foam strips: step 48, image 2 of 3 MacBook Neo Keyboard Replacement, Remove the foam strips: step 48, image 3 of 3
    • If the laptop doesn't have Touch ID, skip the next five steps.

    • Peel up and remove the three foam strips on the Touch ID cable and keyboard shield.

    • During reassembly, you'll reinstall this foam right before installing the screen.

    Ask FixBot

    Add Comment

  49. MacBook Neo Keyboard Replacement, Disconnect the Touch ID cable: step 49, image 1 of 3 MacBook Neo Keyboard Replacement, Disconnect the Touch ID cable: step 49, image 2 of 3 MacBook Neo Keyboard Replacement, Disconnect the Touch ID cable: step 49, image 3 of 3
    • Use the flat end of a spudger to pry up the hinged locking flap on the Touch ID interconnect cable.

    • Use tweezers or your fingers to pull the Touch ID cable out of its socket.

    Ask FixBot

    Add Comment

  50. MacBook Neo Keyboard Replacement, Lift the Touch ID cables: step 50, image 1 of 3 MacBook Neo Keyboard Replacement, Lift the Touch ID cables: step 50, image 2 of 3 MacBook Neo Keyboard Replacement, Lift the Touch ID cables: step 50, image 3 of 3
    • Peel up the Touch ID interconnect cable off the keyboard shield.

    Ask FixBot

    Add Comment

  51. MacBook Neo Keyboard Replacement: step 51, image 1 of 3 MacBook Neo Keyboard Replacement: step 51, image 2 of 3 MacBook Neo Keyboard Replacement: step 51, image 3 of 3
    • Use the flat end of a spudger to gently lift the Touch ID cable off the keyboard shield.

    • Position the cable over the edge of the frame so it's out of the way.

    Ask FixBot

    Add Comment

  52. MacBook Neo Keyboard Replacement, Peel up the keyboard shield: step 52, image 1 of 3 MacBook Neo Keyboard Replacement, Peel up the keyboard shield: step 52, image 2 of 3 MacBook Neo Keyboard Replacement, Peel up the keyboard shield: step 52, image 3 of 3
    • In the next two steps, you'll destructively remove the keyboard shield. Try not to tear the shield—it's easier to remove in one piece.

    • Be careful not to damage any of the flex cables surrounding the keyboard shield as you remove it.

    • Use the point of a spudger to pry up the keyboard shield until you can grab it with tweezers.

    Ask FixBot

    Add Comment

  53. MacBook Neo Keyboard Replacement: step 53, image 1 of 3 MacBook Neo Keyboard Replacement: step 53, image 2 of 3 MacBook Neo Keyboard Replacement: step 53, image 3 of 3
    • Use tweezers to slowly peel up an entire edge of the keyboard shield so you can grab it with your fingers.

    Ask FixBot

    Add Comment

  54. MacBook Neo Keyboard Replacement: step 54, image 1 of 3 MacBook Neo Keyboard Replacement: step 54, image 2 of 3 MacBook Neo Keyboard Replacement: step 54, image 3 of 3
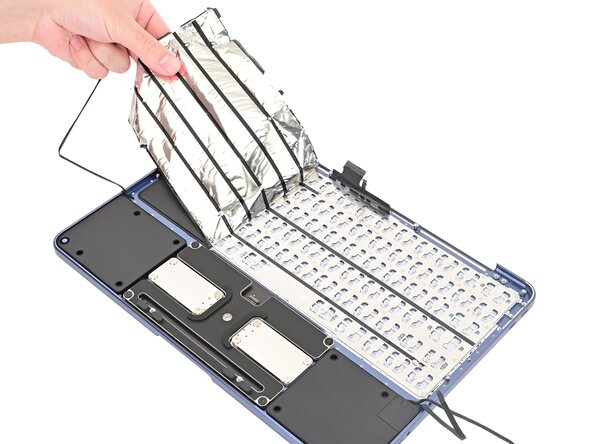
    • Peel up the keyboard shield at a low angle. Try to lift it in one large piece.

    Ask FixBot

    Add Comment

  55. MacBook Neo Keyboard Replacement, Remove the keyboard shield: step 55, image 1 of 3 MacBook Neo Keyboard Replacement, Remove the keyboard shield: step 55, image 2 of 3 MacBook Neo Keyboard Replacement, Remove the keyboard shield: step 55, image 3 of 3
    • Peel off the entire keyboard shield. Try to keep it in one piece.

    • If the shield tears, peel up any remnants off the laptop.

    Ask FixBot

    Add Comment

  56. MacBook Neo Keyboard Replacement, Reassembly information: step 56, image 1 of 3 MacBook Neo Keyboard Replacement, Reassembly information: step 56, image 2 of 3 MacBook Neo Keyboard Replacement, Reassembly information: step 56, image 3 of 3
    • During reassembly:

    • Set the new keyboard shield in place so the holes in the shield are aligned with the posts on the keyboard.

    • Use the flat end of a spudger to press the entire perimeter of the keyboard shield into place.

    • Remove any remaining liners off the keyboard shield.

    Ask FixBot

    Add Comment

  57. MacBook Neo Keyboard Replacement, Reassembly information: step 57, image 1 of 2 MacBook Neo Keyboard Replacement, Reassembly information: step 57, image 2 of 2
    • During reassembly:

    • To install a new keyboard shield:

    • Clean up any residual adhesive off the frame of the laptop.

    • Remove the adhesive liner off the bottom (shiny side) of the new keyboard shield.

    Ask FixBot

    Add Comment

  58. MacBook Neo Keyboard Replacement, Remove the Touch ID screws: step 58, image 1 of 1
    • If the laptop doesn't have Touch ID, skip the next three steps.

    • Use a Torx Plus 3IP driver to remove the four 1.9 mm‑long screws securing the Touch ID sensor.

    • Use a Torx Plus 1IP driver to remove the four 2.2 mm‑long screws securing the Touch ID backplate.

    • During reassembly, turn each screw counter‑clockwise until it drops into the threads, then tighten just until snug.

    Ask FixBot

    Add Comment

  59. MacBook Neo Keyboard Replacement, Remove the Touch ID backplate: step 59, image 1 of 2 MacBook Neo Keyboard Replacement, Remove the Touch ID backplate: step 59, image 2 of 2
    • Pick up the Touch ID backplate and remove it.

    Ask FixBot

    Add Comment

  60. MacBook Neo Keyboard Replacement, Remove the Touch ID sensor: step 60, image 1 of 3 MacBook Neo Keyboard Replacement, Remove the Touch ID sensor: step 60, image 2 of 3 MacBook Neo Keyboard Replacement, Remove the Touch ID sensor: step 60, image 3 of 3
    • Lift the laptop frame to let the Touch ID sensor fall out.

    • Remove the Touch ID sensor and set the laptop back down.

    Ask FixBot

    Add Comment

  61. MacBook Neo Keyboard Replacement, Reveal the keyboard screws: step 61, image 1 of 3 MacBook Neo Keyboard Replacement, Reveal the keyboard screws: step 61, image 2 of 3 MacBook Neo Keyboard Replacement, Reveal the keyboard screws: step 61, image 3 of 3
    • Use tweezers to lift any residual adhesive covering any of the screws securing the keyboard.

    Ask FixBot

    Add Comment

  62. MacBook Neo Keyboard Replacement, Remove the keyboard screws: step 62, image 1 of 1
    • Use a Torx Plus 1IP driver to remove the forty‑one 1.7 mm‑long screws securing the keyboard.

    • Some keyboard layouts have forty‑two.

    • If the laptop doesn't have Touch ID, use a Torx Plus 1IP driver to remove the remaining four screws securing the keyboard.

    Ask FixBot

    Add Comment

  63. MacBook Neo Keyboard Replacement, Remove the keyboard: step 63, image 1 of 3 MacBook Neo Keyboard Replacement, Remove the keyboard: step 63, image 2 of 3 MacBook Neo Keyboard Replacement, Remove the keyboard: step 63, image 3 of 3
    • Lift the keyboard out of the frame and remove it.

    Ask FixBot

    Add Comment

Conclusion

To reassemble the MacBook, follow these instructions in reverse order.

Take your e-waste to an R2 or e-Stewards certified recycler.

Repair didn’t go as planned? Try some basic troubleshooting, or ask our Answers community for help.

Cancel: I did not complete this guide.

Nick Schultz

Member since: 03/24/24

56,872 Reputation

321 Guides authored

0 Guide Comments

Add Comment

View Statistics:

Past 24 Hours: 7

Past 7 Days: 37

Past 30 Days: 63

All Time: 81