Introduction
Use this guide to replace the battery in your Huawei P8 smartphone.
What you need
-
-
-
First switch off your phone.
-
Remove the trays for the SD card and the SIM card.
 Ask FixBot
-
-
-
Remove the two Torx T2 screws located at the bottom next to the device's Micro USB port.
-
-
-
Use an iSclack or a suction handle to separate the display unit from the rear panel.
-
-
-
Remove the two Phillips #00 screws that secure the front camera and display/battery connector brackets
-
-
-
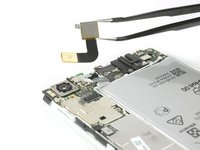
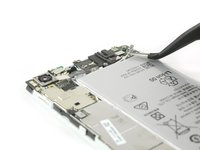
Use a tweezer to remove the bracket covering the display and the battery flex connector.
-
Unplug the battery flex connector with a Spudger.
-
Remove the bracket covering the flex connector of the front camera.
-
-
-
-
Unplug the headphone jack and the front camera flex connectors.
-
Remove the front camera.
-
-
-
Use a spudger to disconnect the power/volume cable and fold it out of the way.
-
Remove the liquid contact indicator.
-
-
-
Remove the five Phillips #00 screws that hold down the motherboard of your Huawei P8.
-
-
-
Unplug the display flex connector from the main board with a Spudger.
-
Disconnect and remove the antenna cable with a tweezer.
-
-
-
Carefully peel up the flex cable of your loudspeaker.
-
If the cable is difficult to peel, heat the loudspeaker assembly with an iOpener or a heat gun.
-
Lift up the loudspeaker assembly with a spudger and remove it.
-
-
-
Free the end of the first adhesive pull tab to get a good grip on it.
-
Pull the adhesive tab in a slow constant movement to free the battery.
-
-
-
Free the end of the second adhesive pull tab.
-
Pull the adhesive tab in a slow constant movement.
-
-






To reassemble your device, follow these instructions in reverse order.
Cancel: I did not complete this guide.
18 other people completed this guide.

Team

9 Guide Comments
Really helpful guide. Only hiccup was that on my handset the screws holding the casing together (Step 2) were Torx 2 rather than pentalobe, possibly a regional variation. I opted not to remove the loudspeaker (Step 10) as the ribbon cable was firmly stuck down and I worried it would break. This meant I could only cleanly remove the adhesive pad in line with the charging port. I was able to prise out the battery using spudger and screwdriver to scrape the other pad from the phone body. All now reassembled and working properly!
Overall a very helpful guide . I also had torx screws in mine . The torx screws are tiny , so make sure you have the right screwdriver before starting . We didn’t bother removing the loudspeader assembly either (Step 10) . You can just prise up the ribbon cable (carefully) . Add heat if necessary . Now to the biggest problem . Removing the old battery from the phone . What a nightmare ! It’s really stuck down .We took our time using a hairdryer (no heat gun) , and a flat head screwdriver , and went from one end to the other prising it off gently . It still took about 20 minutes . Saying that . Don’t rush it , as it’s the final stage . Also . If you do use a flat head screwdriver then don’t twist it , as you might damage the casing . Just slide it underneath it applying heat . Total time to remove the old battery was 90 minutes , but about 50 of those were spent just getting the first 2 screws out . 20 minutes to put the new battery in and reassemble . Make sure all flex connectors are properly reseated .
My P8 battery has completely died on me. I cannot believe that to replace a battery, we have to now go to these lengths to do it. There must be a mountain of mobile phones, where the only issue with them is a flat battery. Surely, this cannot be allowed to continue. I know why the manufacturers want to make it hard to simply replace a battery, because it sells more mobile phones. But think of all that wasted technology, where a phone may have lasted just over a 24 month contract before the battery is done.
Many thanks for this tutorial. Together we shall beat them!
Thank you for a very nice and easy to follow tutorial!
I have now replaced my battery with what should be an original battery for the Huawei Ascend P8, battery nr: HB3447A9EBW. For some reason the width of the new battery is a few millimeters smaller than the old one, meaning that it does not fill out the space completely. Has anyone else experienced the same?
After having assembled the phone again I experience some weird issues with the battery level dropping from 50%, 60%, 70% or even 100% in an instant. I have tried calibrating the battery by, letting it die completely, recharge it to 100% let it drain completely again and recharge. I have tried different battery calibration apps and a factory reset - nothing helps.
I contacted the company I bought the battery from and got a replacement - still same issue.
Unfortunately i damaged the original battery when taking it out, so i cant use that as a reference.
Any suggestions would be most appreciated!
