Introduction
Trick-or-Treat! While making our yearly October 31st rounds, we came across something interesting: a brand new iPad Mini! All hopped up on sugar, we eagerly tore into Apple's first small tablet. Smaller than an iPad, larger than an iPod, and able to leap tall buildings in a single bound: we'd heard mighty claims about the Mini. It was finally time to crack it open and take a look for ourselves.
This iPad was delivered a bit early a ways up the road from us in Berkeley. We'd like to thank friend-of-iFixit, the ever perspicacious Jeff Atwood, for helping us get our hands on it. Jeff started Stack Overflow, which runs a pretty neat Q&A community for Apple software.
Want to follow along with all the newest Mini and mighty news? Follow us on Twitter, or like us on StalkerBook.
What you need
-
-
What do you get when you cram an iPad into a smaller and lighter frame?
-
7.9" 1024 x 768 pixel (163 ppi) multi-touch display
-
Dual-core A5 processor
-
5 megapixel rear-facing and 1.2 megapixel front-facing cameras
-
Bluetooth 4.0
-
Lightning connector
-
16, 32, or 64 GB capacity
-
-
-
Comparison time! With the introduction of the Mini, Apple now offers iDevices fit for any budget. Let's take a look at how they stack up.
-
From bottom to top:
-
The iPad Mini has not one, but two speaker grilles to pump out mini beats. Don't let the iPhone 5's dual grilles fool you; the Mini is the first handheld iDevice to house stereo speakers.
-
-
-
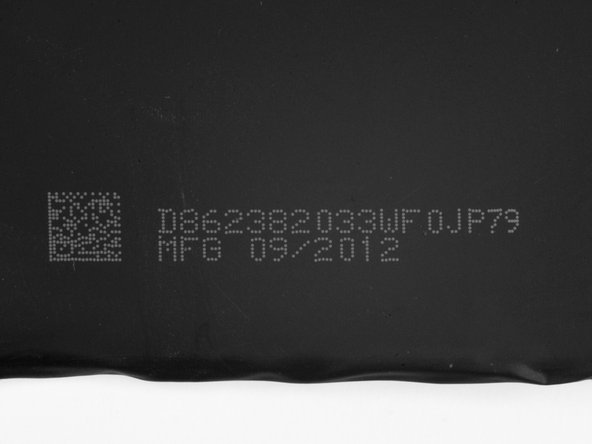
Few things get us more excited than finding a new model number on an Apple device. Though the new model number is only two off from the last iPad we tore down, we quite literally could not be more thrilled.
-
Model Number: A1432. Fun fact: the year 1432 was a leap year!
-
Apple's kerning on our iPad's serial number seems a little questionable. Did they have to squeeze in an extra digit at the last minute?
-
-
-
No, it's not an iPad Halloween costume; it's the iOpener!
-
Thanks to our trusty iOpener, a microwave, and half an hour's worth of time, the adhesive is warmed to the perfect temperature for us to free the glass/digitizer assembly to the spooky tune of our iFixit guitar picks.
-
The iPad Mini continues Apple's repair-impeding practice of keeping iPads together with copious amounts of adhesive. This is one area in which the friendly-to-open Nexus 7 and Kindle Fire HD are clear winners.
-
-
-
The touchscreen still functions with the glass separated from the LCD.
-
We were pleasantly surprised that this round of glass removal was easier than previous ones, requiring less patience and a near-zero fear-factor.
-
With the glass removed, we are ready to get at the guts of this pint-sized iPad (or gallon-sized iPod, depending on how you look at it.)
-
-
-
So far it looks like Apple has more tricks than treats for us with a hidden screw securing the display.
-
After dispatching two hidden screws and two exposed screws with our 54 Bit Driver Kit, we are able to lift the LCD.
-
Pulling up the display reveals a large metal plate, held in with no fewer than 16 screws.
-
We found similar plates in the iPod Touch 5th Generation, and the iPhone 5, so this seems to be a new iDevice design convention.
-
-
-
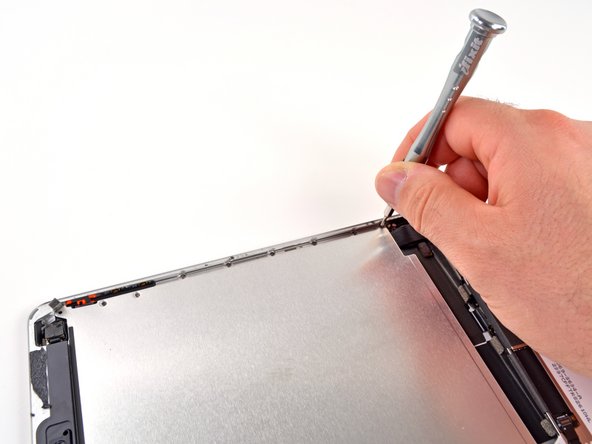
Time to remove some metal. With the inner frame and the connector covers, there is enough metal here to forge at least two—maybe three—paperclips.
-
All this prying and disconnecting is reminding us a lot of our recent iPod Touch teardown. But remember, the Mini and the Touch are, in fact, different devices.
Do you think the device would function any differently without the metal plate? from what I see (but this is just a quick observation from replacing the device lcd and digitizer) that it seems to be not really needed other that adding to the devices overall durability... but as this is my first replacement on this device and my first time I have seen this in an apple product please let me know... Thanks!
ipod touch and iphone 5 also have these plates. for structural and shielding purposes
Tom Chai -
-
-
-
Our first exposed IC is one we've seen before, in the iPhone 5.
-
In fact, you might say we've got a pretty close relationship with the Murata 339S0171 Wi-Fi module.
-
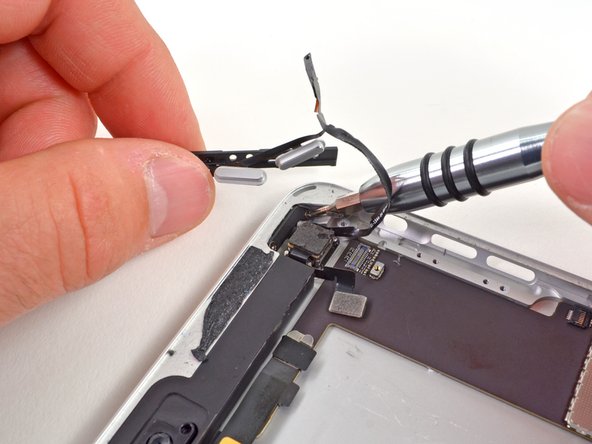
More tricks, fewer treats! With plastic opening tool in hand, we disconnect the display connector, but there's still something holding the LCD in…
Disconnect the battery connector 1st! (Step 11) then press the power button, to discharge any remaining power still in caps.
After much trial and error, (Ipad mini3 now @ end of life) many have had issues with the l.c.d.s blowing a circuit while disconnecting it's connector, with the battery still connected. While not always, and not for everyone, it is still very possible, especially with a >25% charged battery. The safer alternative only takes a 10sec detour to step11, and wages nothing, just in-case.
-
-
-
-
…and the culprit is found. Insulating tape holds the display to the rear case and protects the Lightning connector cable.
-
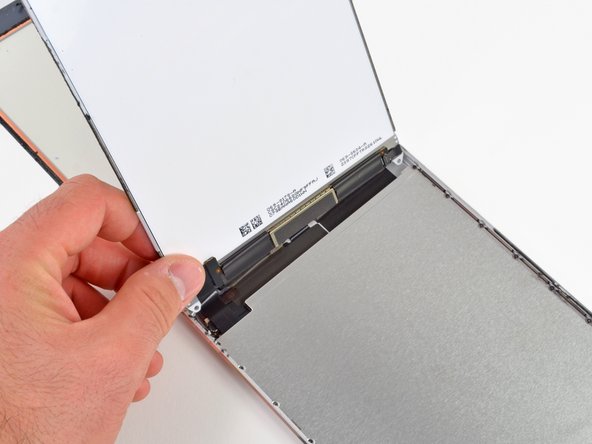
With the tape peeled up, we remove the display assembly and can turn our attention to the interior.
-
Bad news: due to the placement of connectors, you'll need to remove the LCD prior to removing the digitizer. Great news: the LCD and front glass are two separate components. This contrasts the fused glass-LCD assemblies in both the Kindle Fire HD and Nexus 7. Thanks for the repairability, Apple!
There's a piece of tape that holds the bottom of the LCD to the frame of the mini - you need to be very careful taking the tape off or else you can rip the bottom of the LCDs circuits (I don't know what it's technical term is). I did this on my third repair and blacked out a good portion of the LCD.
-
-
-
Peeling the tape and EMI shield off the display reveals the ICs controlling the 1024x768 unit:
-
Samsung W1235 S6TNMR1X01 Display Driver
-
Silicon Mitus SM4031 DA1232 SMCP043, Display PMIC
-
416R 8227
-
HDU 2YC 34
-
Though the markings on the back of the LCD don't turn up much information, the Samsung display driver IC reveals that Apple once again went with Samsung in its display manufacturing.
-
Apple has reportedly been working to move away from Samsung as a primary supplier, so it's somewhat surprising to see a Samsung LCD inside. With that said, Apple often relies on multiple suppliers for a single component, meaning there's quite likely other LCD manufacturers lurking inside other iPad Minis.
-
-
-
Fortunately, the iPad Mini inherited the connector-fastened battery from its larger sibling, not the soldered-in battery found in the iPod Touch.
-
A plastic card makes a nice tool to pry the battery up from the rear panel, but it's still a very difficult task to break through all of the adhesive securing it to the rear case without puncturing the cells.
-
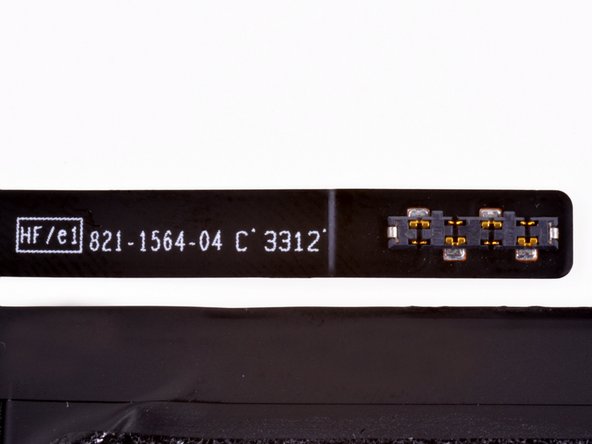
A close-up of the battery connector exposes the numbers 821-1564-04 C 3312.
-
-
-
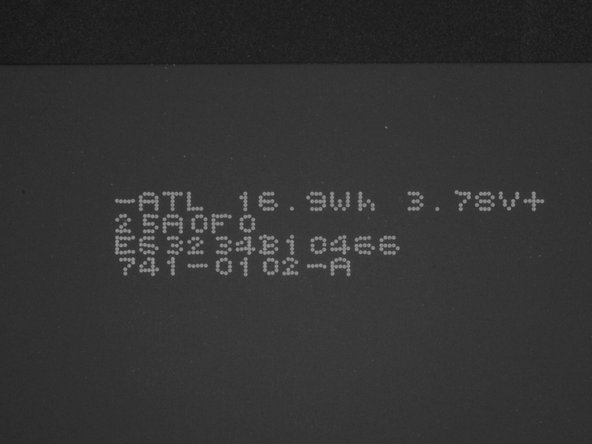
We get a good look at the battery, and find ourselves scratching our heads a bit.
-
This is a 3.72 V, 16.5 Whr, 4440 mAh battery.
-
Or maybe it's a 3.78 V, 16.9 Whr, 4400 mAh battery?
-
Or maybe it's a 3.72 V, 4400 mAh battery?
-
Or maybe, according to Apple's tech specs, it's only 16.3 Whr.
-
Whatever the capacity, it's decidedly mini when compared to the massive 43 Whr battery in the iPad 3. Even the venerable iPad 2 sports a 25 Whr package, 50% more than the iPad Mini.
It seems the battery has a higher capacity in English than it does in Chinese: 4440 mAh in English and 4400 mAh in Chinese!
Thanks for pointing that out! We'll make sure to add it to the teardown.
I think maybe the Apple's tech spec page use only 1 decimal (3.7 * 4.4 = 16.28), but the actual specific data is 3.72*4.44 = 16.52.
But the capacity number is funny -- 4440(english) vs 4400(chinese) mAh.
Anyone else noticed the Battery is "A1445" and the mini is "A1432". Could it be a coincidence that the names are similar? Could it be mini "A1445" is coming sooner than expected?
-
-
-
Next off is the digitizer.
-
Hiding on the connector are a couple of Broadcom touch controller ICs marked BCM5976C0KUB6G.
-
This chip looks familiar…oh yeah, we saw them in the MacBook Air.
That is a ugly board. Was it damaged in the teardown? Otherwise the MFG QA is not to good.
I think they are getting a little more impatient in their teardowns.
cityzen -
You can use common desoldering techniques to remove the RF shield. However it appears that either they don't have the proper tools, or just didn't want to take the time to remove it properly so that it could be restored. Though it can be done, it's much more difficult to resolder the tiny caps and resistors, as long as there is no irreparable damage to the board. I have to add that I enjoy the service that iFix is providing here, however it would be nice if they exhibited a little more bench tech professionalism during these tear downs. I have seen other tear downs, where a little more time and technique used would have resulted in a much cleaner tear down. JMHO !!!
STEP 13 - I need help
I need to replace my digitizer, but my new one doesnt have that "connector" in the end of the cable so I can't plug in to the motherboard.
Do I need to buy a new one or I simply have to take it off the old one and glue it to the new digitizer?
I took it off, but I'm worried it won't work because it didn't came off completely.
I hope someone can give me a answer asap. Thanks
-
-
-
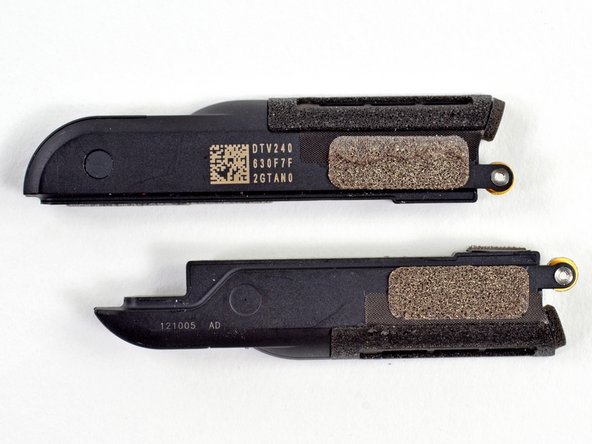
An antenna sits on top of each speaker, presumably Wi-Fi and Bluetooth.
-
For comparison, the screw on the right is from the bottom of an iPhone 5, where the screw on the left is from the Mini.
-
-
-
The folks at Amazon doubted, but we can confirm the Mini does indeed sport stereo speakers. In this one regard, the Mini outdoes the still-mono Retina iPad.
-
The reduction of connector size (30-pin to Lightning) has left just enough space to squeeze a second speaker into the device, allowing for sound quality that is anything but mini.
-
-
-
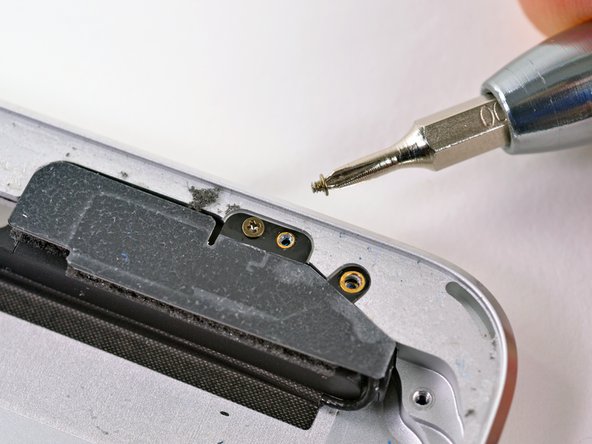
Two hidden screws secure the Lightning connector to the rear case.
-
They've been around less than two months, but Lightning ports are spreading like wildfire across nearly the entire iOS lineup. However, the iPad 2, iPhone 4/4S, and iPod Shuffle are still Lightning-less…for now.
-
As badly as we want to completely remove the Lightning port ribbon cable, we will have to wait, as it appears to be soldered to the logic board.
-
-
-
The endless battle with adhesive rages on as we heat the backside of the rear case in hopes of loosening the adhesive securing the logic board to the rear case.
-
Applying heat to an aluminum frame like this makes it too hot to touch—luckily we keep a silicone pot holder on hand just for this sort of thing.
-
Once the adhesive is loose, we arm ourselves with a spudger to dislodge the logic board from the rear case.
-
-
-
Nothing to see here.
-
Unlike the iPad 3's dock connector, the Mini's lightning port is permanently soldered to the logic board. That design decision will make certain repairs very expensive.
-
-
-
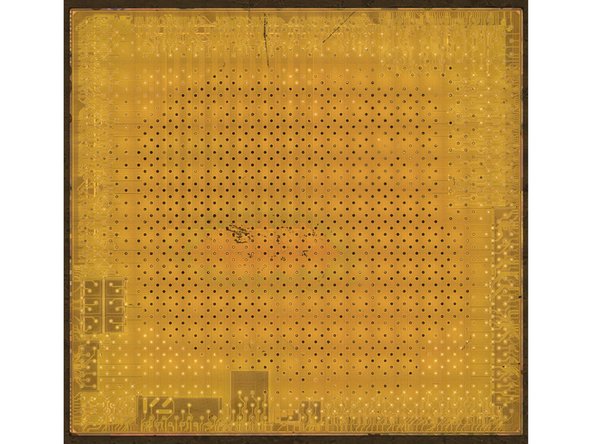
The A5 processor has 512 MB RAM, just like the processor in the latest iPod Touch.
-
How do we know? The package markings E4064P3PM-8D-5 indicate the A5 has two 2 Gb, LP DDR2 RAM dies inside, according to Chipworks.
-
These die photos from Chipworks shows the inner workings of the A5. Care to see the die in all its gory glory? Check out the high-res version.
-
-
-
The top side of the logic board houses all of the ICs:
-
Hynix H2JTDG8UD2MBR 16 GB NAND Flash
-
Apple 343S0593-A5
-
Apple 338S1116 Cirrus Logic Audio Codec
-
Fairchild PCHPS FDMC 6676BZ
-
Fairchild BC7BE F0MC 6683
-
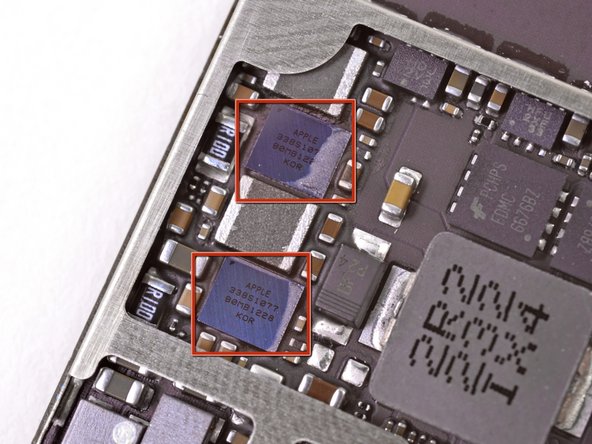
Apple 338S1077, aka Cirrus Logic Class D Amplifier (thanks Chipworks!)
-
STMicroelectronics L3G4200D Three-Axis Gyroscope and LIS331DLH Three-Axis Accelerometer
-
-
-
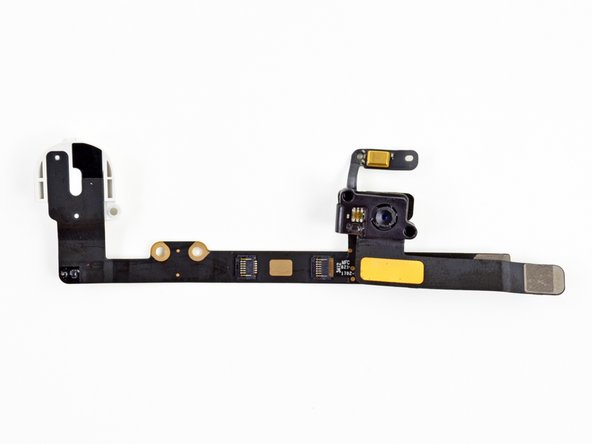
Strong adhesive continues to slow our advance, so another hit with the heat gun is prescribed to pry the headphone jack and front facing camera assembly out of the rear case.
-
The iPad Mini does well in the camera department. While most hardware specs closely match the aging iPad 2, its cameras match those found in the the Retina iPad. Its front-facing FaceTime HD camera delivers 1.2 MP photos, and the rear-facing iSight camera delivers 5 MP resolution and HD video.
-
-
-
iPad Mini Repairability: 2 out of 10 (10 is easiest to repair).
-
The LCD and glass are not fused together and can be replaced independently.
-
The battery is not soldered to the logic board or other components.
-
Teeny-tiny screws can be easily misplaced if you're not careful. Don't sneeze too hard while taking them off.
-
Copious amounts of adhesive hold many components in place -- front glass, logic board, battery, front camera, back camera, ribbon cables -- making repair extremely difficult.
-
The Lightning connector is soldered to the logic board, so don't bend its pins.
-
Hidden screws mean you'll need to be very diligent when trying to remove internal components.
I find it interesting that the iPad mini had the same repairability score as the Fitbit Flex, which required a saw, had a integrated battery on the board, and had all its weather proofing compromised during the tear down.
Being mostly modular, I would have expected it to have at least a 5/10
-


12 Comments
Wonder who made the camera modules?
china made them
i think that guy is kinda late (btw i also am)
It’s ok. I am a bit late as well
Awesome!!! Thanks for the tear down!!!!!!
Impressive stuff as usual iFixit.
Two observations however.
One is the second photo in step 13 showing the Broadcom IC's. some of the SMD capacitors and resistors are displaced from their correct placement, and is actually quite a mess.
The second observation is the photo in step 20, marked as the die of the A5 IC. I think this is actually the substrate that forms the ball grid array for soldering to the PCB, the IC is bonded out to this around the edges with traces leading to the regular pattern of dots. The dots are where the solder balls locate.
FYI, on step 16 you failed to mention the iPod Classic. Either that, or why did you mention the Shuffle as an iOS device? :)
Hey guys,
Can you tell me if / how to remove the series of magnets from the internal left hand side as then repacement metal housing didn't come with them. You know the magnets that hold the Smart Cover on.
Many thanks
Pad Mini Repairability: 2 out of 10 (10 is easiest to repair)...."
Is there a listing of devices by "Repairability"? I would like to see. I would buy the device with the highest rating for this. Shouldn't replacing the screen be as easy as replacing the battery or sim card?
hi my ipad mini 1 the screen is keep moving up and down constantly stop for 1 second and move again..I try to disconnect the digitizer but the screen is still moving.....I want to buy LCD but im not sure if the LCD is the one that cause the problem..My glass digitizer is not working anymore im not sure if my LCD was damage too.. Please give some idea...
Awesome!!! Thanks!!!
And 512MB of RAM?
flyingedge - Reply
Best way to tell if iPad mini is worth the cost &effort?
ba151 - Reply