Introduction
It's been two years since the Mac mini's last appearance on iFixit's teardown table, but a newly revised version joins Apple's lineup this week. Is this truly a refreshed mini, or merely a mini-refresh? Stay tuned to find out just what two years of innovation has to say for itself—it's Mac mini teardown time.
Follow us on Facebook, Instagram, or Twitter for the latest teardown news.
What you need
Video Overview
-
-
Apple's "affordable powerhouse" offers a range of hardware configurations (but no gold color option, so you can't configure for bling). Our unit's internals include:
-
1.4 GHz Dual-Core Intel Core i5 (Turbo Boost up to 2.7 GHz) with 3 MB L3 cache
-
4 GB of 1600 MHz LPDDR3 memory
-
500 GB Hard Drive
-
Intel HD Graphics 5000
-
802.11ac Wi-Fi + Bluetooth 4.0
-
OS X Yosemite
-
-
-
The backside of the mini remains almost identical to the previous iteration. The only change is the omission of a FireWire port in favor of an extra Thunderbolt 2 port.
-
-
-
Gone are the handy thumb indents and indicators. This mini doesn't appear to have twist-off bottom cover!
-
A flick of our
bottle openerplastic opening tool pops this (lower) cap off. -
Well that was nice! But now we're greeted with something new: a solid door where there was once handy access to the RAM and fan.
-
We're starting to feel like the locks on our apartment changed and we weren't given the new keys...
-
-
-
Time to break down the door and see what's changed inside. The plastic bottom cover snaps onto three screws—three TR6 Torx Security screws. Really? Rude.
-
This is the smallest Torx Security screw we've ever seen—our kits go down to T7 Security, so we asked our tool design team to get improvising.
-
Thanks, Apple.
-
-
-
After a bit of work—more than we were expecting—we're able to flip the Wi-Fi antenna/shield plate out of the way.
-
Unfortunately, we're not home free yet. One end of the Wi-Fi antenna cable is clamped firmly to the plate, while the other end is screwed down onto the logic board.
-
-
-
-
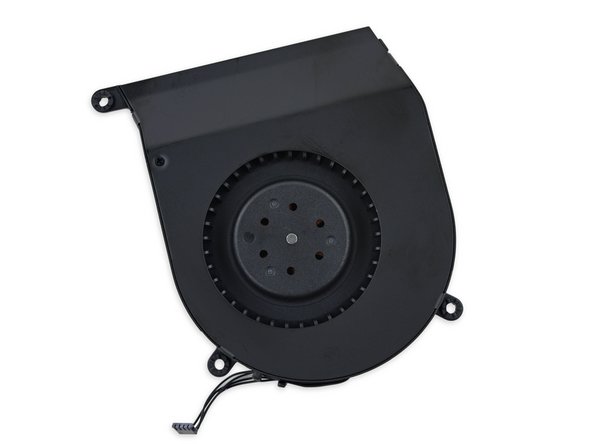
Upon removal, the fan seems identical to the one from the previous model—but let's not be too quick to judge a fan by its cover.
-
Advanced Hydraulic Bearing
-
Hmm. Interesting. What exactly is Advanced Hydraulic Bearing? Let's find out. According to Asia Vital Components:
-
AHB "consists of a polished steel shaft, a sintered bearing and fluid lubricant." In this system there "is no contact between shaft and bearing" and thus "the bearing load is carried solely by a film of fluid lubricant."
-
-
-
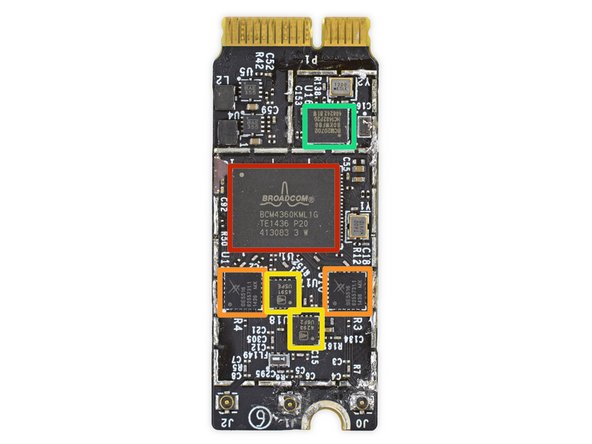
The AirPort card is dispatched after removing one screw and disconnecting two more antennas from their sockets.
-
Let's take a look at the ICs found on the AirPort card:
-
Broadcom BCM4360KML1G 5G WiFi 3-Stream 802.11ac Gigabit Transceiver
-
Skyworks SE5516 Dual-Band 802.11a/b/g/n/ac WLAN Front-End Module
-
RF Micro RFFM4293 2.5 GHz FEMS and RFFM4591 5 GHz FEMS
-
Broadcom BCM20702 Single-Chip Bluetooth 4.0 HCI Solution with Bluetooth Low Energy Support
-
-
-
Using our handy hand-powered Mac mini logic board removal tool, we handily remove our Mac mini's handsome logic board.
-
While past Mac minis have featured two SATA ports, allowing users to upgrade their base model with an extra hard drive, this year we only get one.
-
However, this empty socket over here may well be a spot for a PCIe cable, enabling the installation of a blade SSD.
-
-
-
True to our word, we cracked open a Fusion drive equipped Mac mini, and it looks like our suspicions were accurate.
-
The empty connector is now filled—by a PCIe cable, glued to the top of the hard drive tray.
-
The SSD matches the one we found in the MacBook Air 13" Mid 2013 with the same chips:
-
Samsung S4LN053X01-8030 (ARM) flash controller
-
8 x Samsung K9LDGY8SIC-XCK0 16 GB flash storage
-
Samsung K4P2G324ED 512 MB RAM
-
-
-
Let's have a look at the ICs on the logic board:
-
Samsung K4E8E304EE-EGCE 8 Gb LPDDR3 DRAM (8 Gb x 4 = 32 Gb = 4 GB)
-
Cirrus Logic 4208-CRZ Audio Codec (a returning champion from a bevy of recent Apple products including the Mid 2013 MacBook Air and Mac Pro)
-
Broadcom BCM57766A1KMLG Ethernet PCIe Controller with SD3.0 Card Reader and ASF 2.0
-
Intel DSL5520 Thunderbolt 2 Controller
-
Delta Electronics LFE8904C-F Discrete LAN Filter
-
NXP 6142F and NXP PCA9501BS 8-bit I/O Expander
-
-
-
The IC party continues:
-
Microchip Technology 1428-7 420BE5A BMY System Management Bus (SMBus) Temperature Sensor
-
Cypress Semiconductor CY7C63833 LTXC enCoRe II Low Speed USB Peripheral Controller
-
Texas Instruments TPS51916 DDR3 Memory Power Solution Synchronous Buck Controller
-
Texas Instruments 58873D Synchronous Buck NexFET Power Block MOSFET Pair
-
-
-
The IC after-party:
-
Intel Core i5-4260U Processor with Intel HD Graphics 5000
-
Texas Instruments/Stellaris LM4FS1EH Microcontroller
-
Parade PS8401A HDMI Jitter Cleaning Repeater
-
Macronix MX25L6406E 64 Mb CMOS Serial Flash
-
Delta Electronics LFE8904C-F Discrete LAN Filter
-
Intersil 958 26AHRZ M419VL
-
-
-
We've got the power (supply) at the tips of our fingers. It's an easy extraction, even if it took a while to get here.
-
We get a slight rush before we realize it is the same as the 2012 model...which was the same as the 2011 edition.
-
-
-
Before we go, let's pull out the hard drive tray and take a look at the platter drive our mini came loaded with.
-
Tucked under the tray: a 500 GB, 5400 RPM HGST hard drive, coming in at 2.5" wide and 7 mm thin.
-
And on the top of the tray, a promising mounting point for a blade-style PCIe SSD, presumably what we'll find in a Mac mini equipped with Fusion Drive.
-
-
-
Mac mini Late 2014 Repairability: 6 out of 10 (10 is easiest to repair).
-
There's no glue anywhere inside that needs to be removed while disassembling the mini.
-
With the proper tools, disassembly is straight-forward and simple.
-
T6 Torx Security screws are intended to lock you out of your mini, and make it hard to clean the fan or replace the hard drive.
-
The CPU is soldered to the logic board and not user-upgradeable.
-
The RAM is now also soldered to the logic board, and not user-upgradeable.
-