
iPhone 3G Dock Connector Replacement

What you need

Video Overview

  1. iPhone 3G Dock Connector Replacement, Broken Glass: step 1, image 1 of 3 iPhone 3G Dock Connector Replacement, Broken Glass: step 1, image 2 of 3 iPhone 3G Dock Connector Replacement, Broken Glass: step 1, image 3 of 3
    • If your display glass is cracked, keep further breakage contained and prevent bodily harm during your repair by taping the glass.

    • Lay overlapping strips of clear packing tape over the iPhone's display until the whole face is covered.

    • This will keep glass shards contained and provide structural integrity when prying and lifting the display.

    • Wear safety glasses to protect your eyes from any glass shaken free during the repair.

  2. iPhone 3G Dock Connector Replacement, Dock Connector: step 2, image 1 of 1
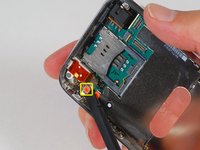
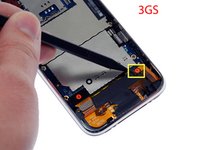
    • Remove the two Phillips #00 screws from the dock-connector end of the iPhone.

  3. iPhone 3G Dock Connector Replacement: step 3, image 1 of 1
    • Remove the metal handle from the suction cup. It's easier and safer to grip the suction cup's base instead of the metal handle.

    • Be very careful when opening the iPhone so that the cables under the display are not severed.

    • There is a rubber gasket between the silver front bezel and black display assembly. A bit of force is required in this step to separate the iPhone's display assembly.

    • Use a small suction cup near the Home button to gently pull up the bottom portion of the iPhone's display assembly.

    • If the display assembly is too damaged to allow the suction cup to adhere, tape with a strong adhesive such as duct tape maybe used.

  4. iPhone 3G Dock Connector Replacement: step 4, image 1 of 1
    • The display assembly is still connected to the iPhone by three cables, so don't try to remove it entirely just yet.

    • Rotate the display assembly up until it is at an angle of approximately 45 degrees.

    • Be careful. Sometimes cable 4 can stick to the back of the display assembly and can be pulled off and/or torn as you remove the display assembly.

  5. iPhone 3G Dock Connector Replacement: step 5, image 1 of 1
    • Continue to hold the display assembly with one hand, and use your other hand and a spudger to disconnect the black ribbon cable labeled "1."

    • Start from the ribbon and work your way towards the outside edge of the case.

  6. iPhone 3G Dock Connector Replacement: step 6, image 1 of 1
    • Rotate the display assembly up until it is roughly vertical. This will allow easier access for disconnecting the remaining cables.

    • Use a spudger to disconnect the black ribbon cable labeled "2."

  7. iPhone 3G Dock Connector Replacement: step 7, image 1 of 1
    • Use a spudger to flip up the white plastic tab holding the remaining ribbon cable in place. The white tab will rotate up 90 degrees, releasing the ribbon cable.

    • Slide the black ribbon cable out of its connector, and remove the display assembly from the iPhone.

  8. iPhone 3G Dock Connector Replacement: step 8, image 1 of 1
    • Insert your SIM eject tool or a paper clip into the hole next to the headphone jack.

    • Press down on the tool until the SIM card tray pops out.

    • Grasp the SIM card tray and slide it out of the iPhone.

  9. iPhone 3G Dock Connector Replacement: step 9, image 1 of 1
    • Use a spudger to disconnect the ribbon cable labeled "4."

  10. iPhone 3G Dock Connector Replacement: step 10, image 1 of 1
    • Use a spudger to disconnect the ribbon cable labeled "5."

  11. iPhone 3G Dock Connector Replacement: step 11, image 1 of 2 iPhone 3G Dock Connector Replacement: step 11, image 2 of 2
    • Use a spudger to disconnect the ribbon cable labeled "6."

    • If you have an iPhone 3GS, refer to picture 2 and use a spudger to disconnect the ribbon cable labeled "7."

  12. iPhone 3G Dock Connector Replacement: step 12, image 1 of 1
    • Carefully peel up the small sticker labeled "Do not remove."

  13. iPhone 3G Dock Connector Replacement: step 13, image 1 of 1
    • Remove the following 8 screws:

    • Five 2.3 mm Phillips #00 screws with partial threads securing the logic board to the rear panel.

    • Two 2.3 mm Phillips #00 screws with full threads securing the logic board and camera.

    • One 2.9 mm Phillips #00 screw from beneath the "Do not remove" sticker.

  14. iPhone 3G Dock Connector Replacement: step 14, image 1 of 1
    • Use a spudger to gently remove the camera retaining clip, (formerly secured by the removed screw) and gently pry the camera up and out of its housing in the rear panel. The camera cannot be removed entirely yet because it's connected to the bottom of the logic board.

  15. iPhone 3G Dock Connector Replacement: step 15, image 1 of 1
    • Use a spudger to gently pry up the end of the logic board closest to the dock connector.

    • There is a small golden grounding tab on the logic board adjacent to the 'Do not remove' sticker. Be very careful this does not snag on the side of the case when prying up the logic board; it breaks easily! If you have signal problems after removing the logic board, check this ground tab.

    • If the board won't lift up, double check to make sure all 8 screws securing the logic board have been removed.

  16. iPhone 3G Dock Connector Replacement: step 16, image 1 of 1
    • Slide the logic board towards the dock connector and out of the iPhone.

  17. iPhone 3G Dock Connector Replacement: step 17, image 1 of 1
    • Remove the following 3 screws:

    • Two 1.5 mm Phillips #00 screws, one on either side of the dock connector.

    • One 2.4 mm Phillips #00 screw near the ribbon cable labeled "4."

  18. iPhone 3G Dock Connector Replacement: step 18, image 1 of 1
    • Lift the dock connector assembly up and out of the iPhone.

    • When inserting the new assembly, ensure the screw holes of the assembly rest ABOVE the bezel's holes.

Conclusion

To reassemble your device, follow these instructions in reverse order.

172 other people completed this guide.

iRobot

Member since: 09/24/09

1 Reputation

636 Guides authored

One Comment

Hm, swapped the docking assembly, but now my phone will only show the apple logo for a few seconds, then goes black. Switched back to my original dock connector, but I have the same problem. Tried the power+home trick, but no dice. Don't think the battery is short cirquited, but not sure, tried to measure it, only got about 3.6 volt, but unsure where which og the pins to measure on.

I was able to boot the phone before swapping out the dock (wanted to swap it because I had no sound from the speaker plus no wifi antenna due to a ripped cord) but not after swapping back. I've gone over all connections and I am fairly sure everyting is hooked up as it should.

Stuck.

mortenskogly - Reply

Add Comment

View Statistics:

Past 24 Hours: 0

Past 7 Days: 11

Past 30 Days: 44

All Time: 301,469