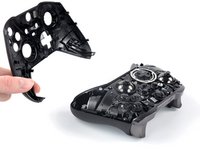
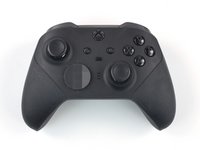
Xbox Elite Wireless Controller Series 2 Battery Replacement

What you need

  1. Xbox Elite Wireless Controller Series 2 Battery Replacement, Remove the thumbstick toppers: step 1, image 1 of 3 Xbox Elite Wireless Controller Series 2 Battery Replacement, Remove the thumbstick toppers: step 1, image 2 of 3 Xbox Elite Wireless Controller Series 2 Battery Replacement, Remove the thumbstick toppers: step 1, image 3 of 3
    • Use your fingers to remove the thumbstick toppers.

  2. Xbox Elite Wireless Controller Series 2 Battery Replacement, Remove the D-pad cover: step 2, image 1 of 2 Xbox Elite Wireless Controller Series 2 Battery Replacement, Remove the D-pad cover: step 2, image 2 of 2
    • Use your fingers to remove the D-pad cover.

  3. Xbox Elite Wireless Controller Series 2 Battery Replacement, Disassembly information: step 3, image 1 of 2 Xbox Elite Wireless Controller Series 2 Battery Replacement, Disassembly information: step 3, image 2 of 2
    • The top housing is secured in two ways:

    • 13 tight plastic clips

    • Several strips of adhesive tape

  4. Xbox Elite Wireless Controller Series 2 Battery Replacement, Release the top housing clips: step 4, image 1 of 3 Xbox Elite Wireless Controller Series 2 Battery Replacement, Release the top housing clips: step 4, image 2 of 3 Xbox Elite Wireless Controller Series 2 Battery Replacement, Release the top housing clips: step 4, image 3 of 3
    • Releasing the plastic clips requires significant force. Take your time to avoid damaging your controller.

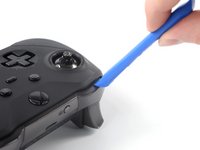
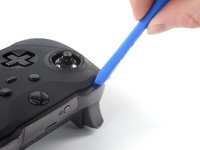
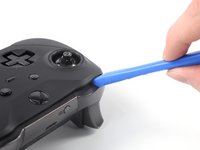
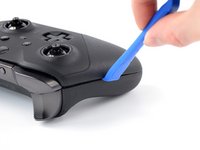
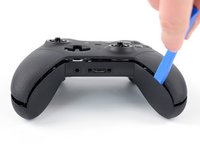
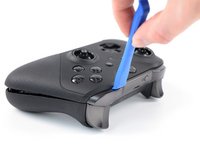
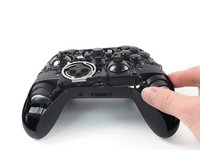
    • Insert an opening tool between the left bumper and the top housing.

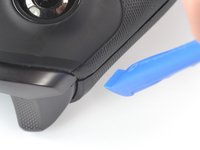
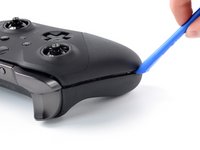
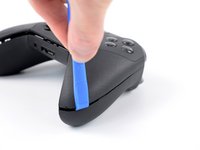
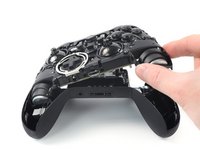
    • Pry up the top housing to release the top left clip.

  5. Xbox Elite Wireless Controller Series 2 Battery Replacement: step 5, image 1 of 2 Xbox Elite Wireless Controller Series 2 Battery Replacement: step 5, image 2 of 2
    • Insert an opening tool into the seam between the two housings on the controller’s left edge.

  6. Xbox Elite Wireless Controller Series 2 Battery Replacement: step 6, image 1 of 3 Xbox Elite Wireless Controller Series 2 Battery Replacement: step 6, image 2 of 3 Xbox Elite Wireless Controller Series 2 Battery Replacement: step 6, image 3 of 3
    • Slide the opening tool along the left edge and pry up intermittently to release the plastic clips.

  7. Xbox Elite Wireless Controller Series 2 Battery Replacement: step 7, image 1 of 3 Xbox Elite Wireless Controller Series 2 Battery Replacement: step 7, image 2 of 3 Xbox Elite Wireless Controller Series 2 Battery Replacement: step 7, image 3 of 3
    • Insert your opening tool into the seam between the two housings on the inner left edge.

    • Slide the opening tool along the bottom edge and pry up intermittently to release the plastic clips.

  8. Xbox Elite Wireless Controller Series 2 Battery Replacement: step 8, image 1 of 3 Xbox Elite Wireless Controller Series 2 Battery Replacement: step 8, image 2 of 3 Xbox Elite Wireless Controller Series 2 Battery Replacement: step 8, image 3 of 3
    • Insert your opening tool into the seam between the two housings on the controller’s right edge.

    • Slide the opening tool along the right edge and pry up intermittently to release the plastic clips.

  9. Xbox Elite Wireless Controller Series 2 Battery Replacement: step 9, image 1 of 2 Xbox Elite Wireless Controller Series 2 Battery Replacement: step 9, image 2 of 2
    • Insert your opening tool between the right bumper and the top housing.

    • Pry up the top housing to release the remaining plastic clips.

  10. Xbox Elite Wireless Controller Series 2 Battery Replacement, Remove the top housing: step 10, image 1 of 3 Xbox Elite Wireless Controller Series 2 Battery Replacement, Remove the top housing: step 10, image 2 of 3 Xbox Elite Wireless Controller Series 2 Battery Replacement, Remove the top housing: step 10, image 3 of 3
    • Remove the top housing.

    • To reinstall the top housing, position it on the midframe assembly and press down firmly along the edges to engage all of the clips.

  11. Xbox Elite Wireless Controller Series 2 Battery Replacement, Unfasten the midframe assembly: step 11, image 1 of 1
    • If there's a white sticker covering one of the top screws, pierce through it with the screwdriver or use tweezers to remove it.

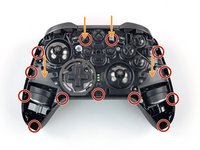
    • Use a Torx T8 Security screwdriver to remove the six 9 mm-long screws securing the midframe assembly.

    • Depending on the age and condition of your bit, a Torx T9 driver may fit better.

  12. Xbox Elite Wireless Controller Series 2 Battery Replacement, Pry up the midframe assembly: step 12, image 1 of 3 Xbox Elite Wireless Controller Series 2 Battery Replacement, Pry up the midframe assembly: step 12, image 2 of 3 Xbox Elite Wireless Controller Series 2 Battery Replacement, Pry up the midframe assembly: step 12, image 3 of 3
    • The midframe assembly is held in place by three plastic clips and two metal rods.

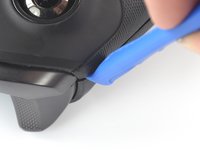
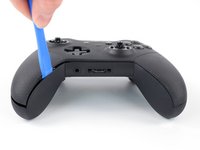
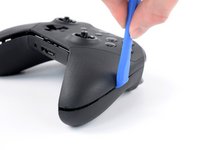
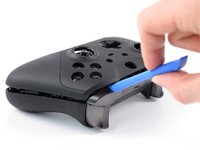
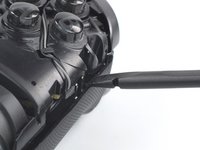
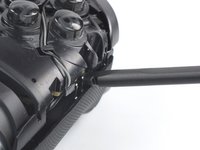
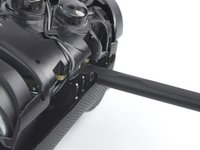
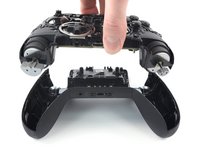
    • Insert the flat end of a spudger under the top right edge of the midframe, just above the clip.

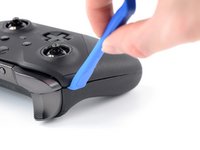
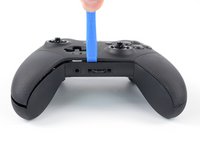
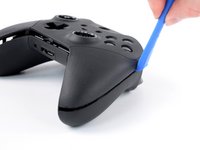
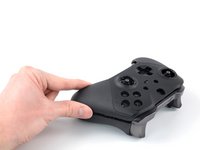
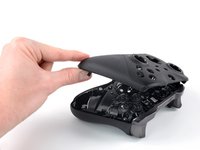
    • Pry up the midframe assembly to release the clips securing it.

  13. Xbox Elite Wireless Controller Series 2 Battery Replacement, Remove the midframe assembly: step 13, image 1 of 3 Xbox Elite Wireless Controller Series 2 Battery Replacement, Remove the midframe assembly: step 13, image 2 of 3 Xbox Elite Wireless Controller Series 2 Battery Replacement, Remove the midframe assembly: step 13, image 3 of 3
    • Remove the midframe assembly.

    • During reassembly, align the triggers with the bottom housing before clipping the midframe assembly back in. If they aren't lined up correctly, the triggers might not work properly.

    • To reinstall the midframe assembly, lay it into the bottom housing and press firmly on the edges to engage the clips.

  14. Xbox Elite Wireless Controller Series 2 Battery Replacement, Unfasten the battery cover: step 14, image 1 of 1
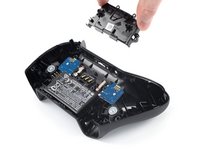
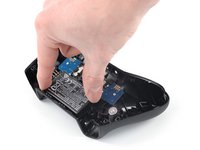
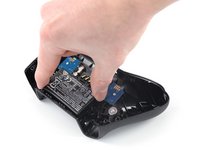
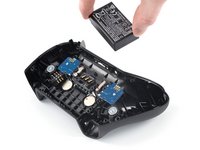
    • Use a Torx T6 screwdriver to remove the four 6.9 mm-long screws securing the battery cover.

  15. Xbox Elite Wireless Controller Series 2 Battery Replacement, Remove the battery cover: step 15, image 1 of 2 Xbox Elite Wireless Controller Series 2 Battery Replacement, Remove the battery cover: step 15, image 2 of 2
    • Remove the battery cover.

  16. Xbox Elite Wireless Controller Series 2 Battery Replacement, Remove the battery: step 16, image 1 of 3 Xbox Elite Wireless Controller Series 2 Battery Replacement, Remove the battery: step 16, image 2 of 3 Xbox Elite Wireless Controller Series 2 Battery Replacement, Remove the battery: step 16, image 3 of 3
    • Grab the battery and lift it out of its recess.

    • Remove the battery.

    • Never reuse a deformed or damaged battery—it's a fire hazard. Replace it with a new battery.

    • Make sure to align the battery correctly by positioning the contacts on the bottom right of the battery on the prongs.

Conclusion

To reassemble your device, follow these instructions in reverse order.

For optimal performance, calibrate your newly installed battery after completing this guide.

Take your e-waste to an R2 or e-Stewards certified recycler.

Repair didn’t go as planned? Check out our Answers community for troubleshooting help.

7 other people completed this guide.

Manuel Haeussermann

Member since: 07/13/22

15,580 Reputation

71 Guides authored

Team

iFixit Member of iFixit

Staff

135 Members

17,207 Guides authored

7 Comments

Absolutely great tutorial, thank you. Now... any idea where I can get a replacement battery pack for this? Mine is deformed and unusable.

Kraeg Minett - Reply

Hi Kraeg Minett, thanks for your comment! Unfortunately, the battery is currently not available at the iFixit Store, but you might have some luck looking for a replacement battery by either using the model code for the Elite Wireless Controller (1797) or the battery itself (DYND01).

Manuel Haeussermann -

Hello.
Great tutorial
But - i cannot find replacement battery pack ( original one )
Please - can you help me with this issue ? Thank u

Stanislav Banas

Stanislav Baňas - Reply

I got one here - https://kasynparts.com/product/xbox-elit...

Had it shipped to the UK and it arrived today after two weeks. I haven't yet installed it as now waiting for a T6 driver to arrive but might be worth a try.

Captain Lager - Reply

Update - The repair was a success, the battery from the above website is good and the controller is now working again :)

Captain Lager -

Add Comment

View Statistics:

Past 24 Hours: 28

Past 7 Days: 239

Past 30 Days: 1,265

All Time: 19,261