Introduction
Trackpad prerequisite without reassembly bullet.
What you need
-
-
-
Use a T3 Torx driver to remove the two 1.8 mm screws securing the trackpad cable connector bracket.
 Ask FixBot
-
-
Tool used on this step:Tweezers$4.99
-
Remove the trackpad cable connector bracket with a pair of tweezers.
-
-
-
Use a spudger to disconnect the trackpad ribbon cable by gently prying its connector straight up from the logic board.
-
-
-
-
Prepare an iOpener and lay it on top of the trackpad ribbon cable for about a minute, in order to soften the adhesive securing the trackpad ribbon cable to the top of the battery.
-
If you don't have an iOpener, use a hair dryer to warm up the cable instead. The cable should be warm, but not too hot to touch. Be careful not to overheat the battery.
-
-
-
Carefully peel the trackpad ribbon cable up off the battery, and push it out of the way.
-
-
-
Use a T5 Torx driver to remove the ten screws securing the trackpad assembly:
-
Two 4.3 mm screws
-
Eight 5.8 mm screws
-
-
-
Swing the display open slightly to access the trackpad.
-
Carefully thread the trackpad ribbon cable out through the hole in the MacBook Pro's frame.
-
-
-
Remove the trackpad assembly.
-
Be sure not to lose the six small washers (two circular and four rectangular) resting on the underside of the trackpad.
-
-


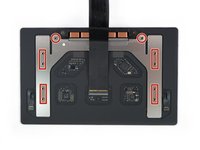

Compare your new replacement part to the original part—you may need to transfer remaining components or remove adhesive backings from the new part before installing.
To reassemble your device, follow the above steps in reverse order.
Take your e-waste to an R2 or e-Stewards certified recycler.
Repair didn’t go as planned? Try some basic troubleshooting or search our Answers community for help.