
Samsung RF28T5001SR Refrigerator Icemaker Assembly Replacement

What you need

  1. Samsung RF28T5001SR Refrigerator Icemaker Assembly Replacement, Unplug your refrigerator: step 1, image 1 of 1
    • Unplug your refrigerator before you begin your repair.

  2. Samsung RF28T5001SR Refrigerator Icemaker Assembly Replacement, Open the freezer drawer: step 2, image 1 of 2 Samsung RF28T5001SR Refrigerator Icemaker Assembly Replacement, Open the freezer drawer: step 2, image 2 of 2
    • Slide the freezer drawer fully open.

  3. Samsung RF28T5001SR Refrigerator Icemaker Assembly Replacement, Remove the freezer bins: step 3, image 1 of 3 Samsung RF28T5001SR Refrigerator Icemaker Assembly Replacement, Remove the freezer bins: step 3, image 2 of 3 Samsung RF28T5001SR Refrigerator Icemaker Assembly Replacement, Remove the freezer bins: step 3, image 3 of 3
    • Lift and remove all the freezer bins from the drawer.

    • You may need to open the refrigerator doors in order to remove the large bin.

  4. Samsung RF28T5001SR Refrigerator Icemaker Assembly Replacement, Remove the freezer door: step 4, image 1 of 3 Samsung RF28T5001SR Refrigerator Icemaker Assembly Replacement, Remove the freezer door: step 4, image 2 of 3 Samsung RF28T5001SR Refrigerator Icemaker Assembly Replacement, Remove the freezer door: step 4, image 3 of 3
    • A plastic tab locks each drawer rail in place.

    • Use a flathead screwdriver or your fingers to press in the plastic tab near the inner end of the drawer rail.

    • While pressing the plastic tab, grasp the rail with your free hand and slide it towards you slightly to unlock the rail.

  5. Samsung RF28T5001SR Refrigerator Icemaker Assembly Replacement: step 5, image 1 of 1
    • Repeat the rail unlock procedure on the other drawer rail.

  6. Samsung RF28T5001SR Refrigerator Icemaker Assembly Replacement: step 6, image 1 of 1
    • Once both rails are unlocked, firmly pull both rails to slide them out of the refrigerator wall guides.

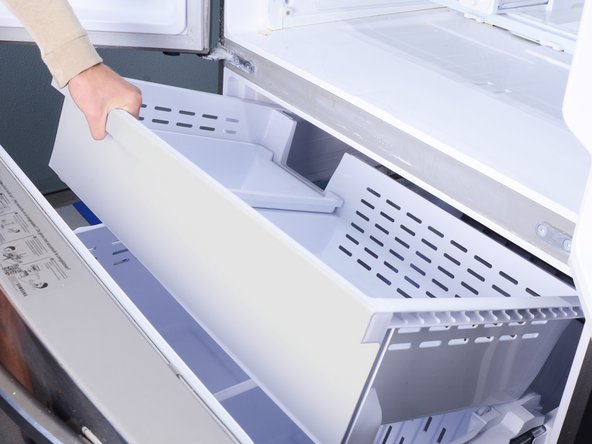
    • Remove the freezer drawer.

    • To reinstall the freezer drawer:

    • Push the geared torsion bar until it rests at the very end of the rails.

    • Align the drawer rails to the refrigerator wall guides.

    • Close the freezer drawer until the rails lock back in place.

    • If you don't hear a click, visually check if the plastic tabs have locked in place. You may need to push the rails in a little further with your fingers to set the tabs.

  7. Samsung RF28T5001SR Refrigerator Icemaker Assembly Replacement, Unfasten the icemaker assembly: step 7, image 1 of 2 Samsung RF28T5001SR Refrigerator Icemaker Assembly Replacement, Unfasten the icemaker assembly: step 7, image 2 of 2
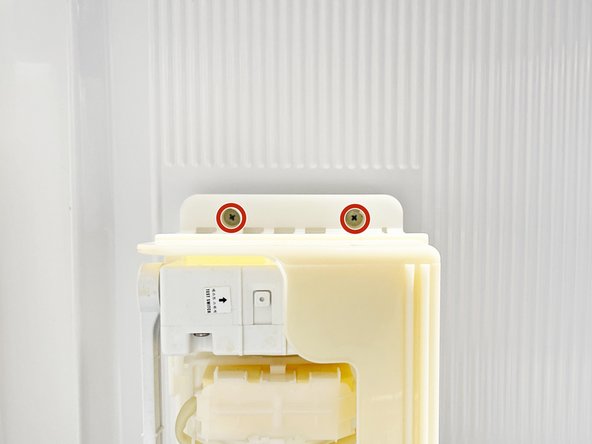
    • Use a Phillips screwdriver to remove the two 18.5 mm-long screws securing the icemaker assembly to the freezer ceiling.

  8. Samsung RF28T5001SR Refrigerator Icemaker Assembly Replacement, Disconnect the icemaker assembly: step 8, image 1 of 2 Samsung RF28T5001SR Refrigerator Icemaker Assembly Replacement, Disconnect the icemaker assembly: step 8, image 2 of 2
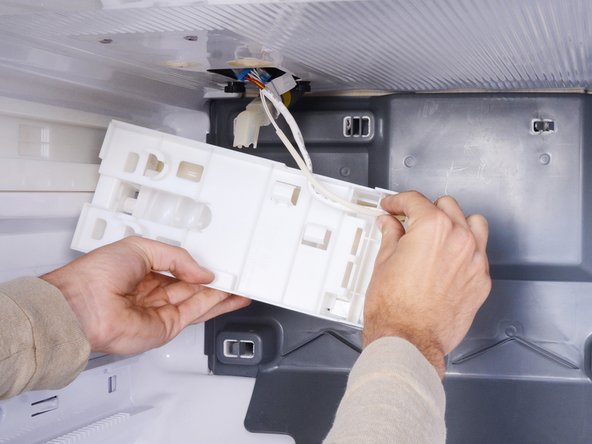
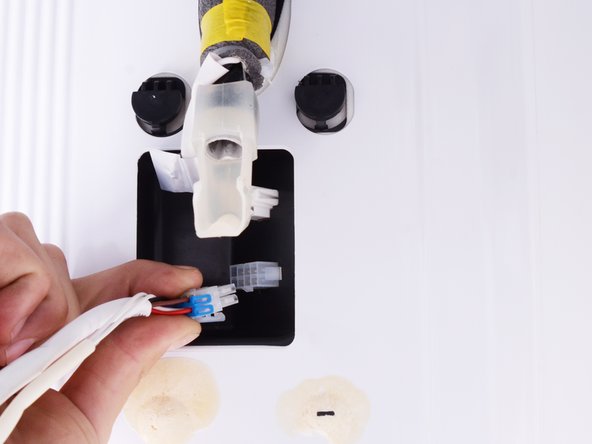
    • Grasp the front edge of the icemaker assembly and tilt it downwards.

    • Don't try to remove the icemaker yet, as it's still connected by a few wires.

  9. Samsung RF28T5001SR Refrigerator Icemaker Assembly Replacement: step 9, image 1 of 2 Samsung RF28T5001SR Refrigerator Icemaker Assembly Replacement: step 9, image 2 of 2
    • Use your fingers to guide the wire harness out of the icemaker assembly.

  10. Samsung RF28T5001SR Refrigerator Icemaker Assembly Replacement: step 10, image 1 of 3 Samsung RF28T5001SR Refrigerator Icemaker Assembly Replacement: step 10, image 2 of 3 Samsung RF28T5001SR Refrigerator Icemaker Assembly Replacement: step 10, image 3 of 3
    • Squeeze the icemaker cable connector and pull to disconnect it.

  11. Samsung RF28T5001SR Refrigerator Icemaker Assembly Replacement: step 11, image 1 of 1
    • Remove the icemaker assembly.

Conclusion

To reassemble your device, follow these instructions in reverse order.

Take your e-waste to an R2 or e-Stewards certified recycler.

Repair didn’t go as planned? Ask our Answers community for help.

Arthur Shi

Member since: 01/03/18

254,151 Reputation

529 Guides authored

Team

iFixit Member of iFixit

Staff

136 Members

17,299 Guides authored

0 Comments

Add Comment

View Statistics:

Past 24 Hours: 3

Past 7 Days: 16

Past 30 Days: 76

All Time: 691