
Reviseer de Nivona Caferomatica 770 aftapkraan

What you need

  1. Reviseer de Nivona Caferomatica 770 aftapkraan, Nivona Caferomatica 770 opening: step 1, image 1 of 1
    • Pull the power plug!

    • Remove all attachments such as water reservoir, coffee compartment lid, trestle drawer. Remove all coffee beans in the storage container.

    • Unscrew the five Torx T10 screws on the back.

  2. Reviseer de Nivona Caferomatica 770 aftapkraan: step 2, image 1 of 3 Reviseer de Nivona Caferomatica 770 aftapkraan: step 2, image 2 of 3 Reviseer de Nivona Caferomatica 770 aftapkraan: step 2, image 3 of 3
    • Unscrew the two Torx T10 screws on the front edge of the heat plate.

    • Do not remove the heat plate completely yet, its supply cables are still connected.

    • Lift the front edge of the heat plate and slide it forward a bit to clear the tabs on the back edge.

    • Put the heat plate back down, but in such a way that you can reach the screws underneath.

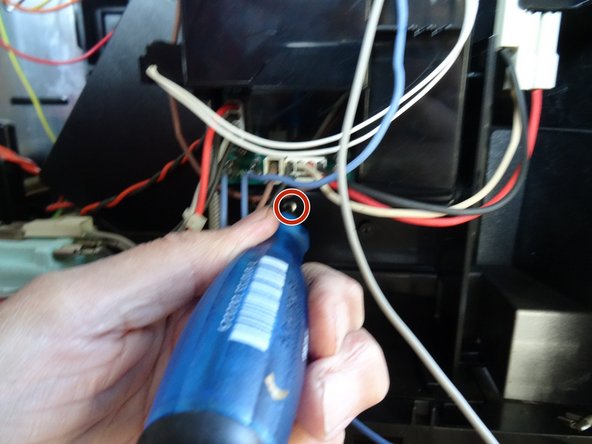
    • Unscrew the two Torx T10 screws located under the heat plate.

  3. Reviseer de Nivona Caferomatica 770 aftapkraan: step 3, image 1 of 3 Reviseer de Nivona Caferomatica 770 aftapkraan: step 3, image 2 of 3 Reviseer de Nivona Caferomatica 770 aftapkraan: step 3, image 3 of 3
    • Gently lift the upper side a bit and put it back down.

    • Push the side panel on the water tank back about 2 cm.

    • This may jam a bit.

    • Place the side panel next to the machine. Do not remove it completely yet, the cables of the switch are still connected.

    • Disconnect the flat plugs from the switch. Be sure to note the order of the cables for later reassembly.

    • Remove the side panel.

  4. Reviseer de Nivona Caferomatica 770 aftapkraan: step 4, image 1 of 1
    • Loosen the two insulated flat plugs with which the heat plate is connected.

    • Lift the top slightly upwards and loosen the nut that secures the eyelet to the green-yellow grounding cable. Remove the eyelet.

    • Do not remove the top yet, it is still connected with a sensor cable.

  5. Reviseer de Nivona Caferomatica 770 aftapkraan: step 5, image 1 of 2 Reviseer de Nivona Caferomatica 770 aftapkraan: step 5, image 2 of 2
    • Lift the top side slightly.

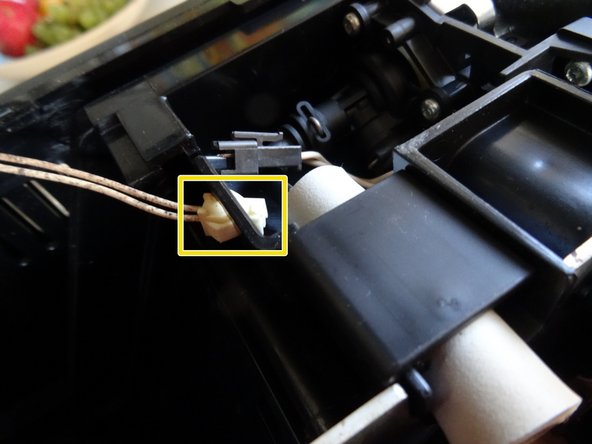
    • Press down the locking tab on the plug of the white sensor cable and pull off the black plug towards the front of the machine.

    • Press the two catches of the counterpart on the sides together and slide it out of the opening towards the back.

    • Now the top is free and you can remove it.

  6. Reviseer de Nivona Caferomatica 770 aftapkraan: step 6, image 1 of 1
    • Slide the side panel with the service door back about 2 cm and remove it.

    • This may jam a little.

  7. Reviseer de Nivona Caferomatica 770 aftapkraan, Drainage valve: step 7, image 1 of 3 Reviseer de Nivona Caferomatica 770 aftapkraan, Drainage valve: step 7, image 2 of 3 Reviseer de Nivona Caferomatica 770 aftapkraan, Drainage valve: step 7, image 3 of 3
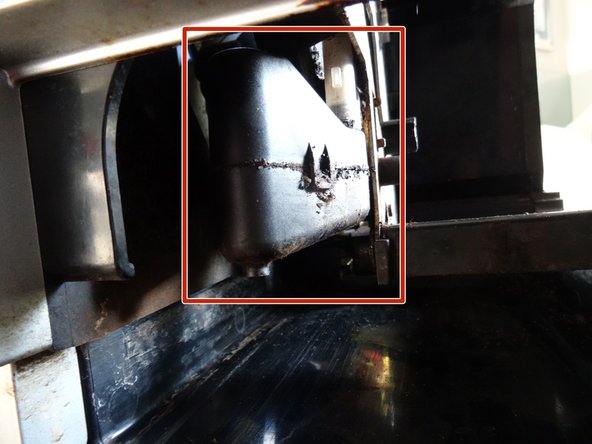
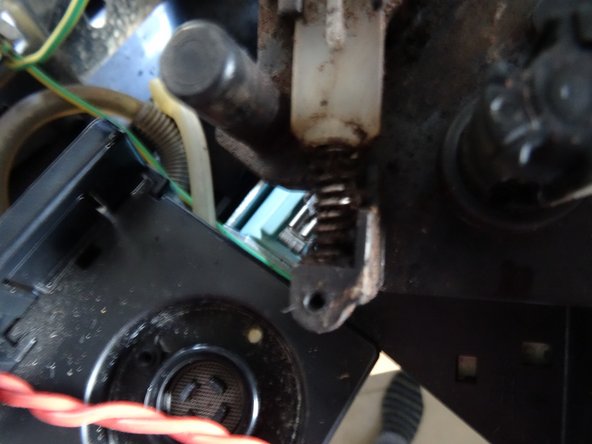
    • Reach into the machine from the front and rotate the expansion tank about 60 degrees to the right and pull downwards.

    • The expansion tank becomes dirty over time and can become clogged. Clean it up every now and then. It consists of two halves that can be easily separated.

  8. Reviseer de Nivona Caferomatica 770 aftapkraan: step 8, image 1 of 3 Reviseer de Nivona Caferomatica 770 aftapkraan: step 8, image 2 of 3 Reviseer de Nivona Caferomatica 770 aftapkraan: step 8, image 3 of 3
    • To access the drainage valve, the gear box must be removed to access the drainage valve. To do that, the way for the box must be cleared. First, the electronics must be loosened.

    • The electronics is attached at the top and bottom with a Torx T10 screw. Unscrew the two screws.

    • Pull out the electronics a few inches. Be careful not to strain the cables too much.

  9. Reviseer de Nivona Caferomatica 770 aftapkraan: step 9, image 1 of 2 Reviseer de Nivona Caferomatica 770 aftapkraan: step 9, image 2 of 2
    • Detach the pressure hose to the gear box.

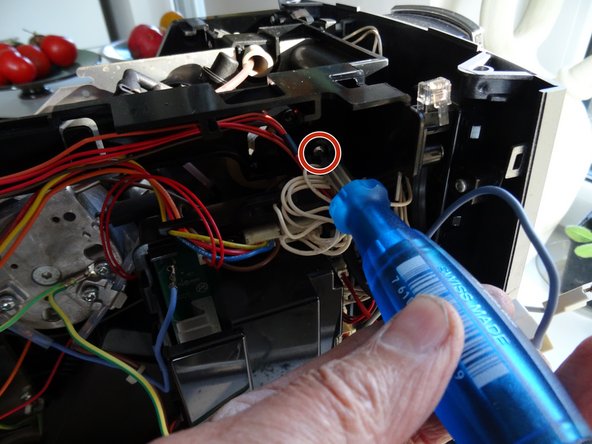
    • Using needle-nose tweezers, pull out the clip (marked in red) that secures the pressure hose to the exhaust valve (with the round black hat, marked in yellow).

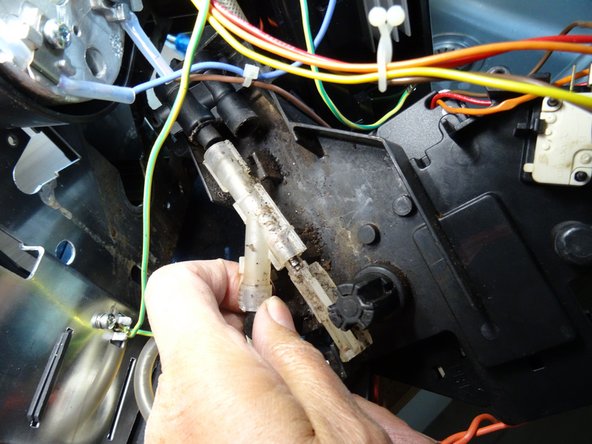
    • Pull out the pressure hose connector. Watch out for the O-ring, it will either get stuck in the port or in the valve. It should be replaced with a new one.

  10. Reviseer de Nivona Caferomatica 770 aftapkraan: step 10, image 1 of 2 Reviseer de Nivona Caferomatica 770 aftapkraan: step 10, image 2 of 2
    • Turn the coffee machine so that the metal partition is facing you. The gear box is secured with five Torx T10 screws that must be removed.

  11. Reviseer de Nivona Caferomatica 770 aftapkraan: step 11, image 1 of 3 Reviseer de Nivona Caferomatica 770 aftapkraan: step 11, image 2 of 3 Reviseer de Nivona Caferomatica 770 aftapkraan: step 11, image 3 of 3
    • The next steps are tedious. Work carefully and patiently. Make sure that no cables or hoses are getting caught on the box.

    • Push out the gearbox on the black plastic pin (marked green) or on the drive shaft (marked yellow) on the other side.

    • Pull out the box on the other side and set it aside. It will still be connected by cables and hoses, be patient.

    • After that the drainage valve becomes visible.

  12. Reviseer de Nivona Caferomatica 770 aftapkraan: step 12, image 1 of 2 Reviseer de Nivona Caferomatica 770 aftapkraan: step 12, image 2 of 2
    • Use a screwdriver to push back on and remove the spring at the bottom of the drain valve.

    • Lift out the white driver. Pay attention to the position, so he has to be used again later.

    • Pull the clip at the top of the valve and take out the pressure hose. Watch out for the O-ring, it gets stuck in the connection or in the valve and should be replaced with a new one.

    • Slide the white part of the drain valve down about 5mm.

    • Gently lift out the drainage valve.

  13. Reviseer de Nivona Caferomatica 770 aftapkraan, Drainage valve gaskets: step 13, image 1 of 1
    • There are different versions of this valve. The tappet can be different, the valve stem can only be a ball, one or two seals are used. However, all valves function in the same way.

    • Pull the cap of the grey upper valve body. Use pliers, if it is stuck.

    • There are two gaskets, the flat side pointing outwards.

    • Newer valves have only one gasket

    • Plunger and downholder

    • Piston and spring

    • Replace the gaskets and reassemble the valve.

Conclusion

Voer de stappen in omgekeerde volgorde uit om het apparaat weer in elkaar te zetten.

One other person completed this guide.

Special thanks to these translators:

de en

100%

These translators are helping us fix the world! Want to contribute?
Start translating ›

VauWeh

Member since: 10/19/15

202,869 Reputation

246 Guides authored

Team

Repair is War on Entropy Member of Repair is War on Entropy

Community

25 Members

1,111 Guides authored

0 Comments

Add Comment

View Statistics:

Past 24 Hours: 0

Past 7 Days: 11

Past 30 Days: 57

All Time: 1,032