Playstation 4 Hauptplatine tauschen

What you need

  1. Playstation 4 Hauptplatine tauschen, Obere Abdeckung der Festplatte entfernen: step 1, image 1 of 3 Playstation 4 Hauptplatine tauschen, Obere Abdeckung der Festplatte entfernen: step 1, image 2 of 3 Playstation 4 Hauptplatine tauschen, Obere Abdeckung der Festplatte entfernen: step 1, image 3 of 3
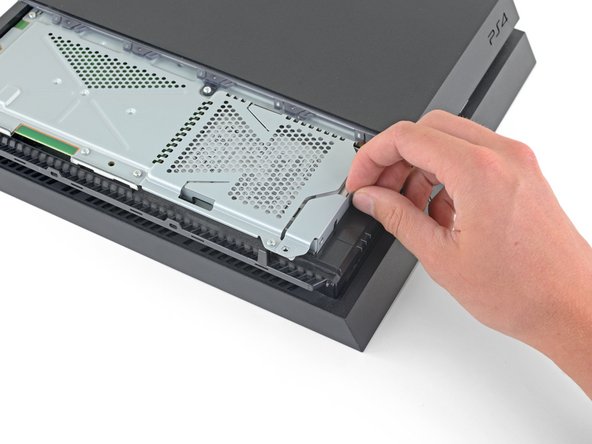
    • Fasse die PS4 mit beiden Händen am Spalt in der oberen Abdeckung an.

    • Drücke den glänzenden Teil des Deckels mit den Daumen zur Seite, bis er sich herauslöst.

    • Hebe den glänzenden Deckel hoch und entferne ihn von der PS4.

  2. Playstation 4 Hauptplatine tauschen, Schraube am Festplatteneinschub entfernen: step 2, image 1 of 2 Playstation 4 Hauptplatine tauschen, Schraube am Festplatteneinschub entfernen: step 2, image 2 of 2
    • Entferne die einzelne 6,5 mm Kreuzschlitzschraube, mit der der Festplatteneinschub am Gehäuse befestigt ist.

  3. Playstation 4 Hauptplatine tauschen, Festplatteneinschub entfernen: step 3, image 1 of 3 Playstation 4 Hauptplatine tauschen, Festplatteneinschub entfernen: step 3, image 2 of 3 Playstation 4 Hauptplatine tauschen, Festplatteneinschub entfernen: step 3, image 3 of 3
    • Ziehe den Festplatteneinschub aus dem Gehäuse heraus.

    • Sei vorsichtig und lasse die Festplatte nicht fallen. Die Bauteile im Inneren sind empfindlich und können bei einem Sturz kaputt gehen.

  4. Playstation 4 Hauptplatine tauschen, PS4 herumdrehen: step 4, image 1 of 1
    • Drehe die PS4 um, so dass der Boden oben liegt und die Rückseite zu dir zeigt.

  5. Playstation 4 Hauptplatine tauschen, Garantieaufkleber abziehen: step 5, image 1 of 3 Playstation 4 Hauptplatine tauschen, Garantieaufkleber abziehen: step 5, image 2 of 3 Playstation 4 Hauptplatine tauschen, Garantieaufkleber abziehen: step 5, image 3 of 3
    • Ziehe die beiden Aufkleber in der Mitte der Rückseite mit einer Pinzette ab, so dass die beiden Gehäuseschrauben sichtbar werden.

  6. Playstation 4 Hauptplatine tauschen, Schraubenabdeckungen aus Kunststoff entfernen: step 6, image 1 of 2 Playstation 4 Hauptplatine tauschen, Schraubenabdeckungen aus Kunststoff entfernen: step 6, image 2 of 2
    • Entferne behutsam mit einer Pinzette die Schraubenabdeckungen aus Kunststoff in jeder Ecke, so dass zwei weitere Schrauben sichtbar werden.

  7. Playstation 4 Hauptplatine tauschen, Gehäuseschrauben entfernen: step 7, image 1 of 2 Playstation 4 Hauptplatine tauschen, Gehäuseschrauben entfernen: step 7, image 2 of 2
    • Entferne die vier 7,2 mm Torx Sicherheitsschrauben von der Rückseite der PS4.

  8. Playstation 4 Hauptplatine tauschen, Gehäuseunterteil entfernen: step 8, image 1 of 2 Playstation 4 Hauptplatine tauschen, Gehäuseunterteil entfernen: step 8, image 2 of 2
    • Hebe das Gehäuseunterteil mit den Daumen hoch und entferne es von der PS4.

    • Das Gehäuseunterteil ist mit Rasten befestigt. Zum Ablösen musst du möglicherweise recht viel Kraft aufbringen.

  9. Playstation 4 Hauptplatine tauschen: step 9, image 1 of 2 Playstation 4 Hauptplatine tauschen: step 9, image 2 of 2
    • Ziehe das Versorgungskabel mit einer Pinzette gerade heraus und trenne das Netzteil von der Hauptplatine ab.

    • Wenn der Stecker festhängt, dann heble ihn behutsam mit einem Spudger heraus.

  10. Playstation 4 Hauptplatine tauschen, Netzteil entfernen: step 10, image 1 of 2 Playstation 4 Hauptplatine tauschen, Netzteil entfernen: step 10, image 2 of 2
    • Entferne drei 9,7 mm Torx Sicherheitsschrauben.

    • Entferne die beiden 41 mm Kreuzschlitzschrauben und Halterungen.

  11. Playstation 4 Hauptplatine tauschen: step 11, image 1 of 3 Playstation 4 Hauptplatine tauschen: step 11, image 2 of 3 Playstation 4 Hauptplatine tauschen: step 11, image 3 of 3
    • Hebe das Netzteil gerade nach oben aus der PS4 heraus.

    • An der linken Seite wird das Netzteil stark von Zinken festgehalten. Wahrscheinlich musst du es mehrfach probieren, bis es herauskommt.

    • Achte beim Zusammenbau darauf, dass die Zinken gut passen, drücke dann das Netzteil fest.

  12. Playstation 4 Hauptplatine tauschen, WLAN-Antenne entfernen: step 12, image 1 of 2 Playstation 4 Hauptplatine tauschen, WLAN-Antenne entfernen: step 12, image 2 of 2
    • Trenne das Kabel zur WLAN-Antenne mit der Spudgerspitze von der Hauptplatine ab.

  13. Playstation 4 Hauptplatine tauschen: step 13, image 1 of 3 Playstation 4 Hauptplatine tauschen: step 13, image 2 of 3 Playstation 4 Hauptplatine tauschen: step 13, image 3 of 3
    • Fasse das Antennenkabel mit dem Finger oder einer Pinzette und hole es aus den Kabelführungen heraus.

  14. Playstation 4 Hauptplatine tauschen: step 14, image 1 of 3 Playstation 4 Hauptplatine tauschen: step 14, image 2 of 3 Playstation 4 Hauptplatine tauschen: step 14, image 3 of 3
    • Hole das Antennenkabel mit dem Finger oder einer Pinzette unter dem Kabel zum optischen Laufwerk hervor.

  15. Playstation 4 Hauptplatine tauschen: step 15, image 1 of 2 Playstation 4 Hauptplatine tauschen: step 15, image 2 of 2
    • Entferne die 9,7 mm Torx Sicherheitsschraube, die die Antenne befestigt.

  16. Playstation 4 Hauptplatine tauschen: step 16, image 1 of 2 Playstation 4 Hauptplatine tauschen: step 16, image 2 of 2
    • Entferne die WLAN-Antenne.

  17. Playstation 4 Hauptplatine tauschen, Optisches Laufwerk abtrennen: step 17, image 1 of 3 Playstation 4 Hauptplatine tauschen, Optisches Laufwerk abtrennen: step 17, image 2 of 3 Playstation 4 Hauptplatine tauschen, Optisches Laufwerk abtrennen: step 17, image 3 of 3
    • Drücke den Metallhebel zum Ablösen des Flachbandkabels oben am optischen Laufwerks mit dem Fingernagel nach unten.

    • Ziehe mit den Fingern oder einer Pinzette an der schwarzen Lasche und löse das Flachbandkabel behutsam ab.

    • Beim Einschieben des Flachbandkabels muss der Metallhebel nicht gedrückt werden. Wenn es richtig drin ist, kannst du ein leichtes Klicken hören.

  18. Playstation 4 Hauptplatine tauschen: step 18, image 1 of 3 Playstation 4 Hauptplatine tauschen: step 18, image 2 of 3 Playstation 4 Hauptplatine tauschen: step 18, image 3 of 3
    • Drücke den Metallhebel zum Ablösen des Flachbandkabels an der Hauptplatine mit dem Fingernagel nach unten.

    • Ziehe mit den Fingern oder einer Pinzette an der schwarzen Lasche und löse das Flachbandkabel behutsam ab.

    • Lege das Flachbandkabel für den späteren Zusammenbau zur Seite.

    • Beim Einschieben des Flachbandkabels muss der Metallhebel nicht gedrückt werden. Wenn es richtig drin ist, kannst du ein leichtes Klicken hören.

  19. Playstation 4 Hauptplatine tauschen: step 19, image 1 of 2 Playstation 4 Hauptplatine tauschen: step 19, image 2 of 2
    • Trenne das Kabel zum optischen Laufwerk mit den Fingern oder einer Pinzette von der Hauptplatine ab.

  20. Playstation 4 Hauptplatine tauschen: step 20, image 1 of 3 Playstation 4 Hauptplatine tauschen: step 20, image 2 of 3 Playstation 4 Hauptplatine tauschen: step 20, image 3 of 3
    • Hole das Kabel zum optischen Laufwerk mit dem Finger oder einer Pinzette aus den Kabelführungen heraus.

  21. Playstation 4 Hauptplatine tauschen, Optisches Laufwerk entfernen: step 21, image 1 of 2 Playstation 4 Hauptplatine tauschen, Optisches Laufwerk entfernen: step 21, image 2 of 2
    • Entferne die vier Schrauben, mit denen das optische Laufwerk befestigt ist:

    • Drei 9,7 mm Torx Schrauben

    • Eine 6,2 mm Kreuzschlitzschraube

  22. Playstation 4 Hauptplatine tauschen: step 22, image 1 of 2 Playstation 4 Hauptplatine tauschen: step 22, image 2 of 2
    • Hebe das optische Laufwerk gerade aus der PS4 nach oben heraus.

  23. Playstation 4 Hauptplatine tauschen, Gehäuseoberteil entfernen: step 23, image 1 of 2 Playstation 4 Hauptplatine tauschen, Gehäuseoberteil entfernen: step 23, image 2 of 2
    • Entferne die beiden 9,7 mm Torx Schrauben, mit denen das Gehäuseoberteil befestigt ist.

  24. Playstation 4 Hauptplatine tauschen: step 24, image 1 of 3 Playstation 4 Hauptplatine tauschen: step 24, image 2 of 3 Playstation 4 Hauptplatine tauschen: step 24, image 3 of 3
    • Hebe das Gehäuseoberteil nach hinten hoch und entferne es von der PS4.

    • Das Gehäuseoberteil ist an der Vorderseite eingerastet. Möglicherweise musst du ziemlich viel Kraft aufbringen.

  25. Playstation 4 Hauptplatine tauschen, Obere EMI-Abschirmung entfernen: step 25, image 1 of 2 Playstation 4 Hauptplatine tauschen, Obere EMI-Abschirmung entfernen: step 25, image 2 of 2
    • Entferne die zwölf 9,7 mm Torx Schrauben, mit denen die obere EMI-Abschirmung befestigt ist.

  26. Playstation 4 Hauptplatine tauschen: step 26, image 1 of 3 Playstation 4 Hauptplatine tauschen: step 26, image 2 of 3 Playstation 4 Hauptplatine tauschen: step 26, image 3 of 3
    • In diesem Schritt siehst du, wie die Andruckplatte richtig entfernt wird.

    • Entferne die beiden 15,6 mm Kreuzschlitzschrauben.

    • Drehe jede Schraube abwechselnd eine halbe Umdrehung auf und löse allmählich die Andruckplatte.

    • Das Abwechseln der Schrauben ist wichtig, damit die Andruckplatte gleichmäßig belastet bleibt.

    • Drehe nicht zuerst die Schraube an einer Seite ganz heraus, ohne auch die andere zu lösen. Du könntest dadurch den Prozessor beschädigen.

  27. Playstation 4 Hauptplatine tauschen: step 27, image 1 of 1
    • Entferne die Andruckplatte.

  28. Playstation 4 Hauptplatine tauschen: step 28, image 1 of 2 Playstation 4 Hauptplatine tauschen: step 28, image 2 of 2
    • Entferne die obere EMI-Abschirmung.

  29. Playstation 4 Hauptplatine tauschen, Hauptplatine entfernen: step 29, image 1 of 2 Playstation 4 Hauptplatine tauschen, Hauptplatine entfernen: step 29, image 2 of 2
    • Setze das flache Ende des Spudgers zwischen dem Lüfterkabel und der Hauptplatine ein.

    • Verdrehe den Spudger, so dass sich der Stecker gerade nach oben hebt und von der Hauptplatine löst.

  30. Playstation 4 Hauptplatine tauschen: step 30, image 1 of 2 Playstation 4 Hauptplatine tauschen: step 30, image 2 of 2
    • Fasse die Hauptplatine an der Kante vorne an der PS4 an.

    • Hebe die Hauptplatine hoch, bis die USB-Anschlüsse aus dem Gehäuse der PS4 herauskommen.

  31. Playstation 4 Hauptplatine tauschen: step 31, image 1 of 3 Playstation 4 Hauptplatine tauschen: step 31, image 2 of 3 Playstation 4 Hauptplatine tauschen: step 31, image 3 of 3
    • Hebe die Hauptplatine aus der PS4 heraus.

    • Bevor du den Prozessor auf der Hauptplatine befestigst, musst du eine Schicht Wärmeleitpaste auftragen. Benutze dazu diese Anleitung.

    • Wenn die Wärmeleitpaste nicht richtig aufgetragen ist, kann die PS4 überhitzen.

    • Setze die I/O-Seite der Hauptplatine zuerst ein, lasse dann die andere Seite absinken.

Conclusion

Um dein Gerät wieder zusammenzubauen, folge diesen Schritten in umgekehrter Reihenfolge.

Entsorge deinen Elektromüll fachgerecht.

Hat die Reparatur nicht ganz geklappt? In unserem Forum findest du Hilfe bei der Fehlersuche.

Vergleiche dein Ersatzteil mit dem Originalteil. Möglicherweise musst du fehlende Bauteile übertragen oder Schutzfolien vom Neuteil abziehen, bevor du es wieder einbauen kannst.

195 other people completed this guide.

Special thanks to these translators:

en de

100%

These translators are helping us fix the world! Want to contribute?
Start translating ›

Sam Omiotek

Member since: 02/25/19

73,143 Reputation

288 Guides authored

17 Comments

Regarding the three wire plug in step 20 - is there a good way to repair this piece if, say, you pulled the wires out of the connector by accident? is there a place to get a replacement part?

Ryan Statz - Reply

I have tried to replace the hdmi port however being somewhat of an idiot I slipped and knocked off onto the little black squares just behind the port on the left hand side. Does anyone know what these are?

Geoff Parker - Reply

contacts of the motherboard

lillarrypimp1993 -

You may be talking about capacitors that are critically important for the unit to function.

South30 -

Add Comment

View Statistics:

Past 24 Hours: 45

Past 7 Days: 364

Past 30 Days: 1,409

All Time: 306,560