Introduction
If your phone won’t turn on or stay on, even after charging it, you may consider replacing the battery. This guide will show you how to remove the battery of the Nexus 6 in order to install a new one.
If your battery is swollen, take appropriate precautions.
What you need
-
-
With a SIM card eject tool (a paperclip will work as well), push down on the hole at the top of the phone until the SIM card holder releases. This should not take much pressure.
-
Remove the SIM card and the SIM card holder.
 Ask FixBot
-
-
Tool used on this step:iOpener$14.95
-
Lay out a soft cloth on your workspace to prevent scratching the screen in this and future steps.
-
Pry open the back casing using the soft plastic opening pick.
-
Carefully pull the back casing apart from the rest of the phone with your hands. Because the casing is glued to the rest of the phone, this step may require some force. Don't be alarmed if the casing flexes a bit.
-
-
-
Tool used on this step:Tweezers$4.99
-
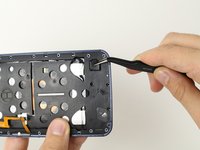
With tweezers, remove the rubber protector on the lower part of the phone.
-
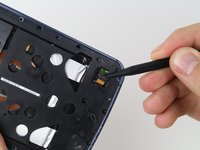
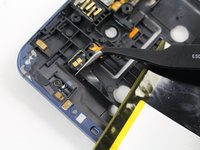
Disconnect the battery connector by gently prying it straight up with a spudger, on the side opposite the cable.
-
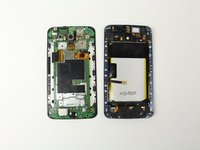
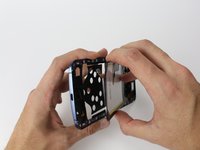
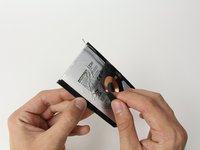
Completely separate the battery side from the motherboard side by gently pulling the sides apart with your hands.
-
-
Tool used on this step:Tweezers$4.99
-
With your hands, pull the battery away from the rest of the casing.
-
Using tweezers, unplug the battery connector. Pry up underneath the hard backing plate, taking care to not peel the cable off of the backing plate.
-
Measure the location of the charging coil on the old battery and transfer those measurements to the new battery. Carefully peel off the charging coil.
-
Transfer the charging coil to the new battery. For the four-wire connector on the other side, measure the location of the contacts/pins on the phone itself and transfer it to the backside of the battery.
-
-
-
Plug in the charging cable. If you get the charging symbols but cannot turn on the phone, ensure that the side buttons are connected. Peel up the rubber cover plug and push the connector into the receptacle.
-
If wireless charging is not working, ensure you're trying it with a phone that is fully booted and operational.
-
If wireless charging is still not working, take it all apart again and carefully transfer the location of the four pins on the phone side to the charging coil connector on the other side.
-
If the two sides are difficult to close and screw back together, bend the battery so that it is more or less curved - matching the previous battery. There shouldn't be any force necessary to keep the halves closed together.
-
If the glue on the back cover is weak, try warming the adhesive with a hair dryer before reinstalling. You can purchase replacement covers (with new adhesive) that are rather inexpensive.
-


To reassemble your device, follow these instructions in reverse order.
After completing this guide, calibrate your newly-installed battery.
Cancel: I did not complete this guide.
108 other people completed this guide.
Team

Cal Poly, Team 70-3, Forte Winter 2015 Member of Cal Poly, Team 70-3, Forte Winter 2015
CPSU-FORTE-W15S70G3
4 Members
32 Guides authored
43 Guide Comments
There's a *lot* of glued down parts. Don't force them apart. Use a hot-water bottle or similar to loosen the glue. Good luck!
Intriguing. I bought my nexus 6 thinking I would never be able to replace the battery, but this looks doable, albeit not without some risk of damaging the device.
Hi David, Im in the same process and what I found is a lot of glue on the back, rather than that is fairly easy. :)
My battery side board has been broken! It did not hurt to work properly, but you guys MUST be careful of taking it apart!
Also T3 screws are so weak, Unscrew carefully and use a good T3 screw drivers otherwise they will be stripped!