
Melitta Caffeo Solo microswitches in the gear drive replacement

What you need

  1. Melitta Caffeo Solo microswitches in the gear drive replacement, Open the Melitta Caffeo Solo: step 1, image 1 of 1
    • Pull out the power cord!

    • Remove the water tank and drainage tray.

    • Remove the side cover and remove the brewing unit.

    • Remove all coffee beans.

  2. Melitta Caffeo Solo microswitches in the gear drive replacement: step 2, image 1 of 1
    • Unscrew and remove six Torx T10 on the rear.

    • Lever the rear cover off. It will most likely be quite stuck and you will need to apply some force. You must use plastic lever tools to prevent damaging the cover.

  3. Melitta Caffeo Solo microswitches in the gear drive replacement: step 3, image 1 of 2 Melitta Caffeo Solo microswitches in the gear drive replacement: step 3, image 2 of 2
    • Press carefully into the slits on the sides using a minus screwdriver or a flat metal spatula, to release the clasps on the upper surface. These may be well tight and you have to use some force.

    • You should have created a separation between the upper surface and side panels. Now lever the upper covering away using a plastic tool. This may be quite stuck and you may apply some force.

  4. Melitta Caffeo Solo microswitches in the gear drive replacement: step 4, image 1 of 1
    • Place a plastic tool in the crack between front panel and left side panel and widen it. Then push the side panel to the back. The side panel will be quite stuck and you may apply some force to do this.

    • Remove the hose from the water tank to the pump.

    • Remove the side panel.

  5. Melitta Caffeo Solo microswitches in the gear drive replacement: step 5, image 1 of 1
    • Place a plastic tool into the crack between the front panel and the right side panel and widen it. Then push the side panel to the back. This may be quite stuck and you may need to apply some force.

    • Remove the side panel.

  6. Melitta Caffeo Solo microswitches in the gear drive replacement, Gear Drive: step 6, image 1 of 3 Melitta Caffeo Solo microswitches in the gear drive replacement, Gear Drive: step 6, image 2 of 3 Melitta Caffeo Solo microswitches in the gear drive replacement, Gear Drive: step 6, image 3 of 3
    • Rotate clockwise the expansion box about 60 degrees and pull it out.

    • The expansion box is frequently filled with coffee oils or grounds. Clean it from time to time. It can easily be separated into two halves.

  7. Melitta Caffeo Solo microswitches in the gear drive replacement: step 7, image 1 of 1
    • The drainage valve is directly plugged to the gear drive. The drive is fixed with five Torx T10 screws on the center panel behind the brew group.

    • Remove the five Torx T10 screws holding the gear drive in place.

  8. Melitta Caffeo Solo microswitches in the gear drive replacement: step 8, image 1 of 2 Melitta Caffeo Solo microswitches in the gear drive replacement: step 8, image 2 of 2
    • Push the gear drive outwards to the left. Pay attention, several cables might get caught.

    • Lay the gear drive on its side. Loosen the upper water connector by pulling the clamp and than sliding off the hose. Mind the O-ring on the end of the hose, replace it if necessary.

  9. Melitta Caffeo Solo microswitches in the gear drive replacement, Microswitches in the gear drive: step 9, image 1 of 3 Melitta Caffeo Solo microswitches in the gear drive replacement, Microswitches in the gear drive: step 9, image 2 of 3 Melitta Caffeo Solo microswitches in the gear drive replacement, Microswitches in the gear drive: step 9, image 3 of 3
    • Open the cover over the drive. It is held by latches.
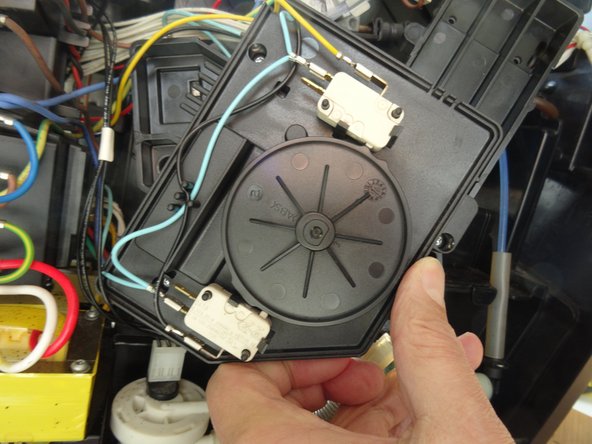
    • Remove the cover.

    • The two microswitches are exposed.

  10. Melitta Caffeo Solo microswitches in the gear drive replacement: step 10, image 1 of 2 Melitta Caffeo Solo microswitches in the gear drive replacement: step 10, image 2 of 2
    • The microswitches are held by detents. Release the catches.

    • Remove the microswitches.

    • Note how the cables are connected, disconnect the flat plugs and replace the switches.

Conclusion

Follow the the steps in reverse order to reassemble your device.

2 other people completed this guide.

Special thanks to these translators:

de en

100%

These translators are helping us fix the world! Want to contribute?
Start translating ›

VauWeh

Member since: 10/19/15

202,869 Reputation

246 Guides authored

Team

Repair is War on Entropy Member of Repair is War on Entropy

Community

25 Members

1,110 Guides authored

0 Comments

Add Comment

View Statistics:

Past 24 Hours: 9

Past 7 Days: 49

Past 30 Days: 148

All Time: 8,321