
MacBook Pro 15" Touch Bar Late 2016 Screen Replacement

What you need

  1. MacBook Pro 15" Touch Bar Late 2016 Screen Replacement, Disable Auto Boot: step 1, image 1 of 3 MacBook Pro 15" Touch Bar Late 2016 Screen Replacement, Disable Auto Boot: step 1, image 2 of 3 MacBook Pro 15" Touch Bar Late 2016 Screen Replacement, Disable Auto Boot: step 1, image 3 of 3
    • Before starting this procedure, you must disable your Mac's Auto Boot feature. Auto Boot powers on your Mac when you open the lid, and may be accidentally triggered during disassembly. Use this guide or follow the abbreviated instructions below to disable Auto Boot. This command may not work on all Macs.

    • Power on your Mac and launch Terminal.

    • Copy and paste the following command (or type it exactly) into Terminal:

    • sudo nvram AutoBoot=%00

    • Press [return]. If prompted, enter your administrator password and press [return] again. Note: Your return key may also be labeled ⏎ or "enter."

    • You can now safely power down your Mac and open the bottom case, without it accidentally powering on.

    • When your repair is complete and your Mac is successfully reassembled, re-enable Auto Boot with the following command:

    • sudo nvram AutoBoot=%03

  2. MacBook Pro 15" Touch Bar Late 2016 Screen Replacement, Lower Case: step 2, image 1 of 1
    Tool used on this step:
    Magnetic Project Mat
    $19.95
    Buy
    • Completely power off and unplug your MacBook Pro before you begin.

    • Close the display and flip the entire laptop upside-down.

    • Use a P5 Pentalobe driver to remove six screws securing the lower case, of the following lengths:

    • Four 4.7 mm screws

    • Two 6.6 mm screws

    • Note the orientation of the screws as you remove them—they need to be reinstalled at a slight angle.

    • Throughout this repair, keep track of each screw and make sure it goes back exactly where it came from to avoid damaging your device.

  3. MacBook Pro 15" Touch Bar Late 2016 Screen Replacement: step 3, image 1 of 2 MacBook Pro 15" Touch Bar Late 2016 Screen Replacement: step 3, image 2 of 2
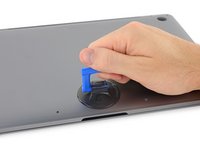
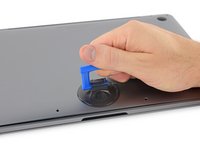
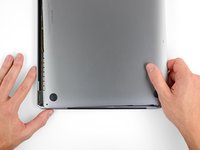
    • Press a suction handle into place near the front edge of the lower case, between the screw holes.

    • Lift up on the suction handle just enough to open a small gap under the lower case.

  4. MacBook Pro 15" Touch Bar Late 2016 Screen Replacement: step 4, image 1 of 3 MacBook Pro 15" Touch Bar Late 2016 Screen Replacement: step 4, image 2 of 3 MacBook Pro 15" Touch Bar Late 2016 Screen Replacement: step 4, image 3 of 3
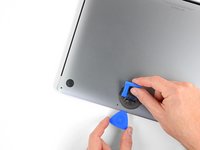
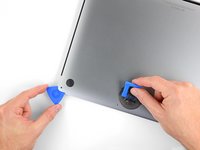
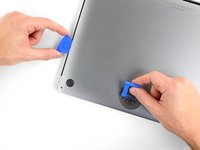
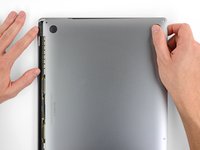
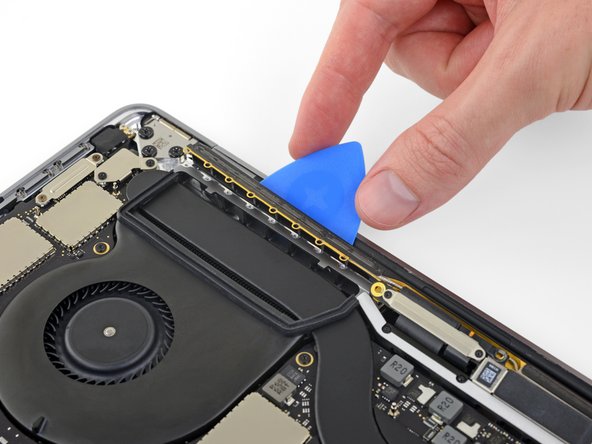
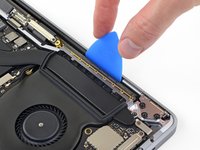
    • Slide the corner of an opening pick into the gap you just created underneath the lower case.

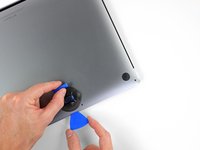
    • Slide the opening pick around the nearest corner and then halfway up the side of the MacBook Pro.

    • This releases the first of the hidden clips securing the lower case. You should feel and hear the clip pop free.

  5. MacBook Pro 15" Touch Bar Late 2016 Screen Replacement: step 5, image 1 of 3 MacBook Pro 15" Touch Bar Late 2016 Screen Replacement: step 5, image 2 of 3 MacBook Pro 15" Touch Bar Late 2016 Screen Replacement: step 5, image 3 of 3
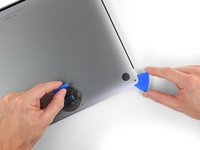
    • Repeat the previous step on the opposite side, using your opening pick to release the second clip.

  6. MacBook Pro 15" Touch Bar Late 2016 Screen Replacement: step 6, image 1 of 1
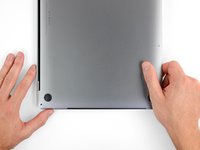
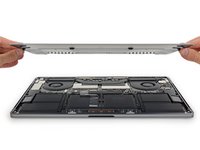
    • Lift the front edge of the lower case (the side opposite the display hinge) just enough to slide your fingertips underneath and get a good grip on it.

    • Two additional hidden clips near the middle of the cover may pop free at this point, if they haven't already.

    • Don't lift very far and don't try to remove the lower case yet.

  7. MacBook Pro 15" Touch Bar Late 2016 Screen Replacement: step 7, image 1 of 3 MacBook Pro 15" Touch Bar Late 2016 Screen Replacement: step 7, image 2 of 3 MacBook Pro 15" Touch Bar Late 2016 Screen Replacement: step 7, image 3 of 3
    • Pull the lower case firmly towards the front of the MacBook (away from the hinge area) to separate the last of the clips securing the lower case.

    • Pull first at one corner, then the other.

    • Pull to the side—not up.

    • This may require a lot of force.

  8. MacBook Pro 15" Touch Bar Late 2016 Screen Replacement: step 8, image 1 of 2 MacBook Pro 15" Touch Bar Late 2016 Screen Replacement: step 8, image 2 of 2
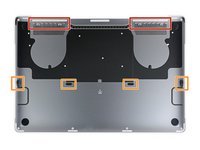
    • Remove the lower case.

    • To reinstall the lower case:

    • Set it in place and align the sliding clips near the display hinge. Press down and slide the cover toward the hinge. It should stop sliding as the clips engage.

    • When the sliding clips are fully engaged and the lower case looks correctly aligned, press down firmly on the lower case to engage the four hidden clips. You should feel and hear them click into place.

  9. MacBook Pro 15" Touch Bar Late 2016 Screen Replacement, Battery Connector: step 9, image 1 of 2 MacBook Pro 15" Touch Bar Late 2016 Screen Replacement, Battery Connector: step 9, image 2 of 2
    • Peel up and remove the large rectangular battery board cover, on the edge of the logic board nearest the battery.

    • If the cover doesn't peel up easily, apply mild heat with an iOpener, hair dryer, or heat gun to soften the adhesive underneath, and try again.

    • If the cover doesn't seat securely during reassembly, try rotating it 180 degrees. It must be oriented correctly in order for the adhesive pads underneath to contact the board screws.

  10. MacBook Pro 15" Touch Bar Late 2016 Screen Replacement: step 10, image 1 of 2 MacBook Pro 15" Touch Bar Late 2016 Screen Replacement: step 10, image 2 of 2
    • Peel back the tape covering the battery board data cable connector.

    • The tape may not detach completely; just peel it back enough to access the connector.

  11. MacBook Pro 15" Touch Bar Late 2016 Screen Replacement: step 11, image 1 of 3 MacBook Pro 15" Touch Bar Late 2016 Screen Replacement: step 11, image 2 of 3 MacBook Pro 15" Touch Bar Late 2016 Screen Replacement: step 11, image 3 of 3
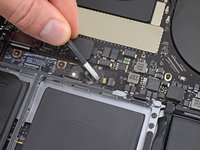
    • Use a spudger to gently pry up the locking flap on the ZIF connector for the battery board data cable.

  12. MacBook Pro 15" Touch Bar Late 2016 Screen Replacement: step 12, image 1 of 2 MacBook Pro 15" Touch Bar Late 2016 Screen Replacement: step 12, image 2 of 2
    • Disconnect the battery board data cable by sliding it out from its socket.

    • Slide parallel to the logic board, in the direction of the cable.

  13. MacBook Pro 15" Touch Bar Late 2016 Screen Replacement: step 13, image 1 of 2 MacBook Pro 15" Touch Bar Late 2016 Screen Replacement: step 13, image 2 of 2
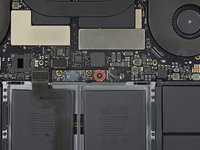
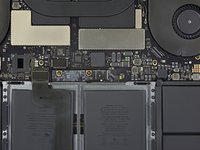
    • Use a T5 Torx driver to remove the 3.7 mm pancake screw securing the battery power connector.

  14. MacBook Pro 15" Touch Bar Late 2016 Screen Replacement: step 14, image 1 of 2 MacBook Pro 15" Touch Bar Late 2016 Screen Replacement: step 14, image 2 of 2
    • Use a spudger to gently lift the battery power connector, disconnecting the battery.

    • Lift the connector high enough to keep it separated from its socket while you work. If it accidentally makes contact, it could damage your MacBook Pro.

  15. MacBook Pro 15" Touch Bar Late 2016 Screen Replacement, Screen: step 15, image 1 of 3 MacBook Pro 15" Touch Bar Late 2016 Screen Replacement, Screen: step 15, image 2 of 3 MacBook Pro 15" Touch Bar Late 2016 Screen Replacement, Screen: step 15, image 3 of 3
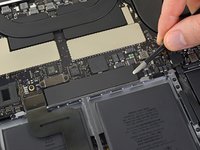
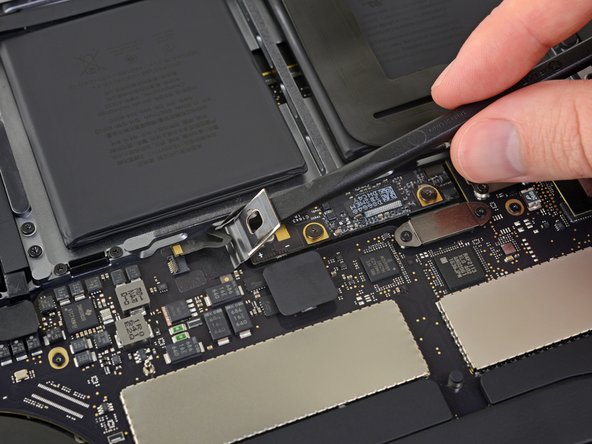
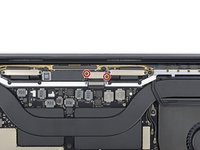
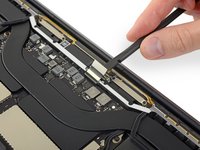
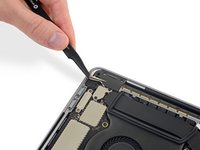
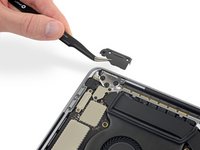
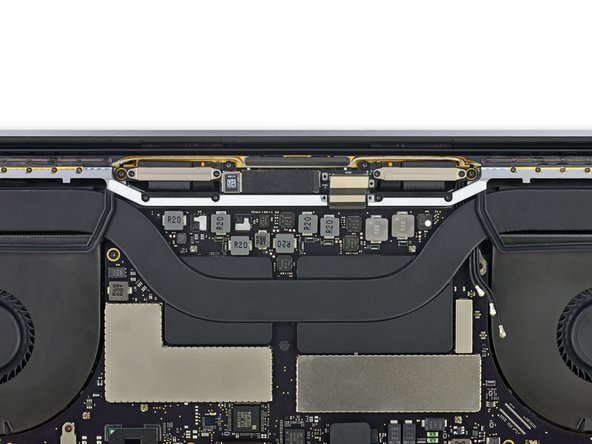
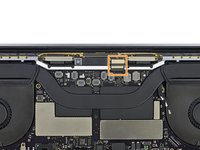
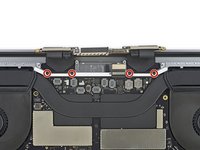
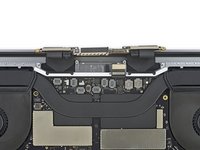
    • Use a T3 Torx driver to remove the two 3.5 mm screws securing the cover on the display board flex cable.

    • Remove the display board flex cable cover.

  16. MacBook Pro 15" Touch Bar Late 2016 Screen Replacement: step 16, image 1 of 3 MacBook Pro 15" Touch Bar Late 2016 Screen Replacement: step 16, image 2 of 3 MacBook Pro 15" Touch Bar Late 2016 Screen Replacement: step 16, image 3 of 3
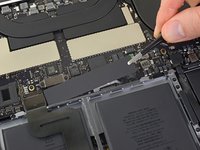
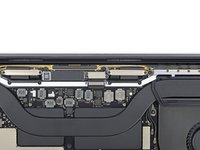
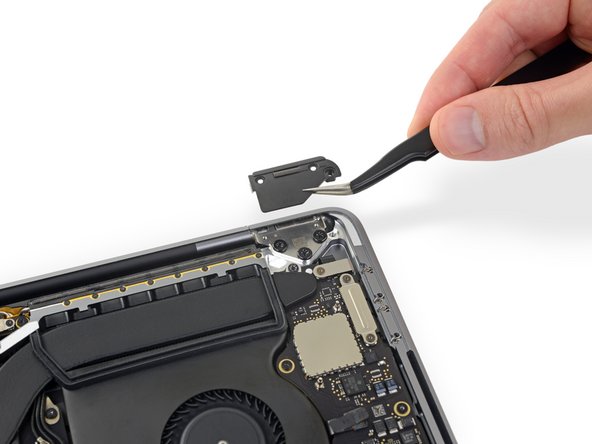
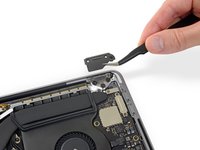
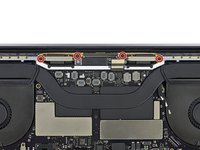
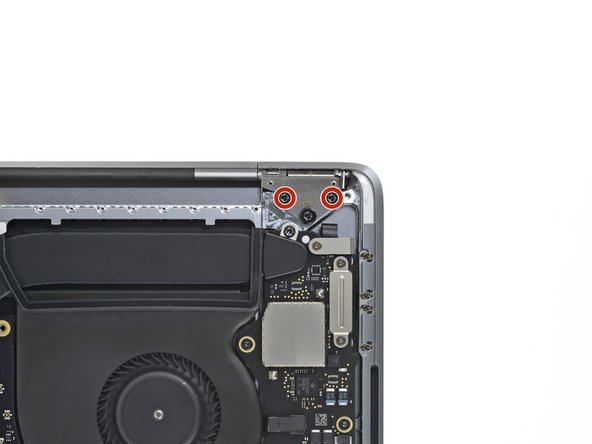
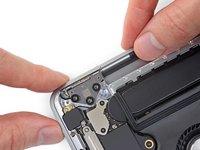
    • Use a T3 Torx driver to remove the two 1.7 mm screws securing the bracket for the display board cable connector.

    • Remove the bracket from the display board cable connector.

  17. MacBook Pro 15" Touch Bar Late 2016 Screen Replacement: step 17, image 1 of 2 MacBook Pro 15" Touch Bar Late 2016 Screen Replacement: step 17, image 2 of 2
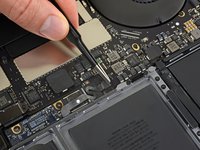
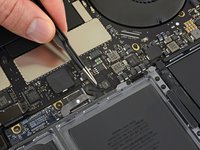
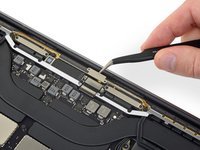
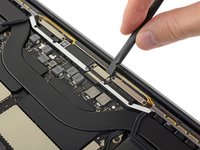
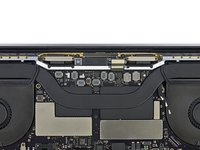
    • Pry straight up with your spudger to disconnect the display board flex cable.

  18. MacBook Pro 15" Touch Bar Late 2016 Screen Replacement: step 18, image 1 of 2 MacBook Pro 15" Touch Bar Late 2016 Screen Replacement: step 18, image 2 of 2
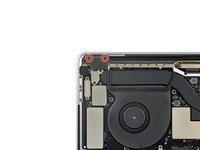
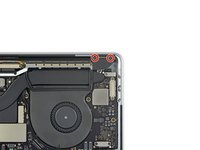
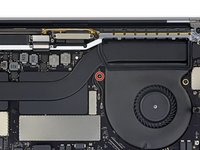
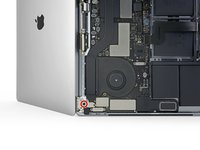
    • Use a T3 Torx driver to remove the two 2.0 mm screws securing each hinge cover (four screws total).

  19. MacBook Pro 15" Touch Bar Late 2016 Screen Replacement: step 19, image 1 of 3 MacBook Pro 15" Touch Bar Late 2016 Screen Replacement: step 19, image 2 of 3 MacBook Pro 15" Touch Bar Late 2016 Screen Replacement: step 19, image 3 of 3
    • Remove both hinge covers.

  20. MacBook Pro 15" Touch Bar Late 2016 Screen Replacement: step 20, image 1 of 2 MacBook Pro 15" Touch Bar Late 2016 Screen Replacement: step 20, image 2 of 2
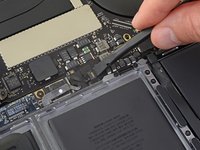
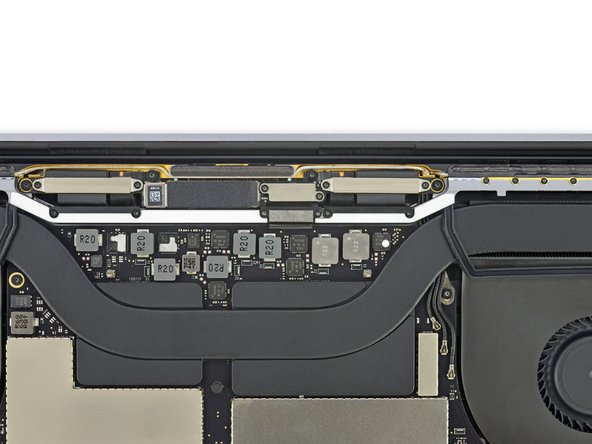
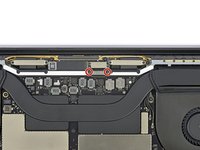
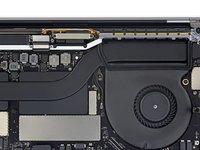
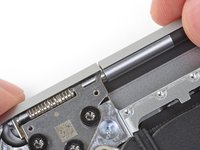
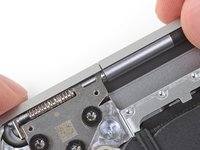
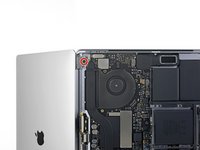
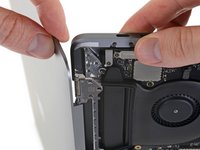
    • Use a T5 Torx driver to remove the single 2.9 mm screw securing the antenna cable bundle.

  21. MacBook Pro 15" Touch Bar Late 2016 Screen Replacement: step 21, image 1 of 3 MacBook Pro 15" Touch Bar Late 2016 Screen Replacement: step 21, image 2 of 3 MacBook Pro 15" Touch Bar Late 2016 Screen Replacement: step 21, image 3 of 3
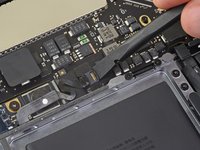
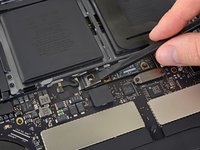
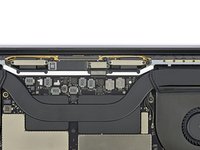
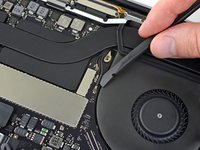
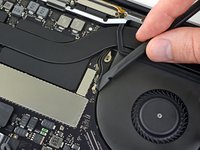
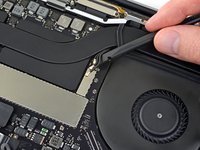
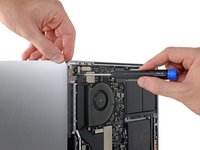
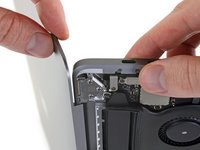
    • Disconnect all three antenna cables by prying each one straight up from its socket.

    • Slide your tweezers or the flat end of your spudger underneath each cable until it's near the socket, and then gently twist or pry up to disconnect it.

    • To reconnect each cable, align the connector directly over its socket, and then press down so it snaps into place.

  22. MacBook Pro 15" Touch Bar Late 2016 Screen Replacement: step 22, image 1 of 3 MacBook Pro 15" Touch Bar Late 2016 Screen Replacement: step 22, image 2 of 3 MacBook Pro 15" Touch Bar Late 2016 Screen Replacement: step 22, image 3 of 3
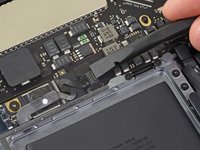
    • Use a T5 Torx driver to remove the four 3.3 mm screws securing the display board.

    • Before reinstalling these screws:

    • Make sure the display board flex cable lies on top of the board, not trapped underneath.

  23. MacBook Pro 15" Touch Bar Late 2016 Screen Replacement: step 23, image 1 of 2 MacBook Pro 15" Touch Bar Late 2016 Screen Replacement: step 23, image 2 of 2
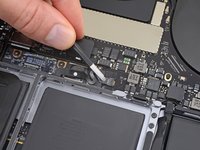
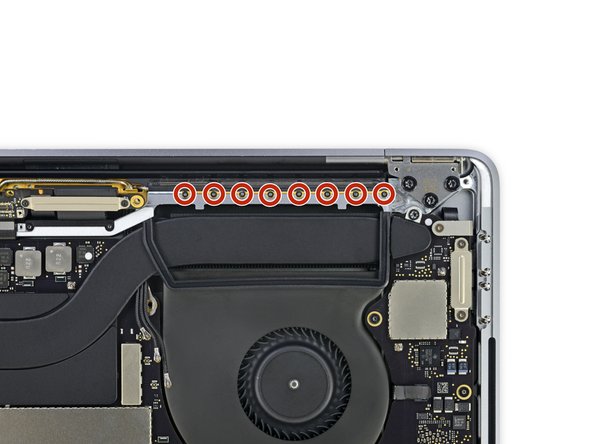
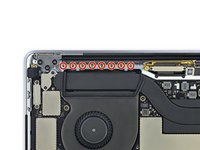
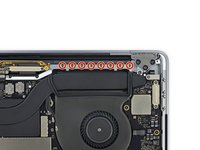
    • Use a P2 Pentalobe driver to remove the sixteen 1.5 mm screws securing the antenna assembly.

  24. MacBook Pro 15" Touch Bar Late 2016 Screen Replacement: step 24, image 1 of 3 MacBook Pro 15" Touch Bar Late 2016 Screen Replacement: step 24, image 2 of 3 MacBook Pro 15" Touch Bar Late 2016 Screen Replacement: step 24, image 3 of 3
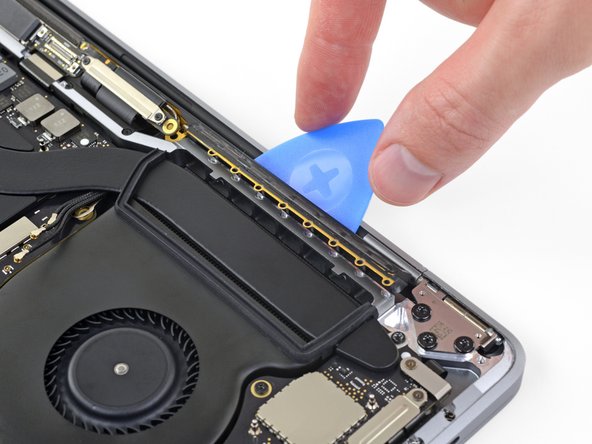
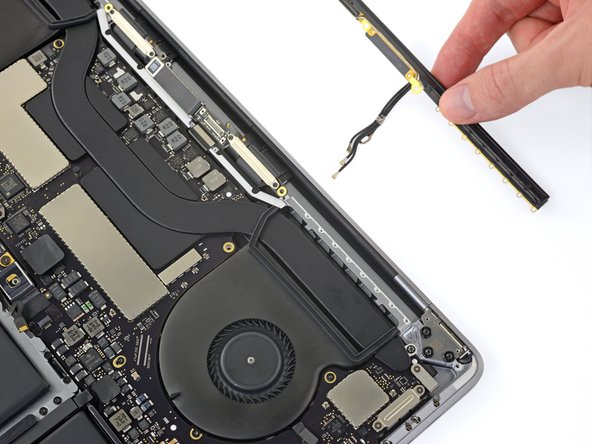
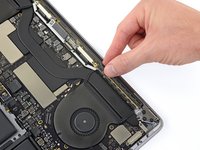
    • Use an opening pick to pry up the antenna assembly and separate it from the MacBook Pro.

    • Watch out for the delicate ribbon cables in the middle section. Avoid sliding the pick from side to side so as not to damage the cables.

  25. MacBook Pro 15" Touch Bar Late 2016 Screen Replacement: step 25, image 1 of 3 MacBook Pro 15" Touch Bar Late 2016 Screen Replacement: step 25, image 2 of 3 MacBook Pro 15" Touch Bar Late 2016 Screen Replacement: step 25, image 3 of 3
    • Carefully remove the antenna assembly, while simultaneously feeding the antenna cable bundle out from underneath the heat sink.

    • During reassembly, gently pinch the cable bundle together and guide it under the heat pipe into the correct position on the board. If needed, use your tools to help guide it through, but don't force it.

  26. MacBook Pro 15" Touch Bar Late 2016 Screen Replacement: step 26, image 1 of 2 MacBook Pro 15" Touch Bar Late 2016 Screen Replacement: step 26, image 2 of 2
    • Use a T3 Torx driver to remove the four 3.9 mm screws securing the display cable cover springs.

  27. MacBook Pro 15" Touch Bar Late 2016 Screen Replacement: step 27, image 1 of 2 MacBook Pro 15" Touch Bar Late 2016 Screen Replacement: step 27, image 2 of 2
    • Use a T8 Torx driver to remove two 4.9 mm screws from each hinge (four screws total).

    • Each hinge has a third screw, which you should leave in place for now.

  28. MacBook Pro 15" Touch Bar Late 2016 Screen Replacement: step 28, image 1 of 3 MacBook Pro 15" Touch Bar Late 2016 Screen Replacement: step 28, image 2 of 3 MacBook Pro 15" Touch Bar Late 2016 Screen Replacement: step 28, image 3 of 3
    • During reassembly, first install the hinge screws without tightening them. Then adjust the screen until it is correctly centered and aligned on each side. Finally, tighten the screws.

    • If your screen clicks or snaps upon opening, loosen the hinge screws and adjust the alignment. Make sure the screen doesn't sit too far forward, or it can catch on the body when opening and closing.

    • If desired, add a little blue threadlocker to the screw threads to prevent them from loosening over time.

  29. MacBook Pro 15" Touch Bar Late 2016 Screen Replacement: step 29, image 1 of 2 MacBook Pro 15" Touch Bar Late 2016 Screen Replacement: step 29, image 2 of 2
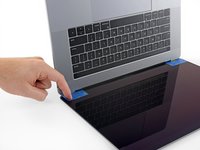
    • If you plan to re-use your screen, open it and apply a piece of tape to the glass directly above each hinge. This helps protect the glass from getting scratched in the following step.

    • Fully open the screen and stand your MacBook Pro up on one side.

  30. MacBook Pro 15" Touch Bar Late 2016 Screen Replacement: step 30, image 1 of 3 MacBook Pro 15" Touch Bar Late 2016 Screen Replacement: step 30, image 2 of 3 MacBook Pro 15" Touch Bar Late 2016 Screen Replacement: step 30, image 3 of 3
    • Use a T8 Torx driver to remove the two remaining 4.9 mm hinge screws (one from each hinge).

    • Remove the topmost screw last, using one hand to steady both halves of the MacBook Pro to make sure they don't separate and fall over unexpectedly.

  31. MacBook Pro 15" Touch Bar Late 2016 Screen Replacement: step 31, image 1 of 3 MacBook Pro 15" Touch Bar Late 2016 Screen Replacement: step 31, image 2 of 3 MacBook Pro 15" Touch Bar Late 2016 Screen Replacement: step 31, image 3 of 3
    • Keep a firm grip on both the screen and main body of the MacBook Pro. Either half can fall unexpectedly during this step.

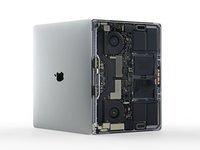
    • Push both halves of the MacBook Pro together so that the hinges can be lifted clear of their recesses in the chassis.

    • Push the main body of the MacBook Pro away from you while pulling the screen toward you to separate it.

  32. MacBook Pro 15" Touch Bar Late 2016 Screen Replacement: step 32, image 1 of 1
    • Remove the screen.

Conclusion

Compare your new replacement part to the original part—you may need to transfer remaining components or remove adhesive backings from the new part before installing.

To reassemble your device, follow the above steps in reverse order.

Take your e-waste to an R2 or e-Stewards certified recycler.

Repair didn’t go as planned? Check out our Answers community for troubleshooting help.

44 other people completed this guide.

Jeff Suovanen

Member since: 08/06/13

426,545 Reputation

259 Guides authored

Team

iFixit Member of iFixit

Staff

135 Members

16,475 Guides authored

18 Comments

Many thanks for this excellent guide, Jeff.

I completed this two months ago and it went very well - fitted a new screen to replace a smashed one and it worked perfectly… until this week. Now I need some advice please!

The new screen has developed strange ghosting and freezing and vertical lines. It started gradually and has become unusable now. I know the installation was good because it worked. I’ve checked the connections and ribbon cables - all is well, undamaged and correctly-routed. The video chip & logic board seem good because an exrternal monitor displays fine and allows me to carry on working even when the MacBook screen is frozen.

Anyone ever come across this before? I suspect it’s a faulty screen, but the sypmtoms are strange so before sending it back and finding the replacement does the same thing, I want to explore any avenues I may have missed.

Many thanks,

Mousematt

Mousematt - Reply

Ouch! Your troubleshooting steps sound right to me—bad display would be my guess as well. Best of luck getting it sorted out!

Jeff Suovanen -

Thanks for sharing. Emus4u app is the best app, I love this app. Emus4u easy to download all game chats app and emulators apps. This app has advantages to download the free cost of app and quality and quantity apps. Emus4u apps design for PC, ISO devices, and Android. All the apps including the paid ones that you see in the official app stores are available for free using Emus4u. There is a lot to explore in the app store. I really enjoy this app Click more information

Emus4u

jinn dev - Reply

Great Guide! Thanks!!!

tyamashita - Reply

I completed the replacement by following this amazing guide about two months ago. The new display has been working great since then. However, last week I realised that my keyboard doesn’t have backlight anymore! Trying to adjust the backlight brightness gives the icon that there is no backlight.

Is there any possibility I disconnected something relating to the keyboard backlight during this display replacement?

Thanks!

Arne - Reply

Add Comment

View Statistics:

Past 24 Hours: 20

Past 7 Days: 187

Past 30 Days: 852

All Time: 76,332