What you need
-
-
-
Remove the 5 skatepads carefully using a scalpel and tweezers or small pliers. Do not throw them away if you do not have a replacement at hand.
-
Do not throw away the skatepads, it is very difficult to find new ones.
-
Remove the 5 screws using a Phillips screwdriver (Size PH1).
-
-
-
Open the device as shown in the image without force.
-
You can remove the flex cable after carefully lifting the brown plastic part using finger nail or a small srew driver.
-
To remove the mouse wheel, the marked screw has to be removed using a PH1 screwdriver.
-
-
-
-
The assembly consists after the removal of the screw (left) of a plastic part laying on the PCB and the main assembly.
-
Furthermore, a small spring belongs to the assembly, which may be secured till reassembly by using a magnet.
-
-
-
The battery case lays loosely in top of the base assembly and is connected to the main PCB using a small connector.
-
-
-
The case for the transmitter isn't secured by any screw and can be removed by lifting it out of the mouse with very little force.
-
To remove the PCB board, unscrew the two screws using a PH00 bit.
-
-
-
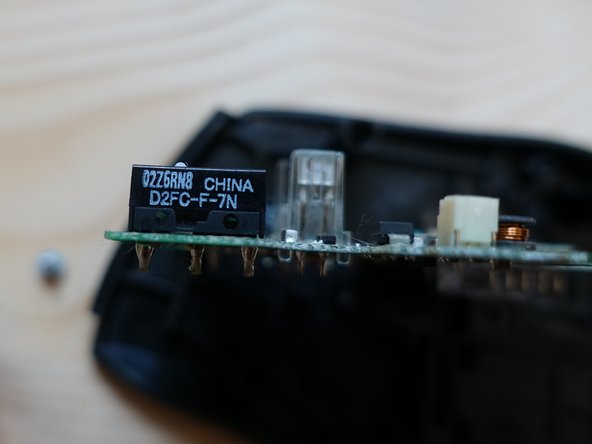
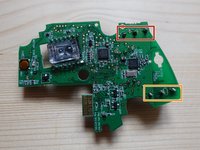
Backside of the PCB. The markings illustrate the positions of the mouse buttons (type D2FC-F-7N).
-
Contacts for the right mouse button. Desolder if neccessary.
-
Contacts for the left mouse button. Desolder if neccessary.
-
-
-
Follow the previous steps in reverse for reassembly.
-
The mouse wheel assembly has a small metal pin in the front. This pin has to fit inside the hole in the loos plastic part.
-
It is recommended to combine the assembly and the plastic part before reinserting them to their final spot. Furthermore, the battery box shoud be assembled thereafter to simplify the process.
-
Check the functionality of the mouse before reapplying the skate pads.
-

 Ask FixBot



Cancel: I did not complete this guide.
One other person completed this guide.
Special thanks to these translators:
100%


These translators are helping us fix the world! Want to contribute?
Start translating ›

