Introduction
Use this guide to replace the battery in your Logitech MX Master 3 mouse.
Lithium-ion batteries have a limited lifespan. If your mouse dies quickly, it may be time to replace the battery.
If possible, follow this guide after your battery has fallen below 25% charge. While your MX Master 3 has a relatively small battery, any charged battery is a potential safety hazard if accidentally bent or punctured.
What you need
-
-
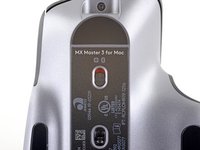
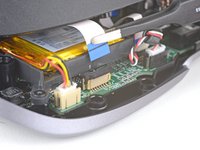
Flip the mouse's power switch into the OFF position, unplug any cables, and flip it over so the feet are facing up.
-
Heat an iOpener and apply it to each of the mouse feet for about one minute each.
 Ask FixBot
-
-
-
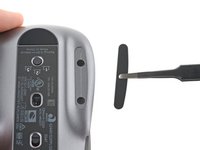
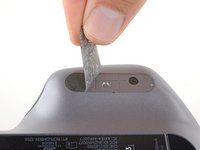
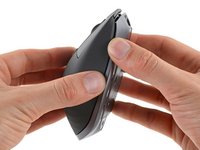
Slide an opening pick under an edge of the left mouse foot.
-
Slide your pick under the foot to separate its adhesive until you can grab it with your fingers.
-
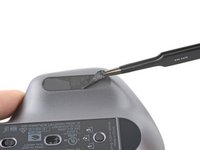
Peel up and remove the left mouse foot.
-
-
-
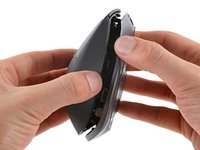
Repeat the previous two steps to remove the right and the rear mouse feet.
-
-
Tool used on this step:Tweezers$4.99
-
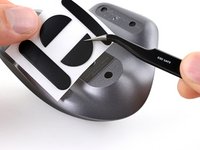
Slide the flat end of a spudger under an edge of the adhesive. If the adhesive seems stuck, you may need to heat the adhesive further.
-
Use a pair of tweezers or a spudger to remove any large chunks of leftover adhesive.
-
Thoroughly clean the bottom of the mouse with isopropyl alcohol and a lint-free of microfiber cloth. Allow the surface to dry completely.
-
Peel your new mouse feet away from their adhesive liners and press them firmly into place.
-
-
-
Use a Phillips screwdriver to remove the five 4.3 mm-long screws securing the lower half of the lower case.
-
Use a T5 Torx driver to remove the one 4.2 mm‑long screw securing the upper half of the lower case.
-
-
-
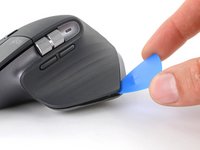
Insert your opening pick into the seam between the thumb rest and the lower case.
-
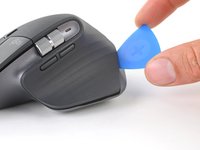
Slide your pick right, towards the rear of the upper shell and pry upward to release the left clips.
-
-
-
-
Gently pry the upper shell and lower case apart to release the clips on the right side of the mouse.
-
-
-
Lay your mouse down onto your work surface, making sure none of the clips re-engage.
-
Grasp the upper shell and partially lift up the right edge.
-
Pull the upper shell up and back to release the final clip and separate the upper shell from the lower case.
-
-
-
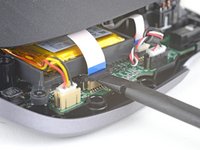
Use the flat end of a spudger to gently lift up the black sliding lock on the interconnect cable socket.
-
Slide the cable straight out of its socket on the motherboard.
-
-
-
Remove the upper shell from the lower case.
-
-
Tool used on this step:Tweezers$4.99
-
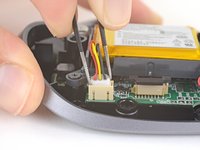
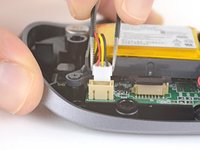
Use a pair of tweezers to grip the top of the battery connector.
-
Gently rock the connector side to side and pull it out of its socket.
-
-
-
Use a Phillips screwdriver to remove the two 3.5 mm-long screws securing the battery housing.
-
-
-
Flip the battery housing over so the battery is facing down.
-
Apply a heated iOpener to the battery housing for about 2 minutes to soften the battery adhesive.
-
-
-
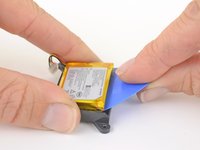
Insert the long edge of an opening pick between the battery and its housing at the side opposite the battery cable.
-
Push the opening pick under the battery and lift up to pry the battery out of its housing.
-
-
Tool used on this step:Tesa 61395 Tape$8.95
-
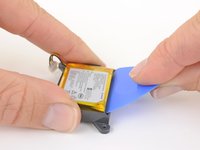
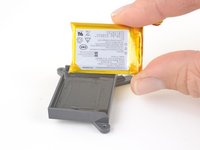
Remove the battery.
-
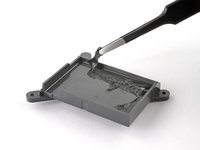
Use a spudger or your fingers to peel any old adhesive off of the battery housing. The old adhesive shouldn't leave any residue.
-
If your new battery doesn't come with preinstalled adhesive, place a couple strips of double-sided tape into the battery housing.
-
Orient your new battery so its cables route through the cutout in the corner of the housing. Press the battery firmly into place to secure it.
-


Compare your new replacement part to the original part—you may need to transfer remaining components or remove adhesive backings from the new part before you install it.
To reassemble your device, follow these instructions in reverse order.
For optimal performance, calibrate your newly installed battery after completing this guide.
Take your e-waste to an R2 or e-Stewards certified recycler.
Repair didn’t go as planned? Try some basic troubleshooting, or ask our Answers community for help.
Cancel: I did not complete this guide.
16 other people completed this guide.

7 Guide Comments
Pretty straight forward manual. Is there also a manual or spare parts available for the scroll wheel and/or its parts?
Hi! any clue of where to buy the replacement battery?
On Amazon or AliExpress. Google for 652535
@dmitriypritupov It is possible to replace with a larger battery, in my case a 103450, I removed the battery housing and it was not easy to close the mouse.
For the step (step 10) to remove the ribbon cable to separate the top half from the bottom, you are better served keeping it together but being careful not to damage the cable. The cable retaining clip and connector housing are delicate and can break trying to release the clip. And it's difficult to put back on.