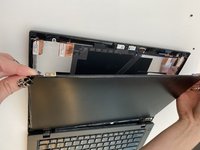
Lenovo ThinkPad T431S Screen Replacement

What you need

  1. Lenovo ThinkPad T431S Screen Replacement, Screen: step 1, image 1 of 2 Lenovo ThinkPad T431S Screen Replacement, Screen: step 1, image 2 of 2
    • Remember before starting any disassembly, to prevent electric shock or harm, disconnect from any external power source and make sure device is powered off.

    • Use the Jimmy tool to remove the screen bezel with a gentle prying motion.

  2. Lenovo ThinkPad T431S Screen Replacement: step 2, image 1 of 2 Lenovo ThinkPad T431S Screen Replacement: step 2, image 2 of 2
    • Remove the four 3.0 mm screws in the four corners of the screen with a Phillips #1 screwdriver bit.

    • While removing the screws, pry the screen off with an opening tool.

    • If your screen is cracked, use caution, as there will be broken glass or sharp parts.

  3. Lenovo ThinkPad T431S Screen Replacement: step 3, image 1 of 3 Lenovo ThinkPad T431S Screen Replacement: step 3, image 2 of 3 Lenovo ThinkPad T431S Screen Replacement: step 3, image 3 of 3
    • Lift screen off of top panel to reveal LCD power plug/connector.

    • There will be a wire attaching the screen to the rest of the device.

    • Remove the tape on the wire so you can unplug the connection, pulling upwards.

    • Information about disposal of your damaged screen can be found at E-Waste Recycling

Conclusion

To reassemble your device, follow these instructions in reverse order.

One other person completed this guide.

0 Comments

Add Comment

View Statistics:

Past 24 Hours: 0

Past 7 Days: 0

Past 30 Days: 4

All Time: 919