Introduction
This guide will teach users how to pry open the back cover, and remove screws in order to access the battery.
What you need
-
-
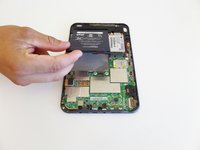
Turn the device upside-down and insert a pry tool between the two case pieces.
-
Work the pry tool around the edge of the case, releasing the 18 clips. Don't insert your tool too far, or you may damage components near the edges of the device. The clips are all in the outer edge of the backplate anyway. Note that the clip above the power switch is bigger and stronger than the rest.
-
Pull the rear cover off. The remaining two clips near the center of the back are surprisingly strong, but they face in the same direction so don't just pull up. Instead slide the cover slightly towards the top of device to release them.
 Ask FixBot
-
-
-
-
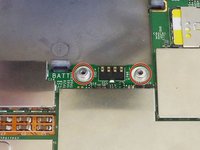
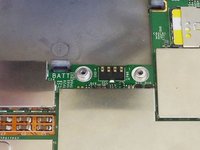
Unscrew the two silver 4 mm Phillips screws securing the battery connector.
-
Set the screws aside in a safe place -- there are exposed components and it's easy for them to short-circuit something.
-
-
-
Lift battery out of housing starting at the end that was secured by the screws.
-
Watch out for the odd-shaped silver washers beneath the battery connector (see second photo); they are necessary for proper mating of the electrical contacts when the screws are re-tightened.
-


To reassemble your device, follow these instructions in reverse order, paying attention to the reassembly notes in the individual steps.
Cancel: I did not complete this guide.
112 other people completed this guide.
Team

CSU Fullerton, Team 1-5, Bruce Fall 2014 Member of CSU Fullerton, Team 1-5, Bruce Fall 2014
CSUF-BRUCE-F14S1G5
4 Members
16 Guides authored
25 Guide Comments
Hi Allison Monahan,
thank you very much for yor help! By using your guide I made my nearly 6 years old Kindle Keyboard fixed - great!
I went to mpfproducts.com and ordered my new battery which came in today. I’ve changed out the battery and my Kindle 3 is now charging. YAHOO!!!
The old Amazon link has been removed. There’s now a link at the top of this guide to an eBay vendor that stocks the battery. Good luck!
Thanks, Allison and IFIXIT!!! God, I love this site. Cheers, Tom