
Jura Capresso IMPRESSA J5 Outlet Valve Replacement/Service

What you need

  1. Jura Capresso IMPRESSA J5 Outlet Valve Replacement/Service, Jura Capresso IMPRESSA J5  opening procedure: step 1, image 1 of 1
    • Unplug the power cord!

    • Remove the water tank and the drip tray. Remove all coffee beans from the storage container.

  2. Jura Capresso IMPRESSA J5 Outlet Valve Replacement/Service: step 2, image 1 of 3 Jura Capresso IMPRESSA J5 Outlet Valve Replacement/Service: step 2, image 2 of 3 Jura Capresso IMPRESSA J5 Outlet Valve Replacement/Service: step 2, image 3 of 3
    • Flip open the lid of the bean compartment.

    • Unscrew the two slotted screws inside the bean compartment. The screws have a rubber washer and will not come out completely.

    • Remove the bean compartment.

  3. Jura Capresso IMPRESSA J5 Outlet Valve Replacement/Service: step 3, image 1 of 3 Jura Capresso IMPRESSA J5 Outlet Valve Replacement/Service: step 3, image 2 of 3 Jura Capresso IMPRESSA J5 Outlet Valve Replacement/Service: step 3, image 3 of 3
    Tool used on this step:
    iFixit Precision 4 mm Screwdriver Bit
    $2.99
    Buy
    • The top cover is fastened with oval head screws. Unscrew them.

    • These screws have an oval head that makes them look like rivets (picture 2). You need to use a special bit - also available at iFixit - for their removal. Here a DIY guide. If the right bit is not available, it could be done with a pair of needle nose pliers. Jura wants to keep us out of our own machines!!!

  4. Jura Capresso IMPRESSA J5 Outlet Valve Replacement/Service: step 4, image 1 of 1
    • Also remove the two oval head screws underneath the ground coffee compartment lid.

  5. Jura Capresso IMPRESSA J5 Outlet Valve Replacement/Service: step 5, image 1 of 1
    • Now you can pry up the top cover all around.

    • Remove the top cover. This often requires a little force.

    • Use plastic tools to avoid scratching your device.

  6. Jura Capresso IMPRESSA J5 Outlet Valve Replacement/Service: step 6, image 1 of 2 Jura Capresso IMPRESSA J5 Outlet Valve Replacement/Service: step 6, image 2 of 2
    • Turn the device with the back facing you.

    • Turn the Jura label a few degrees counterclockwise. If it's hard to do, use a small suction cup.

    • Remove the Jura label.

  7. Jura Capresso IMPRESSA J5 Outlet Valve Replacement/Service: step 7, image 1 of 3 Jura Capresso IMPRESSA J5 Outlet Valve Replacement/Service: step 7, image 2 of 3 Jura Capresso IMPRESSA J5 Outlet Valve Replacement/Service: step 7, image 3 of 3
    • Underneath the label you will find two Torx T15 screws. Remove them.

    • Carefully pull the top of the chrome cover slightly outwards, then push it down and put it aside.

  8. Jura Capresso IMPRESSA J5 Outlet Valve Replacement/Service: step 8, image 1 of 1
    • Remove the Torx T15 screw on the side panel with the water tank.

  9. Jura Capresso IMPRESSA J5 Outlet Valve Replacement/Service: step 9, image 1 of 2 Jura Capresso IMPRESSA J5 Outlet Valve Replacement/Service: step 9, image 2 of 2
    • Pull the right side panel slightly towards the back.

    • Remove the side panel.

  10. Jura Capresso IMPRESSA J5 Outlet Valve Replacement/Service: step 10, image 1 of 1
    • Pull the left side panel slightly towards the back and remove it.

  11. Jura Capresso IMPRESSA J5 Outlet Valve Replacement/Service, Ceramic valve: step 11, image 1 of 3 Jura Capresso IMPRESSA J5 Outlet Valve Replacement/Service, Ceramic valve: step 11, image 2 of 3 Jura Capresso IMPRESSA J5 Outlet Valve Replacement/Service, Ceramic valve: step 11, image 3 of 3
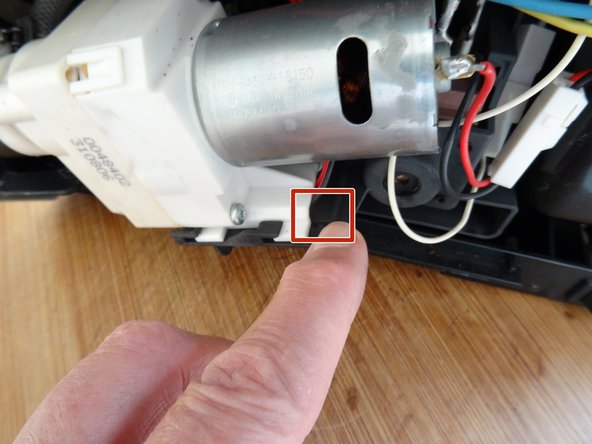
    • Find the ceramic valve at the bottom behind the right side panel It is slid onto a black plastic support plate and connected with two cable connections and three hoses.

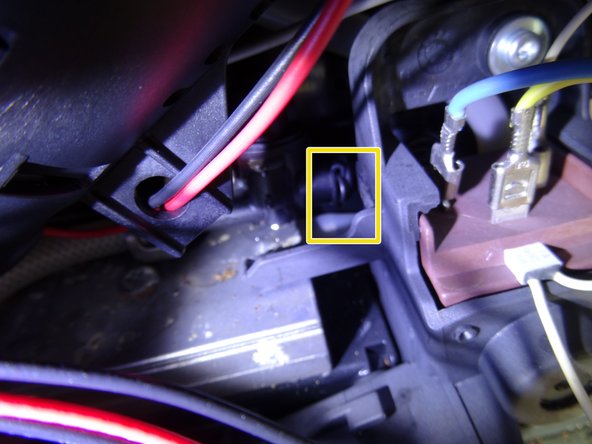
    • Using your finger press the black plastic detent down.

    • Push the ceramic valve upward to the right.

    • The valve may still be secured on the underside with a screw.

    • If you want to replace the valve, you have to disconnect all cables and hoses. If you are only removing the valve to access other components (outlet valve, heat exchanger), you do not need to disconnect the connections.

  12. Jura Capresso IMPRESSA J5 Outlet Valve Replacement/Service, Outlet valve: step 12, image 1 of 2 Jura Capresso IMPRESSA J5 Outlet Valve Replacement/Service, Outlet valve: step 12, image 2 of 2
    • The outlet valve ist exposed. The lime traces clearly indicate that this valve is leaking.

    • The valve ist connected on the right side to a raccord and held by a metal clip. On the left side are two connections to hoses.

    • Using a pair of sharp tweezers pull out the metal clip.

    • Push the valve to the left. There is an O-ring seal on the connection, do not lose it. If possible, replace it during reassembly. The two hoses can remain connected.

  13. Jura Capresso IMPRESSA J5 Outlet Valve Replacement/Service: step 13, image 1 of 3 Jura Capresso IMPRESSA J5 Outlet Valve Replacement/Service: step 13, image 2 of 3 Jura Capresso IMPRESSA J5 Outlet Valve Replacement/Service: step 13, image 3 of 3
    • Three clips hold the black cap on top of the valve. Using a flathead screwdriver carefully losen them and lift off the cap.

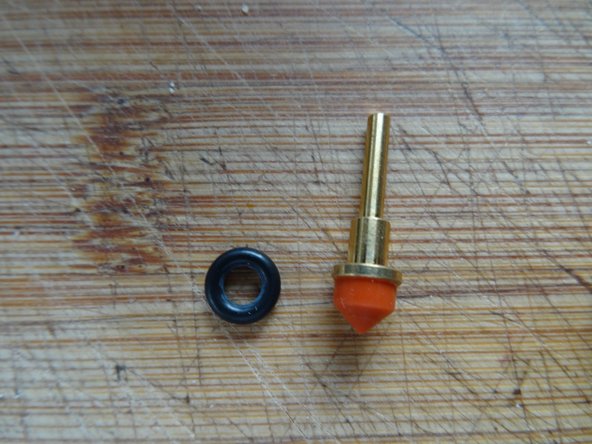
    • Take out the spring, the valve piston and the seals with the spring plate. Note their position for reassembly.

    • This valve had a broken piston and aged seal. They were replaced, the piston from the repair kit is now made from metal and will never break again.

Conclusion

To reassemble your device, follow these instructions in reverse order.

Special thanks to these translators:

de en

100%

VauWeh is helping us fix the world! Want to contribute?
Start translating ›

VauWeh

Member since: 10/19/15

202,869 Reputation

246 Guides authored

Team

Repair is War on Entropy Member of Repair is War on Entropy

Community

25 Members

1,111 Guides authored

0 Comments

Add Comment

View Statistics:

Past 24 Hours: 0

Past 7 Days: 10

Past 30 Days: 61

All Time: 2,021