
Free Shipping on Domestic Orders $75+

Framework Laptop 13 Bezel Replacement

What you need

  1. Framework Laptop 13 Bezel Replacement, Reposition the laptop: step 1, image 1 of 2 Framework Laptop 13 Bezel Replacement, Reposition the laptop: step 1, image 2 of 2
    • Open the laptop so the screen sits flat on your work surface.

  2. Framework Laptop 13 Bezel Replacement, Remove the bezel: step 2, image 1 of 2 Framework Laptop 13 Bezel Replacement, Remove the bezel: step 2, image 2 of 2
    • The bezel is secured with magnets.

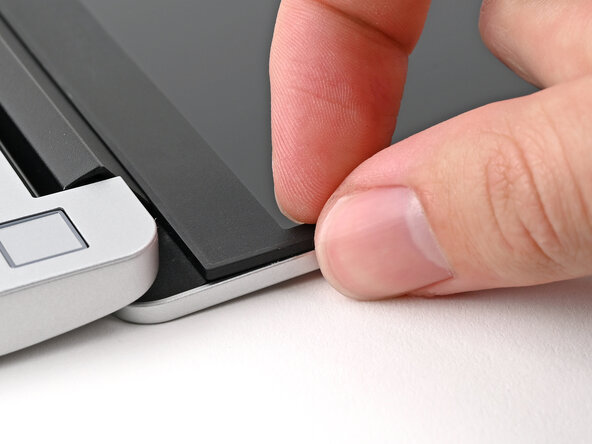
    • Slide your fingernail under the inside edge of either bottom corner of the bezel.

    • Pull the bezel away from the screen to release the first few magnets.

  3. Framework Laptop 13 Bezel Replacement: step 3, image 1 of 2 Framework Laptop 13 Bezel Replacement: step 3, image 2 of 2
    • Lift the bezel around the perimeter of the screen until all of its magnets are released.

    • Remove the bezel.

  4. Framework Laptop 13 Bezel Replacement, Check the cables: step 4, image 1 of 2 Framework Laptop 13 Bezel Replacement, Check the cables: step 4, image 2 of 2
    • Before continuing, check if cables next to the hinges are routed properly:

    • The Display Cable should be routed just above the hinge without any large gaps.

    • Your Display Cable might come with a white sticker. This doesn't affect the routing.

    • The Display Cable should be routed between the metal clips.

    • The Webcam Cable should be routed just above the hinge without any large gaps and shouldn't overlap with the antenna cables.

    • If the cables aren't routed properly, the Bezel won't sit flat and you risk damaging the Bezel and the Display during reassembly.

  5. Framework Laptop 13 Bezel Replacement, Install the Bezel: step 5, image 1 of 3 Framework Laptop 13 Bezel Replacement, Install the Bezel: step 5, image 2 of 3 Framework Laptop 13 Bezel Replacement, Install the Bezel: step 5, image 3 of 3
    • If there's any liners covering adhesive on the back of the Bezel, remove them now.

    • Align the bottom edge of the Bezel with the top edge of the Input Cover and press down so the Bezel covers the hinges and cables.

    • The bottom edge of the Bezel should sit flat and the magnets at its edges should "snap" into place.

    • Lay the rest of the Bezel over the screen and let the magnets pull it into place.

  6. Framework Laptop 13 Bezel Replacement: step 6, image 1 of 3 Framework Laptop 13 Bezel Replacement: step 6, image 2 of 3 Framework Laptop 13 Bezel Replacement: step 6, image 3 of 3
    • Check that all four corners of the Bezel sit flat on the Top Cover. If they're uneven, do the following:

    • Use your fingers to press around the edge of the Bezel. The magnets should easily snap into place.

    • If the Bezel is still uneven, remove the Bezel and reseat it. Refer to this step for how the cables should be routed.

  7. Framework Laptop 13 Bezel Replacement, Remove the plastic liners: step 7, image 1 of 2 Framework Laptop 13 Bezel Replacement, Remove the plastic liners: step 7, image 2 of 2
    • If there are any plastic liners covering the webcam and microphone, remove them.

Conclusion

You finished fixing your Framework Laptop!

Take your e-waste to an R2 or e-Stewards certified recycler.

If you need help, contact Framework support.

Alex Diaz-Kokaisl

Member since: 01/16/22

234,447 Reputation

1,139 Guides authored

0 Guide Comments

Add Comment

View Statistics:

Past 24 Hours: 6

Past 7 Days: 23

Past 30 Days: 44

All Time: 87