
Fairphone 4 Battery Replacement

What you need

  1. Fairphone 4 Battery Replacement, Pry the back cover up: step 1, image 1 of 2 Fairphone 4 Battery Replacement, Pry the back cover up: step 1, image 2 of 2
    • Be sure to power off your phone before you begin.

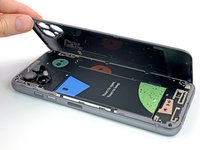
    • Insert your thumbnail, or a prying tool like a spudger, into the notch at the bottom right of the back cover.

    • Pry the back cover up to start separating its plastic clips.

  2. Fairphone 4 Battery Replacement: step 2, image 1 of 3 Fairphone 4 Battery Replacement: step 2, image 2 of 3 Fairphone 4 Battery Replacement: step 2, image 3 of 3
    • Using your thumbnail or an opening pick, slide along the right side of the phone to loosen the plastic clips.

  3. Fairphone 4 Battery Replacement: step 3, image 1 of 3 Fairphone 4 Battery Replacement: step 3, image 2 of 3 Fairphone 4 Battery Replacement: step 3, image 3 of 3
    • Slide along the bottom of the phone to loosen the plastic clips.

  4. Fairphone 4 Battery Replacement: step 4, image 1 of 3 Fairphone 4 Battery Replacement: step 4, image 2 of 3 Fairphone 4 Battery Replacement: step 4, image 3 of 3
    • Slide along the left side of the phone to loosen the plastic clips.

    • Lift the back cover to release the rest of the plastic clips and remove it.

    • To reinstall the back cover press it firmly into place until you hear a snap from the plastic clips.

  5. Fairphone 4 Battery Replacement, Lever up the Battery: step 5, image 1 of 3 Fairphone 4 Battery Replacement, Lever up the Battery: step 5, image 2 of 3 Fairphone 4 Battery Replacement, Lever up the Battery: step 5, image 3 of 3
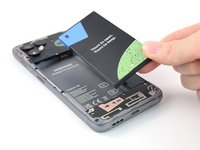
    • Use a fingernail or a prying tool at the marked notch to lever the battery out of its recess.

    • Lift the battery out of its recess and remove it.

    • Remove the battery.

Conclusion

For optimal performance, calibrate your newly installed battery after completing this guide.

To reassemble your device, follow these instructions in reverse order.

Take your e-waste to an R2 or e-Stewards certified recycler.

Repair didn’t go as planned? Try some basic troubleshooting, or ask our Answers community for help.

5 other people completed this guide.

Manuel Haeussermann

Member since: 07/13/22

15,592 Reputation

71 Guides authored

Team

iFixit Member of iFixit

Staff

136 Members

17,299 Guides authored

One Comment

I am not sure steps 2,3,4 are really necessary in this guide.

Bartłomiej Tokarzewski - Reply

Add Comment

View Statistics:

Past 24 Hours: 6

Past 7 Days: 43

Past 30 Days: 219

All Time: 6,778