
Dell XPS 13 9310 Battery Replacement

What you need

  1. Dell XPS 13 9310 Battery Replacement, Unfasten the lower case: step 1, image 1 of 2 Dell XPS 13 9310 Battery Replacement, Unfasten the lower case: step 1, image 2 of 2
    • Use a T5 Torx screwdriver to remove the eight 3.3 mm screws securing the case.

  2. Dell XPS 13 9310 Battery Replacement, Insert an opening pick: step 2, image 1 of 2 Dell XPS 13 9310 Battery Replacement, Insert an opening pick: step 2, image 2 of 2
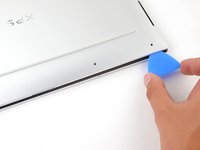
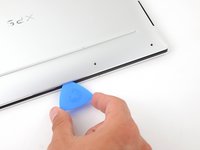
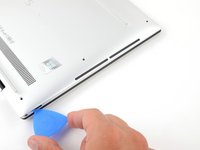
    • Insert an opening pick between the lower case and the chassis on the front right edge.

  3. Dell XPS 13 9310 Battery Replacement, Release the case's front clips: step 3, image 1 of 2 Dell XPS 13 9310 Battery Replacement, Release the case's front clips: step 3, image 2 of 2
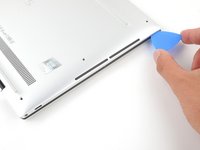
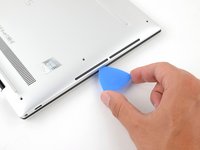
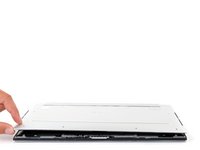
    • Slide the pick along the front edge to release the clips securing the lower case.

  4. Dell XPS 13 9310 Battery Replacement, Release the remaining clips: step 4, image 1 of 3 Dell XPS 13 9310 Battery Replacement, Release the remaining clips: step 4, image 2 of 3 Dell XPS 13 9310 Battery Replacement, Release the remaining clips: step 4, image 3 of 3
    • Continue sliding the opening pick along the perimeter of the lower case to release the remaining clips.

  5. Dell XPS 13 9310 Battery Replacement: step 5, image 1 of 3 Dell XPS 13 9310 Battery Replacement: step 5, image 2 of 3 Dell XPS 13 9310 Battery Replacement: step 5, image 3 of 3
    • Lift the lower case from the chassis and remove it.

    • During reassembly, this is a good point to power on your laptop and test all functions before sealing it up. Be sure to power your laptop back down before you continue working.

  6. Dell XPS 13 9310 Battery Replacement, Disconnect the battery: step 6, image 1 of 3 Dell XPS 13 9310 Battery Replacement, Disconnect the battery: step 6, image 2 of 3 Dell XPS 13 9310 Battery Replacement, Disconnect the battery: step 6, image 3 of 3
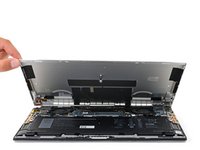
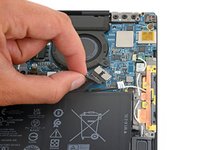
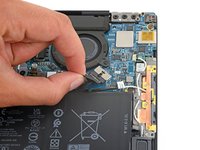
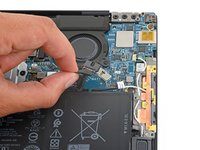
    • Grip the pull tab on the battery connector with your fingers and gently pull away from the socket to disconnect it.

    • After you disconnect the battery, some of your laptop's startup (BIOS) settings will revert to their defaults.

    • You may need to run BIOS setup to reset the system clock as well as any specialized disk settings before you can boot up your XPS.

  7. Dell XPS 13 9310 Battery Replacement, Unfasten the battery: step 7, image 1 of 2 Dell XPS 13 9310 Battery Replacement, Unfasten the battery: step 7, image 2 of 2
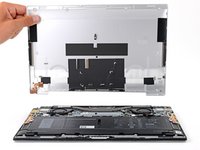
    • Use a Phillips screwdriver to remove the five 2.8 mm-long screws securing the battery.

  8. Dell XPS 13 9310 Battery Replacement, Remove the battery: step 8, image 1 of 3 Dell XPS 13 9310 Battery Replacement, Remove the battery: step 8, image 2 of 3 Dell XPS 13 9310 Battery Replacement, Remove the battery: step 8, image 3 of 3
    • Lift the battery straight out of its recess and remove it.

Conclusion

To reassemble your device, follow these instructions in reverse order.

For optimal performance, calibrate your newly installed battery after completing this guide.

Take your e-waste to an R2 or e-Stewards certified recycler.

Repair didn’t go as planned? Try some basic troubleshooting, or ask our Answers community for help.

2 other people completed this guide.

Alex Diaz-Kokaisl

Member since: 01/16/22

123,972 Reputation

581 Guides authored

Team

iFixit Member of iFixit

Staff

135 Members

17,136 Guides authored

0 Comments

Add Comment

View Statistics:

Past 24 Hours: 12

Past 7 Days: 71

Past 30 Days: 384

All Time: 4,567